Linux+BT+Docker+Discourse Quick Forum Site Setup from Scratch, Discourse is the most popular open‑source forum software abroad.
Why use BT Panel for deployment? It makes website management easier and allows multiple sites on the same server.
Video tutorial: https://www.bilibili.com/video/BV1f311BrEdp/
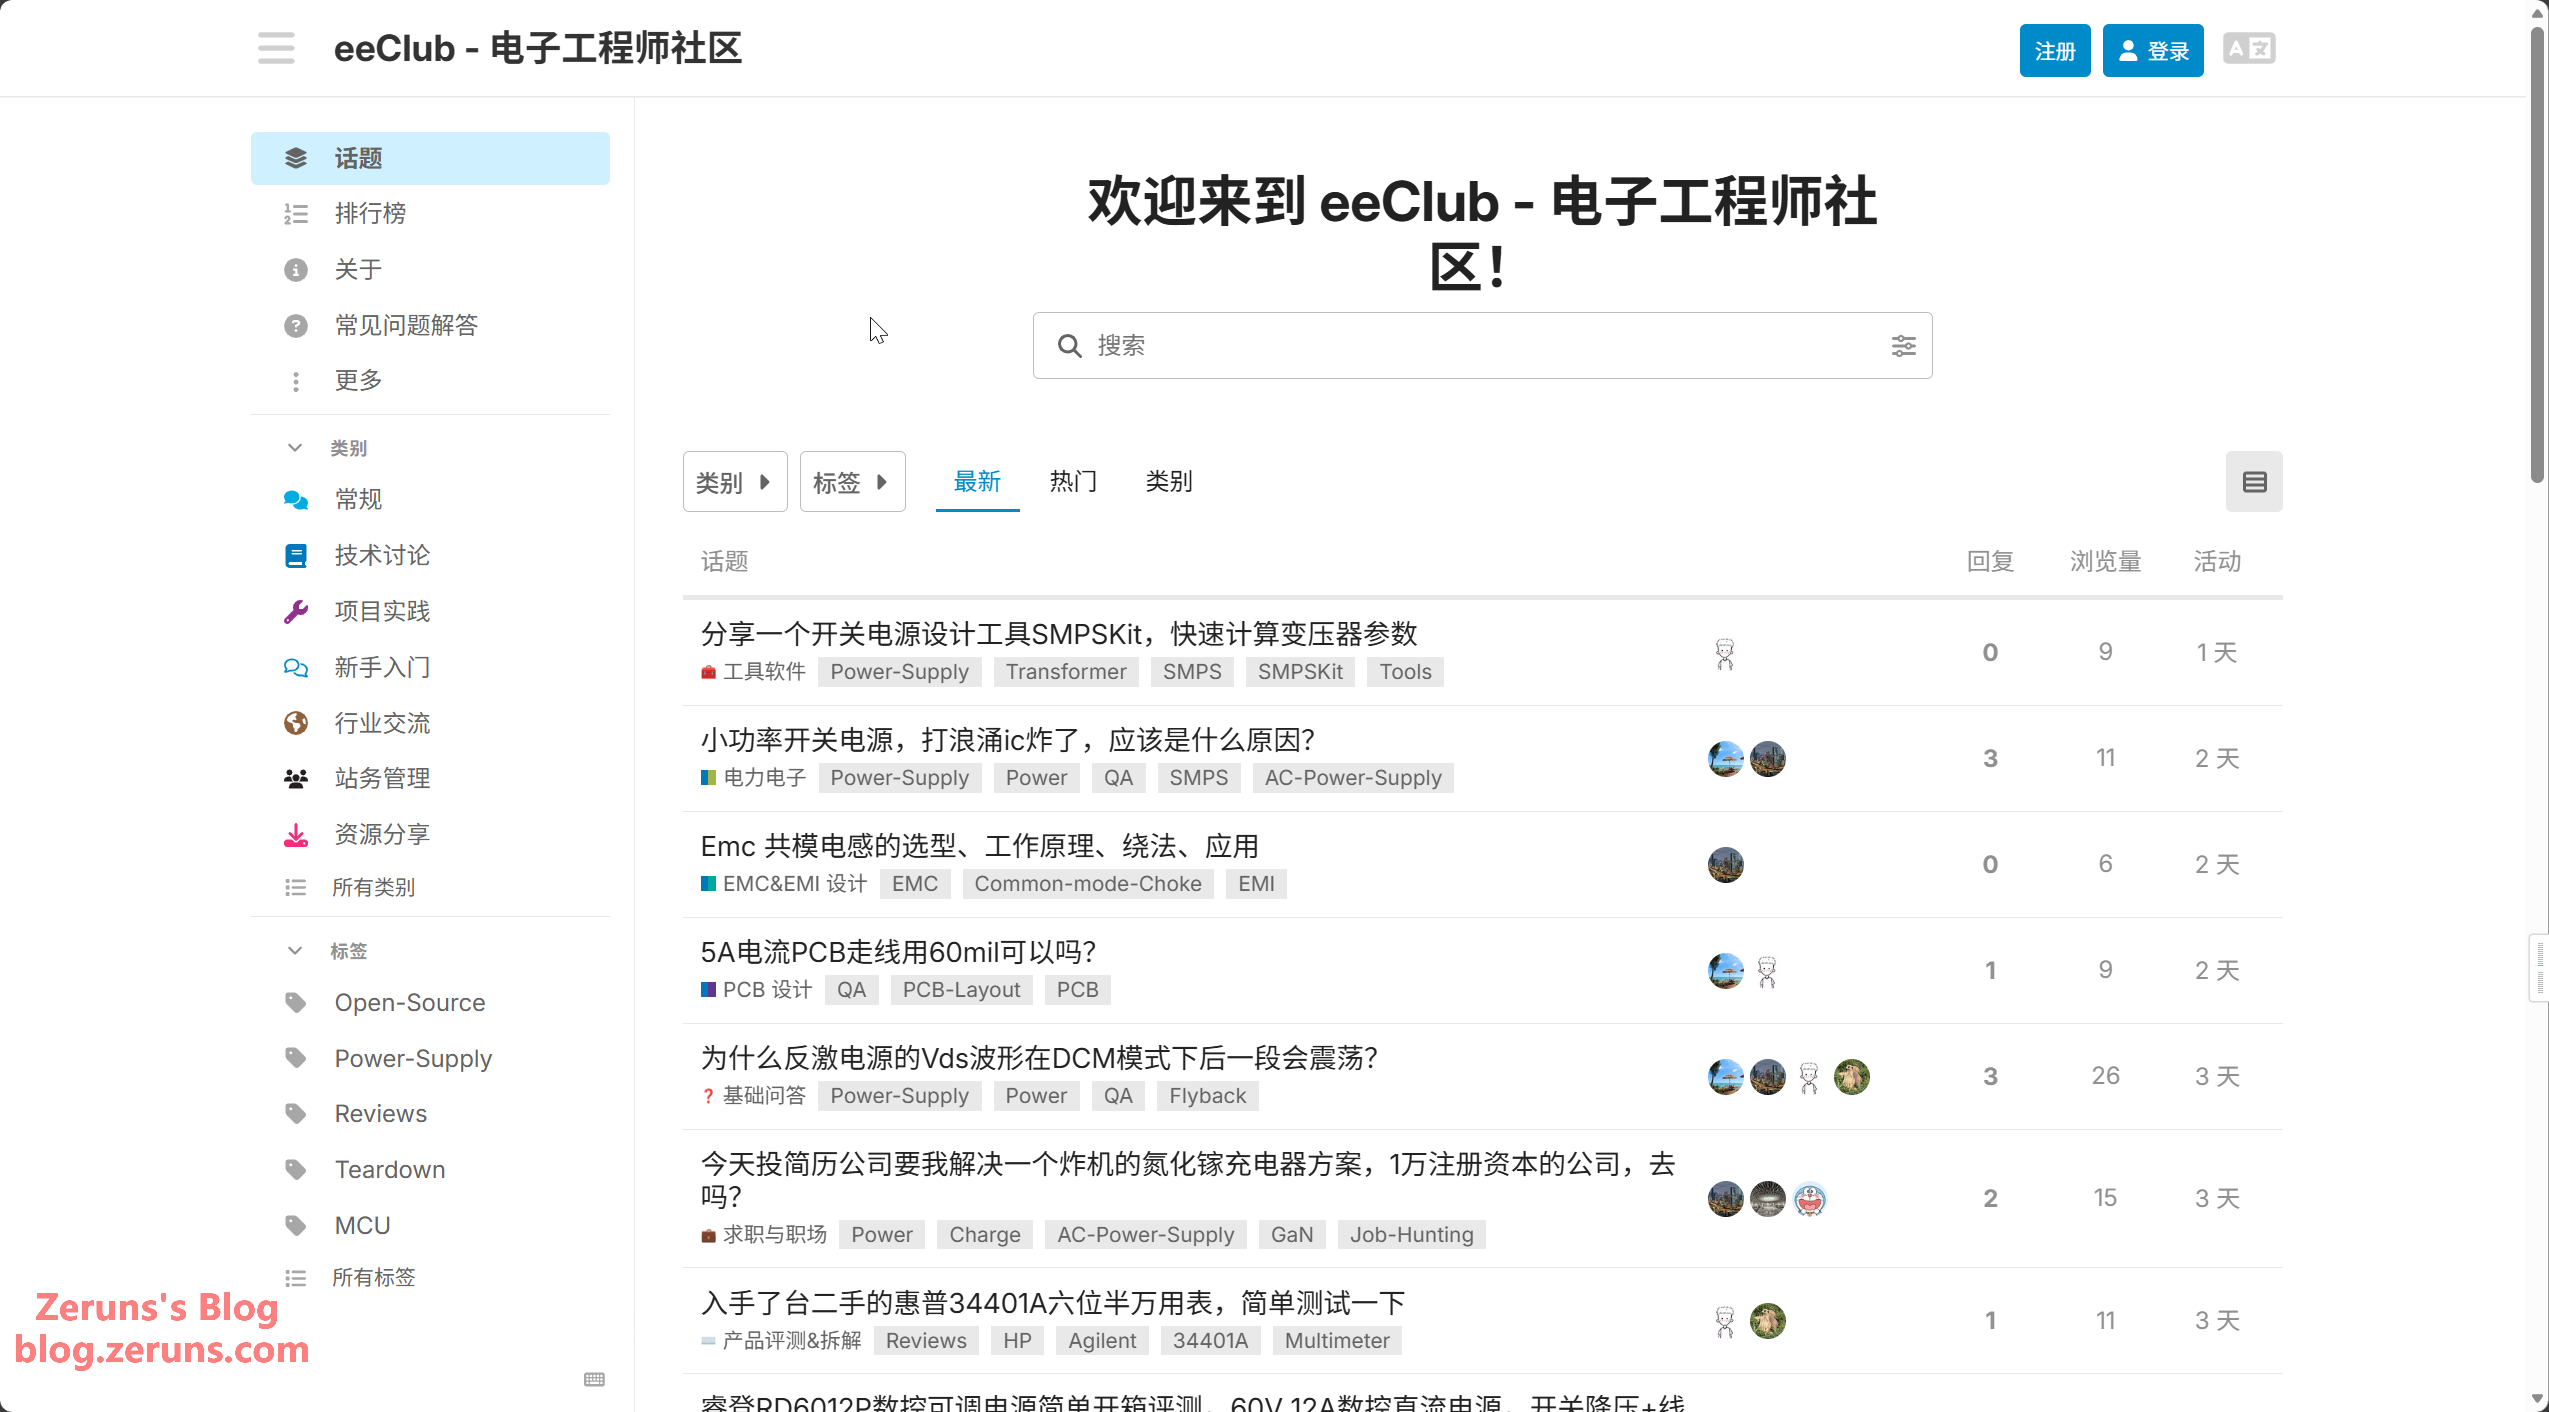
This is a forum I built with Discourse: https://bbs.eeclub.top/
I previously made a tutorial for the lightweight forum software Flarum; if interested, check it out: https://blog.zeruns.com/archives/866.html
Webmaster group chat: 767557452
Introduction to Discourse
Discourse is an open‑source forum software designed for modern web environments, aimed at replacing traditional forums and providing a smoother community interaction experience.
Discourse was launched ten years ago by Jeff Atwood, co‑founder of Stack Overflow.
Many well‑known software forums abroad are built with Discourse, whereas its adoption in China is relatively low.
Compared with Flarum, Discourse has a much higher usage rate, but Flarum is somewhat more popular than Discourse in China. Therefore, when encountering Discourse issues, it’s best to use a VPN to Google for solutions, as Baidu has fewer resources.
Discourse also includes AI plugins for AI moderation, translation, search, etc.; Discourse AI configuration tutorial: https://blog.zeruns.com/archives/917.html
1. Core Features
- Real‑time interaction: Discourse supports live updates, allowing users to converse in a chat‑like manner rather than the traditional “post” format. This real‑time nature makes participation feel more natural.
- Mobile‑friendly: Discourse is designed to adapt to various screen sizes, making browsing and participating on mobile devices convenient.
- User trust levels: Discourse determines trust levels based on activity and contributions, helping prevent abuse and spam.
- Powerful search: The forum offers robust search to help users easily find topics and discussions of interest.
- Plugin system: Discourse provides a rich plugin ecosystem for extending and customizing forum functionality.
2. Main Use Cases
- Enterprise / product community: For product feedback and user communication, such as software company user forums or hardware product support sections.
- Interest communities: For niche groups (e.g., tech, reading, photography) to discuss, with topic‑based sub‑boards.
- Internal collaboration platform: Some companies use it as an internal communication tool, replacing traditional email or instant messaging, preserving traceable collaborative content.
3. Deployment and Maintenance
Discourse offers two primary deployment options to meet different user needs:
| Deployment Method | Advantages | Disadvantages |
|---|---|---|
| Official Hosted | No technical background required; the official team handles server maintenance, updates, and security | Subscription fee required; limited customization freedom |
| Self‑hosted | Completely free; you can choose any server and deeply customize features | Requires server administration and code deployment skills |
Introduction to BT Panel
BT Panel is a powerful server management software that supports Windows and Linux systems and provides a web‑based interface for easy server administration, significantly improving operational efficiency. Its main features include:
- Server management: BT Panel lets users perform maintenance via an interactive interface, such as system updates, adding sites, modifying settings, eliminating the need to remember complex Linux commands; simple clicks suffice.
- Supports multiple OSes: BT Panel works on both Windows and Linux, so users can manage either type of server through the same interface.
- One‑click management: BT Panel provides website, FTP, database management, visual file manager, software manager, CPU/memory/traffic charts, scheduled tasks, etc., making server management intuitive and efficient.
- Security monitoring: BT Panel offers one‑click scanning for viruses, vulnerabilities, mining malware, and real‑time alerts to help ops locate issues quickly.
- Ease of use: Installation and usage are straightforward; users can install the panel quickly and replace complex command line operations with mouse clicks, greatly reducing difficulty.
BT official website: https://url.vpszj.cn/bt
Additional Site‑Building Tutorial Recommendations
- Cloud server + BT Panel + Gridea quick personal blog tutorial: https://blog.zeruns.com/archives/783.html
- Linux + Discuz forum tutorial: https://blog.zeruns.com/archives/681.html
- One‑click Halo blog deployment with 1Panel: https://blog.zeruns.com/archives/858.html
- Flarum forum tutorial and theme/plugin installation: https://blog.zeruns.com/archives/866.html
- Rainyun RCA cloud application (K8s) PHP site tutorial, high availability, no server needed: https://blog.zeruns.com/archives/869.html
- Baota Cloud WAF free version setup and basic configuration tutorial: https://blog.zeruns.com/archives/874.html
- ALLinSSL deployment and usage tutorial – one‑click SSL certificate request, renewal, deployment, monitoring: https://blog.zeruns.com/archives/877.html
- Cross‑border e‑commerce independent site tutorial, WordPress foreign‑trade guide: https://blog.zeruns.com/archives/889.html
Domain Registration
What is a domain name?
A domain name is the “address” of a website, used to replace hard‑to‑remember IP numbers (e.g., 192.168.1.1). For example, typing blog.zeruns.com accesses a specific site without remembering the server IP.
A domain name consists of three parts:
- TLD (e.g.,
.com) indicates the type of site. - Second‑level domain (
zeruns) is the custom name you choose. - Subdomain (
blog) can be set freely.
When a user enters a domain, the DNS system automatically resolves it to the server’s IP address. Register a domain through platforms such as [Alibaba Cloud] (≈ 50 CNY/year; cheaper for less common TLDs), then bind the domain to your server’s IP to launch a website. A good domain is short and memorable, like taobao.com.
Register a Domain
You can register via:
- Tencent Cloud referral registration (AFF): https://curl.qcloud.com/rbDL8jYd
- Aliyun 15% off referral link (AFF): https://www.aliyun.com/minisite/goods?userCode=jdjc69nf
- Rainyun referral registration (AFF): https://www.rainyun.com/zeruns_?s=nodeloc
Below is an example using Rainyun to register a zeruns.xyz domain.
-
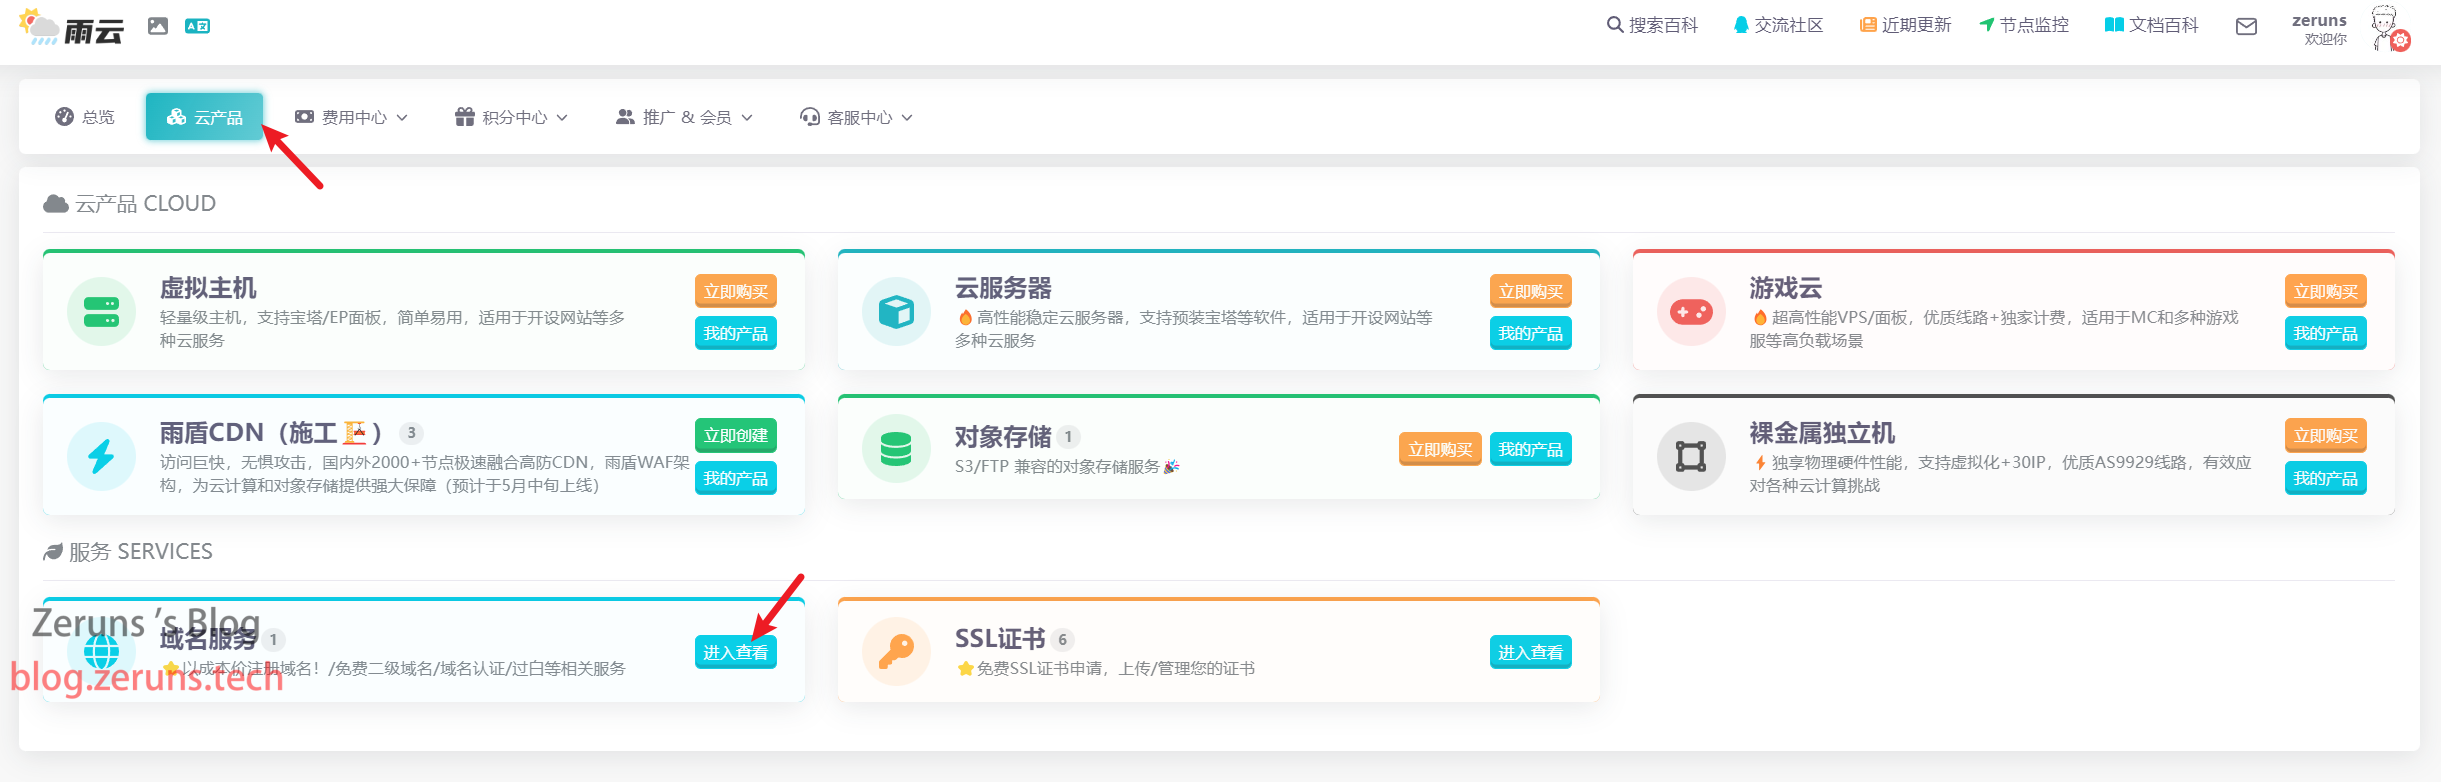
Find Domain Service in the cloud product list.
-
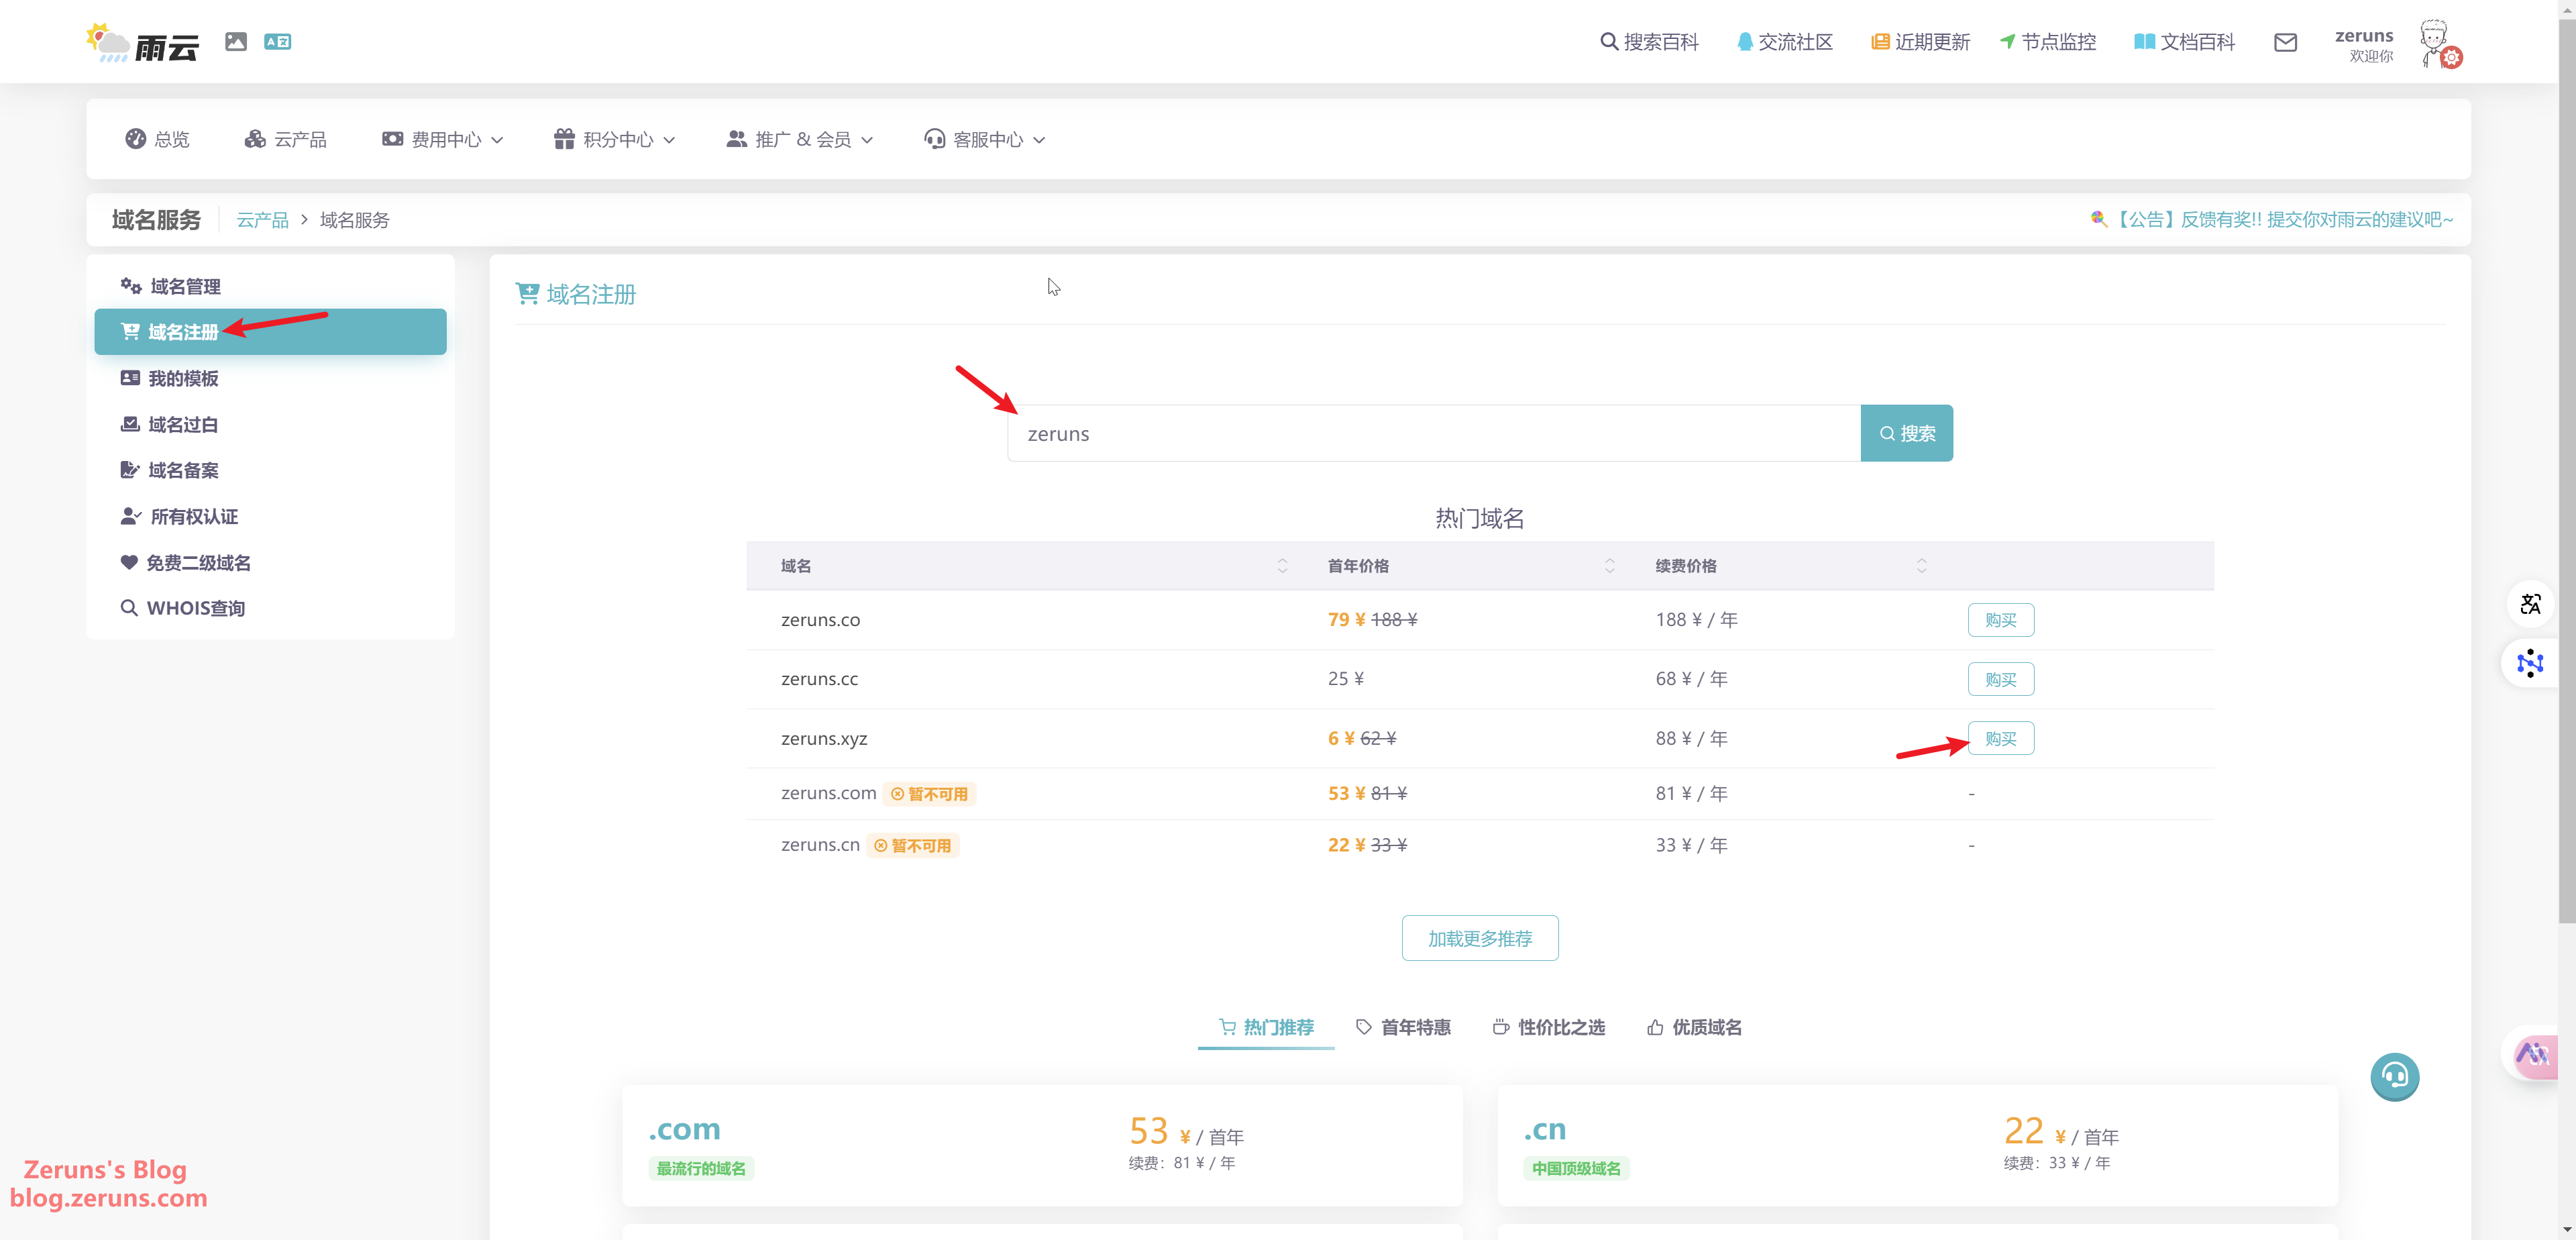
Click Register Domain, search for the desired name.
-
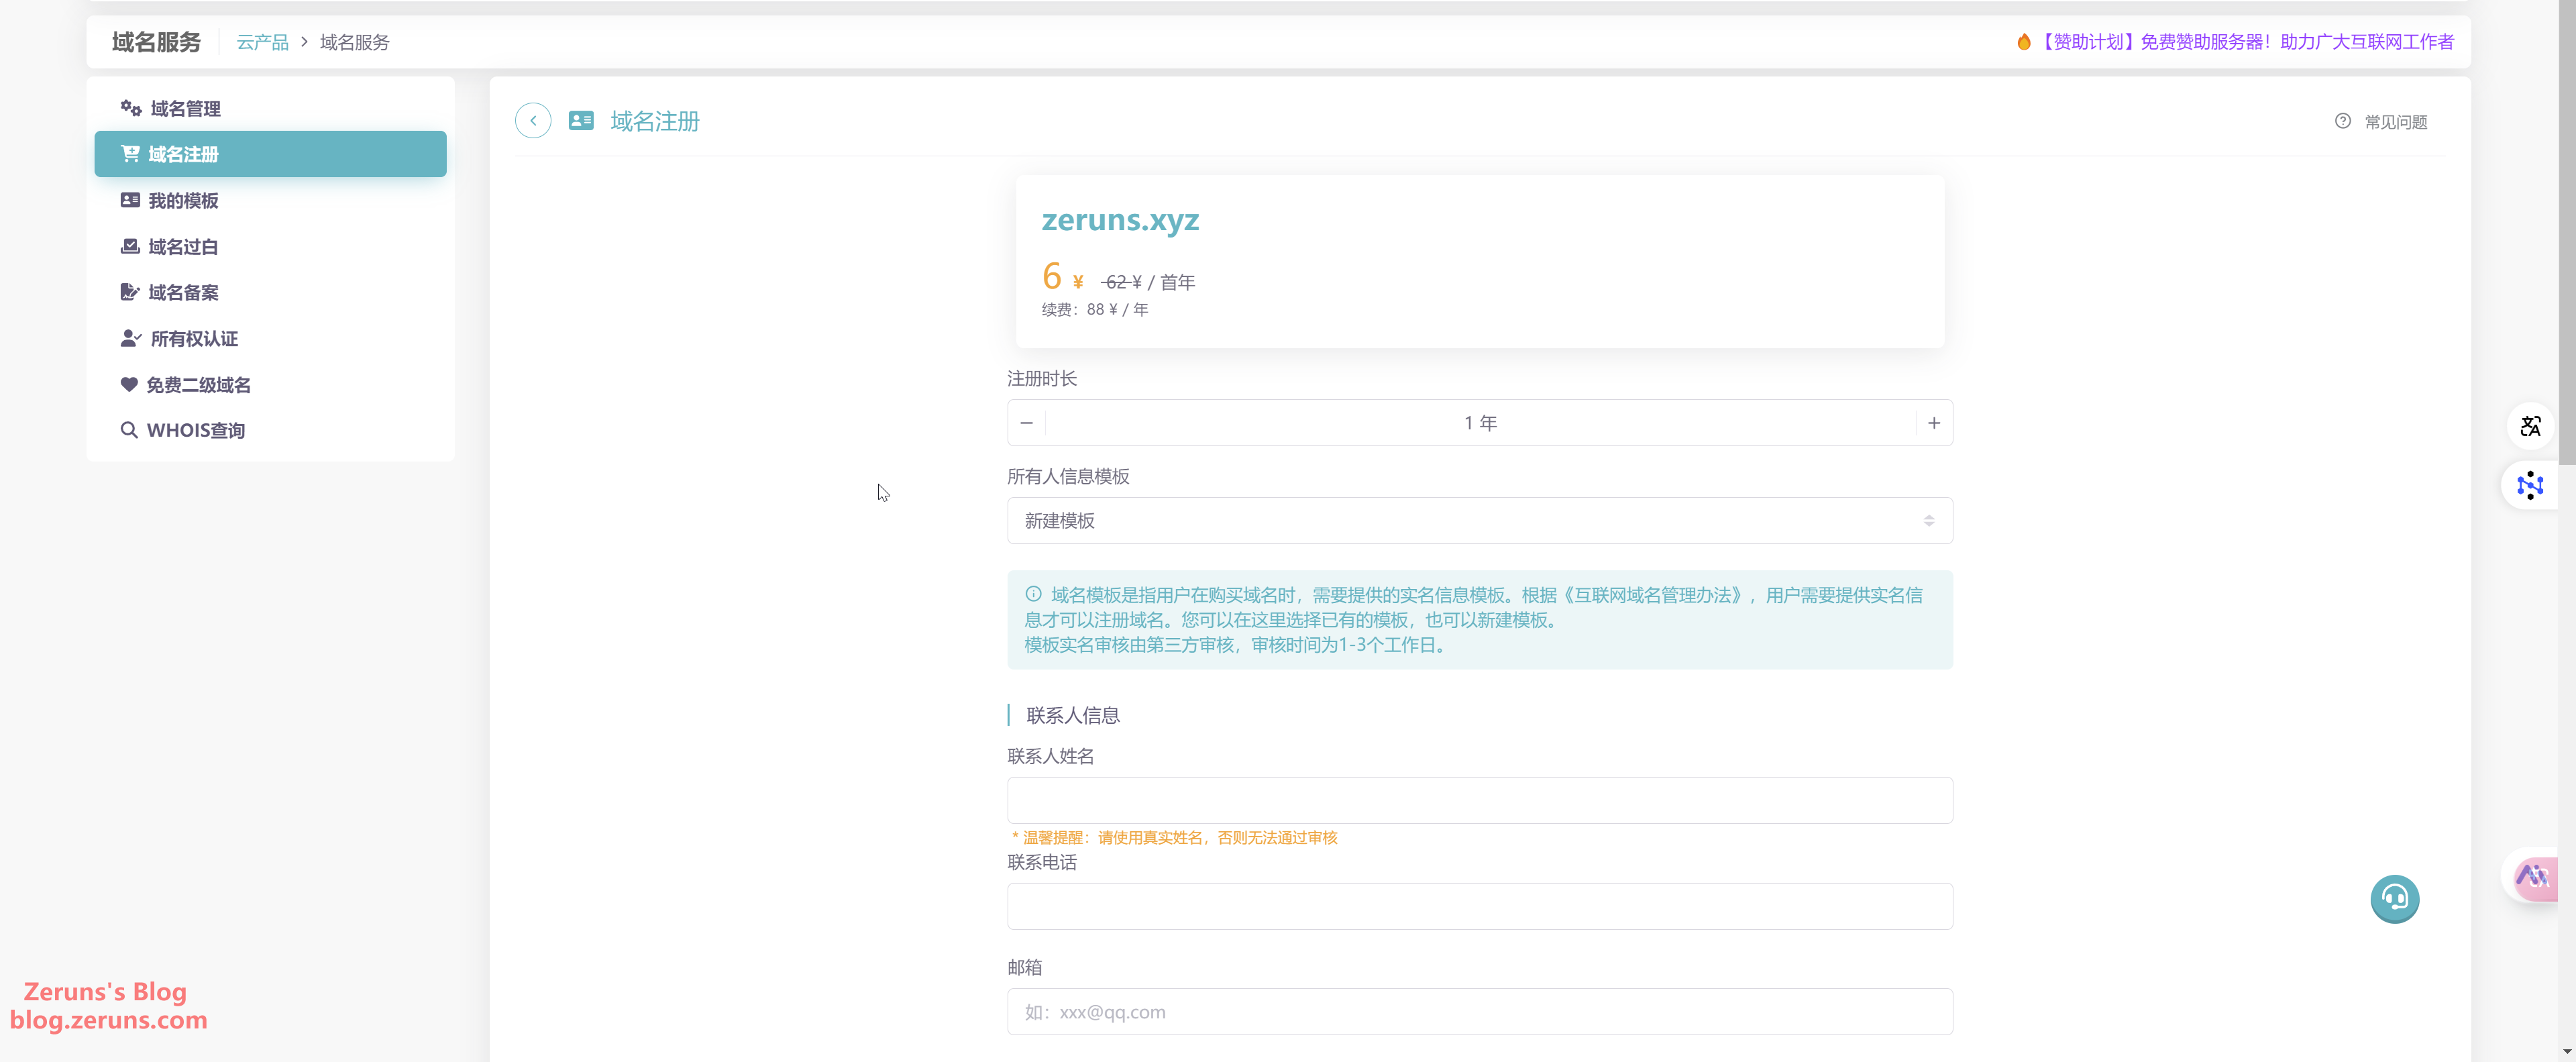
Fill in the required information.
-
Click Register Now and wait for approval.

If you use a domestic server, you also need to complete ICP filing. The filing process is omitted; you can look it up yourself.
Tip: Purchasing a domestic cloud server from major providers like Tencent Cloud or Aliyun for more than 3 months includes free filing assistance; the same applies to Rainyun or Haoliang Cloud Engine for servers over 3 months.
Preparation
First, you need a cloud server with a public IP; we recommend Rainyun:
Rainyun referral registration (AFF): https://www.rainyun.com/zeruns_?s=nodeloc
Referral code: zeruns
After registering with the code and linking WeChat you get a 50% off coupon for the first month, plus an exclusive 20% off coupon in the points shop.
Other cloud server recommendations: https://blog.zeruns.com/archives/383.html
- Haoliang Cloud Engine Hong Kong lightweight server, three‑network direct, 8‑core 16 GB 40 Mbps 70 CNY/month: https://blog.vpszj.cn/archives/2540.html
- Rainyun Hong Kong Zone 3 three‑network direct VPS, 4‑core 4 GB 10 Mbps 69 CNY/month: https://blog.vpszj.cn/archives/2079.html
- Cool Duck Data Hong Kong VPS, three‑network direct, 2‑core 2 GB 5 Mbps 6.9 CNY/month: https://blog.vpszj.cn/archives/2646.html
After registering, log into the Rainyun console; the Cloud Server entry can be found under Overview or Cloud Products.
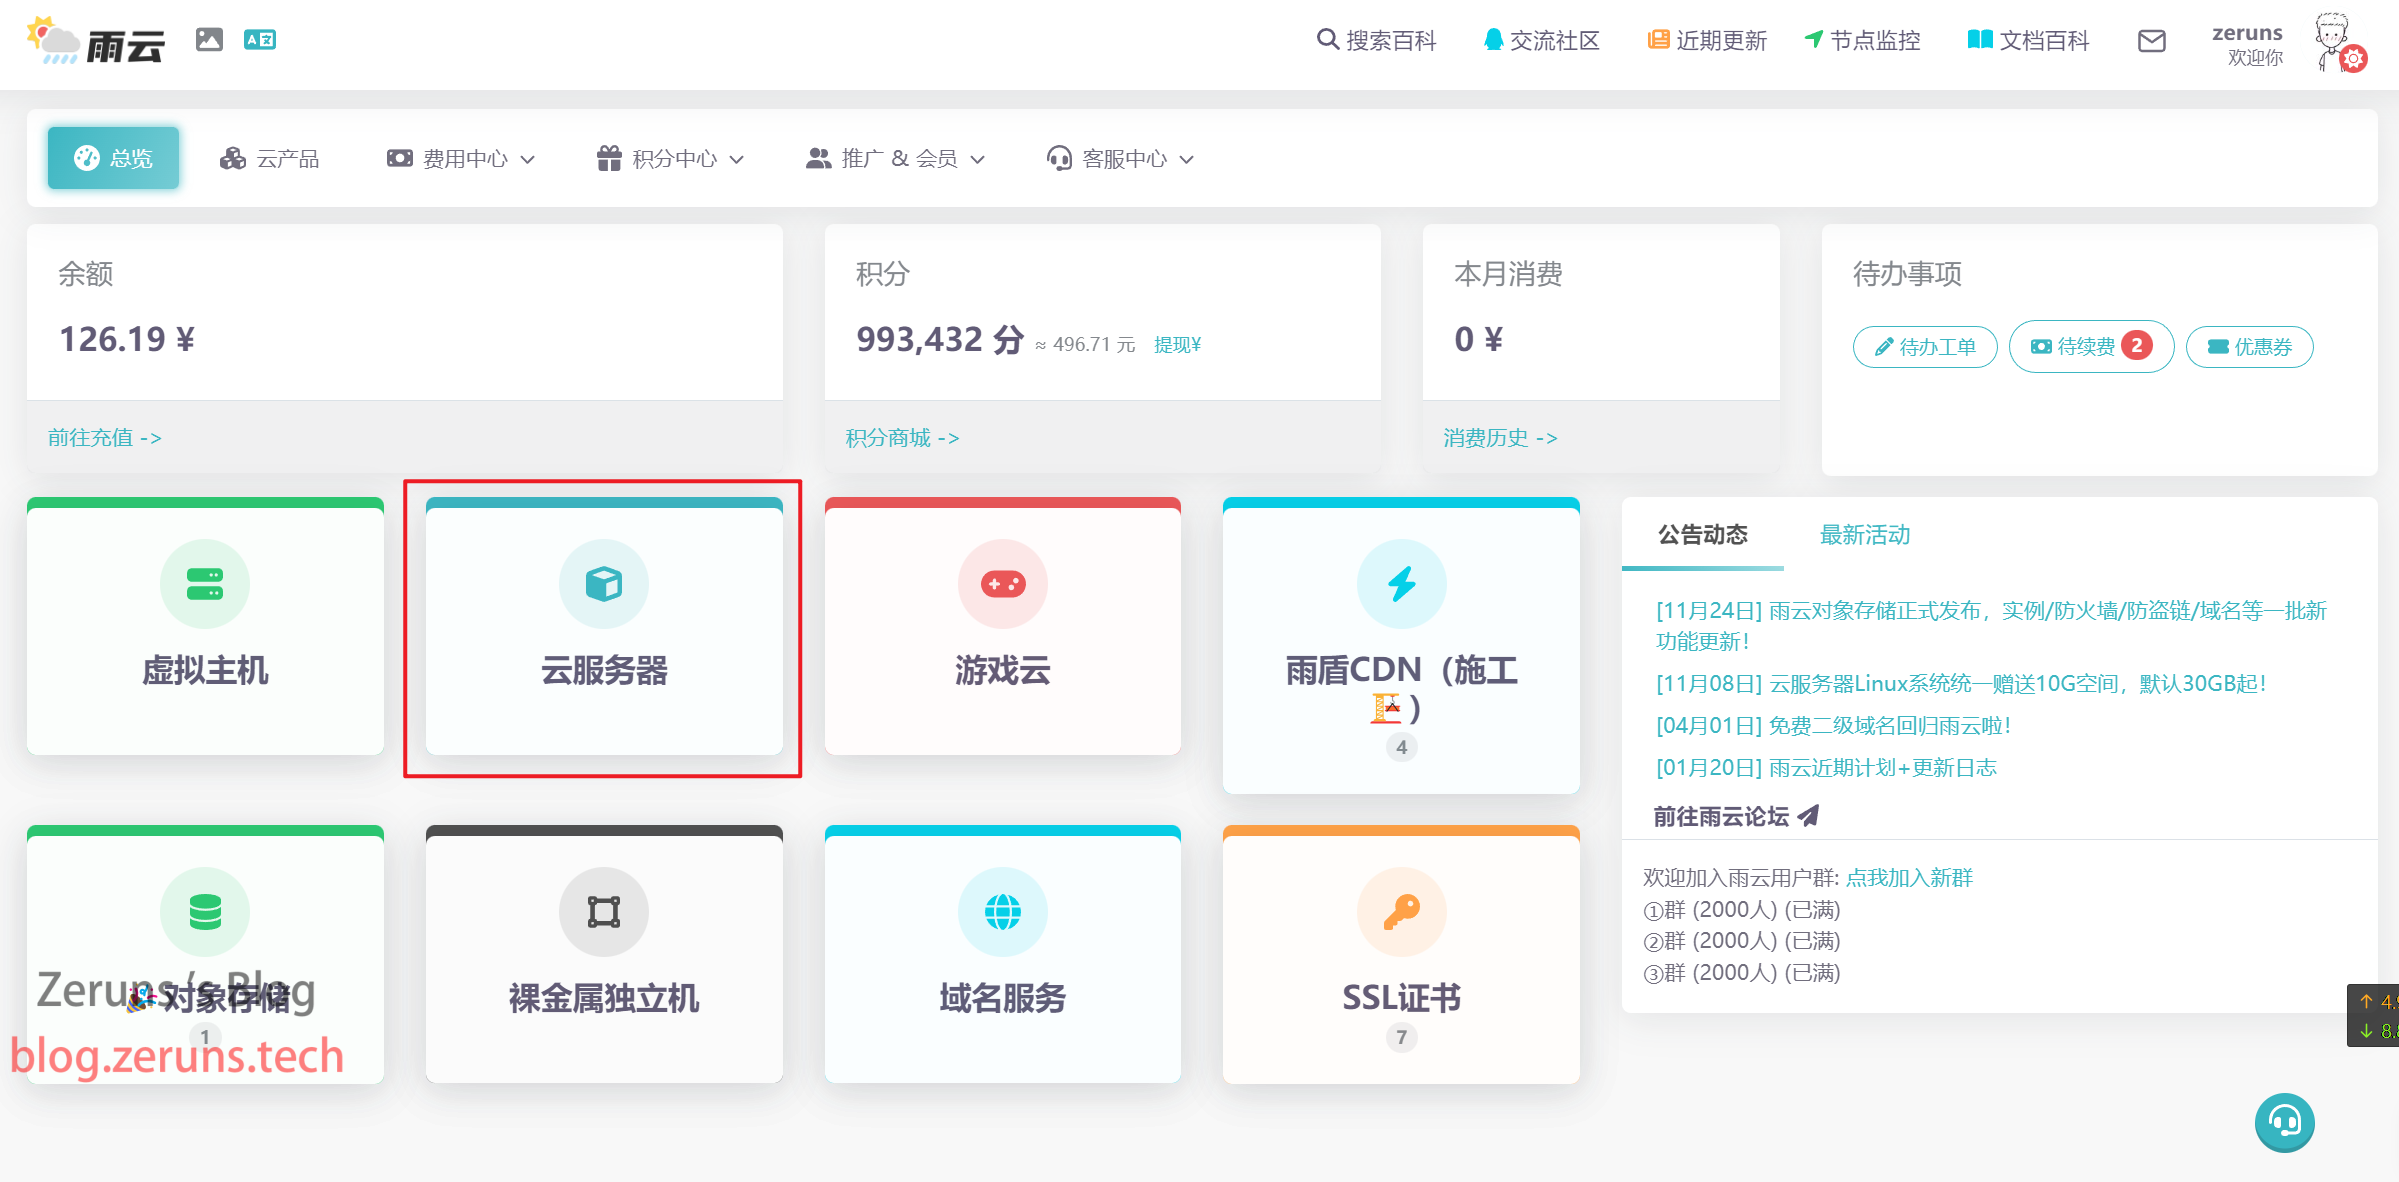
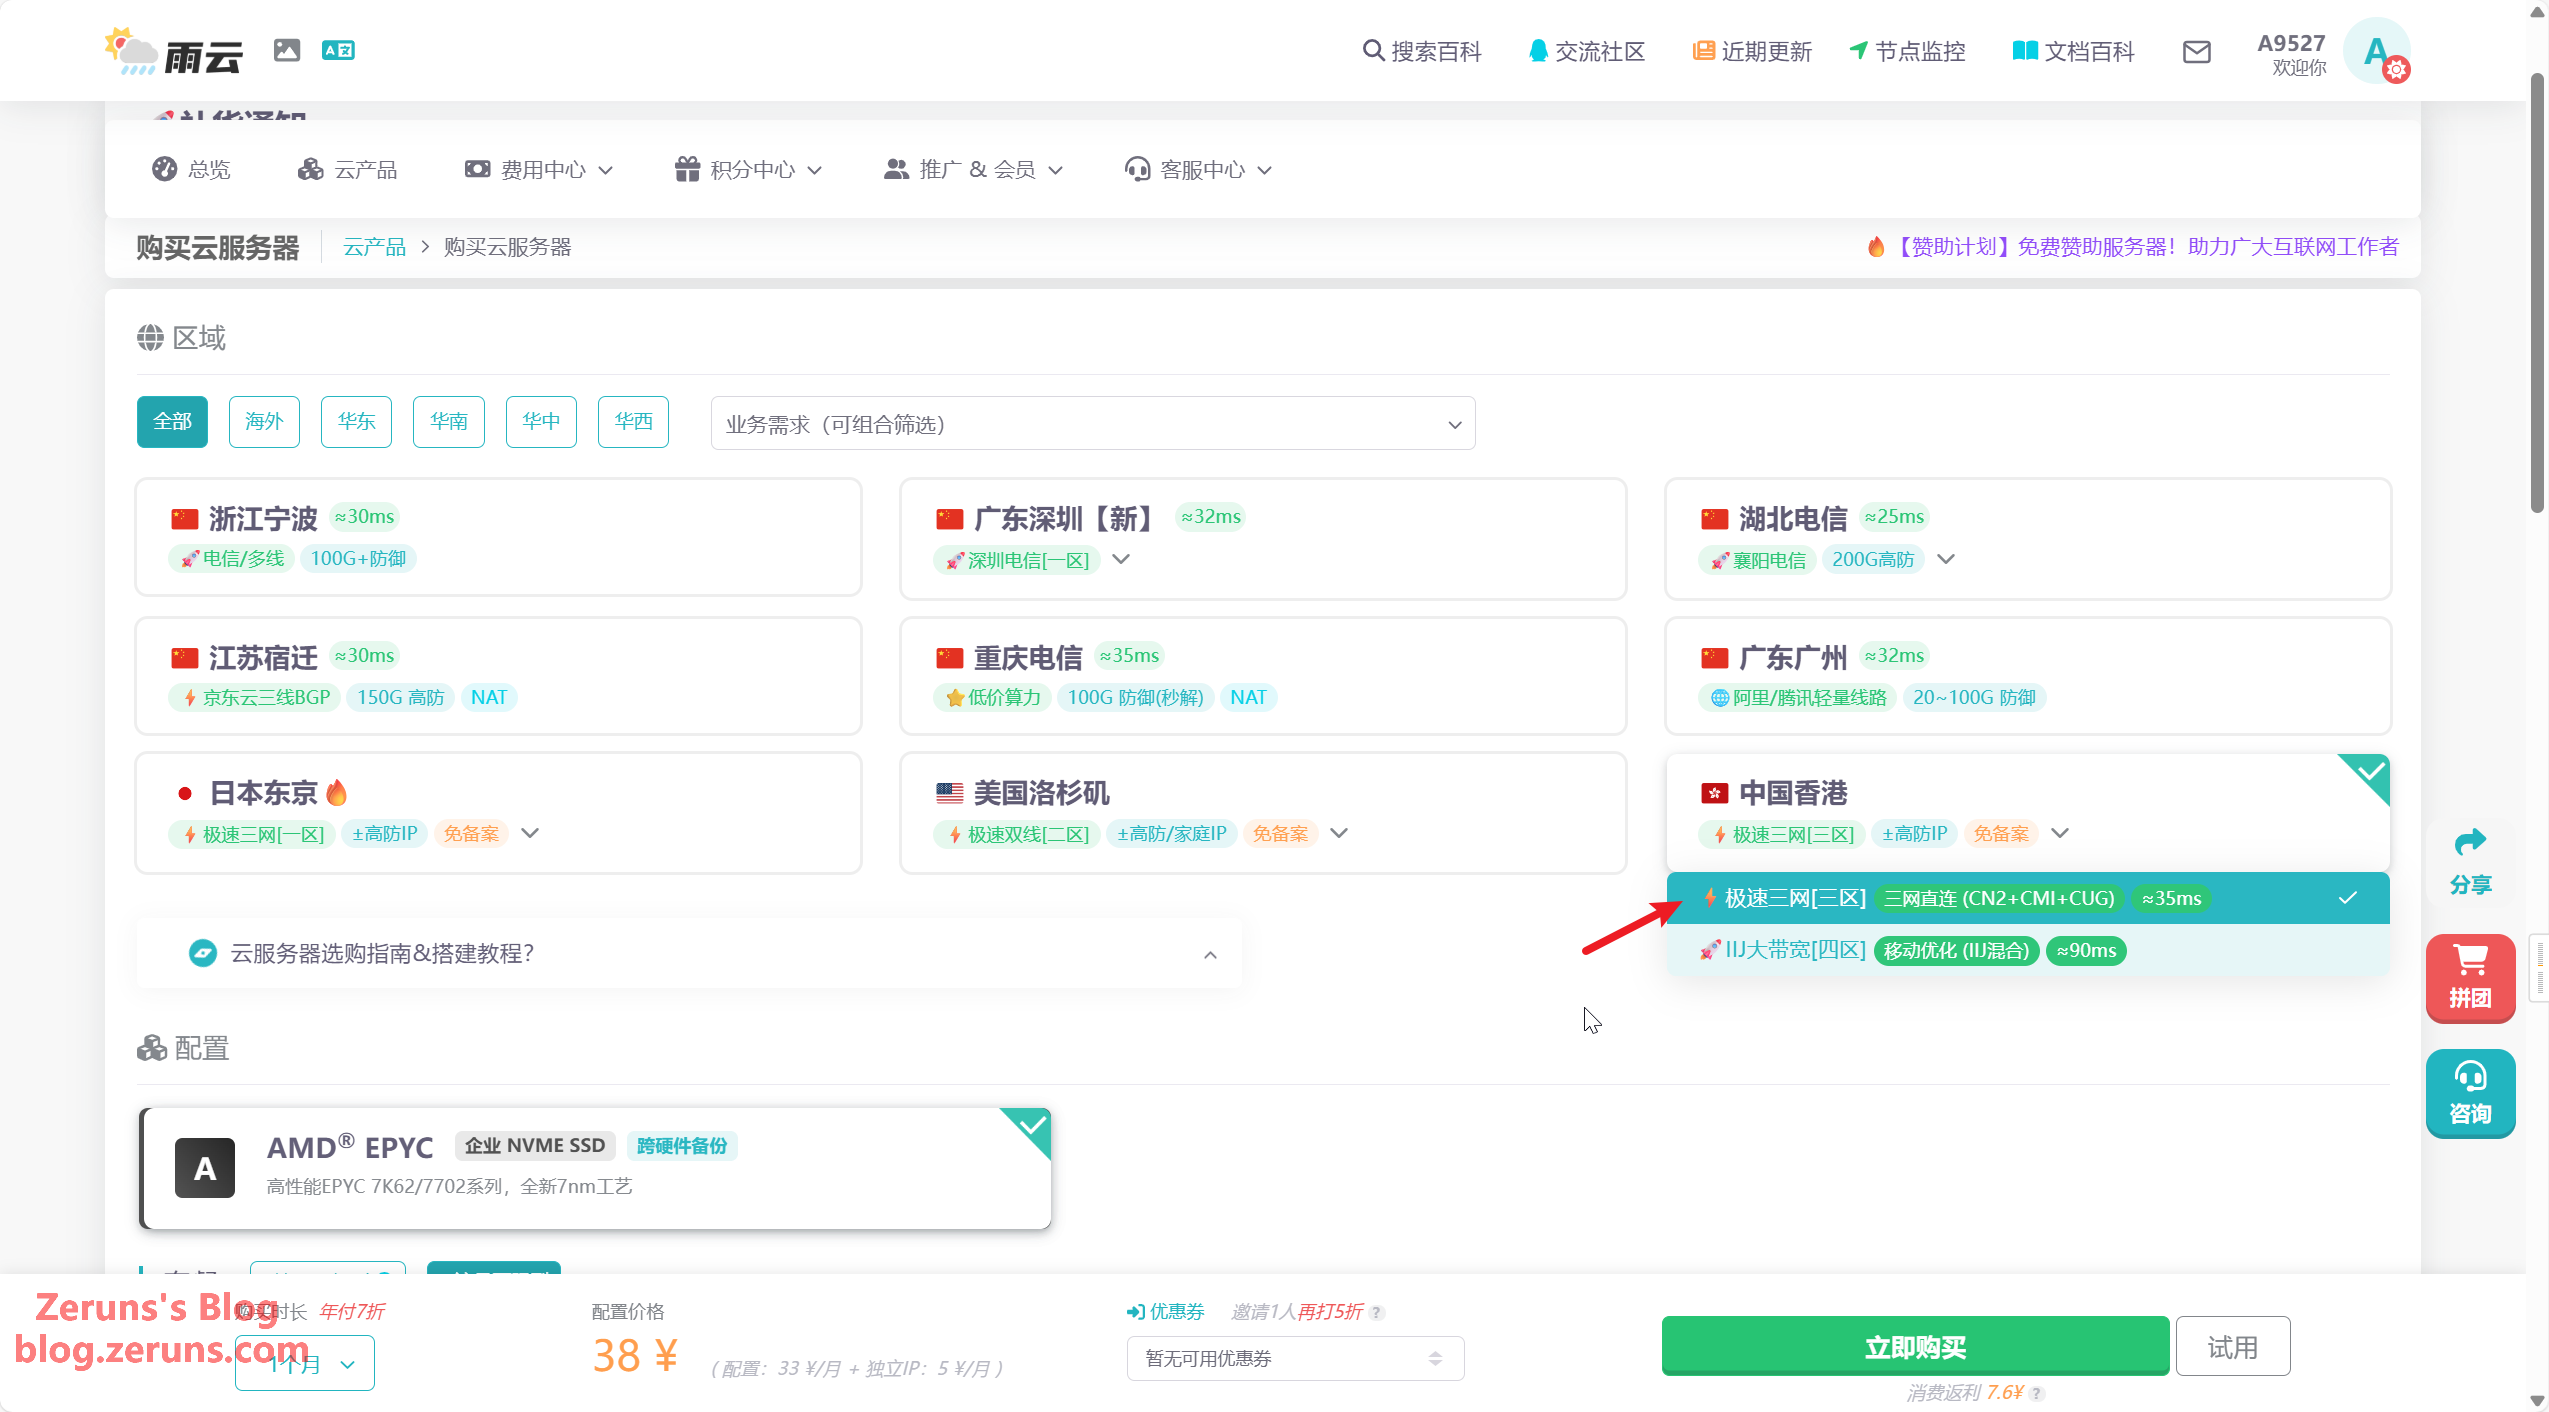
Click Buy Cloud Server, then Select Server Region. Mainland users may choose a domestic data center, but if you lack a filing domain or prefer not to file, choose Hong Kong or the US (prefer Hong Kong for lower latency). I chose Hong Kong Zone 3.
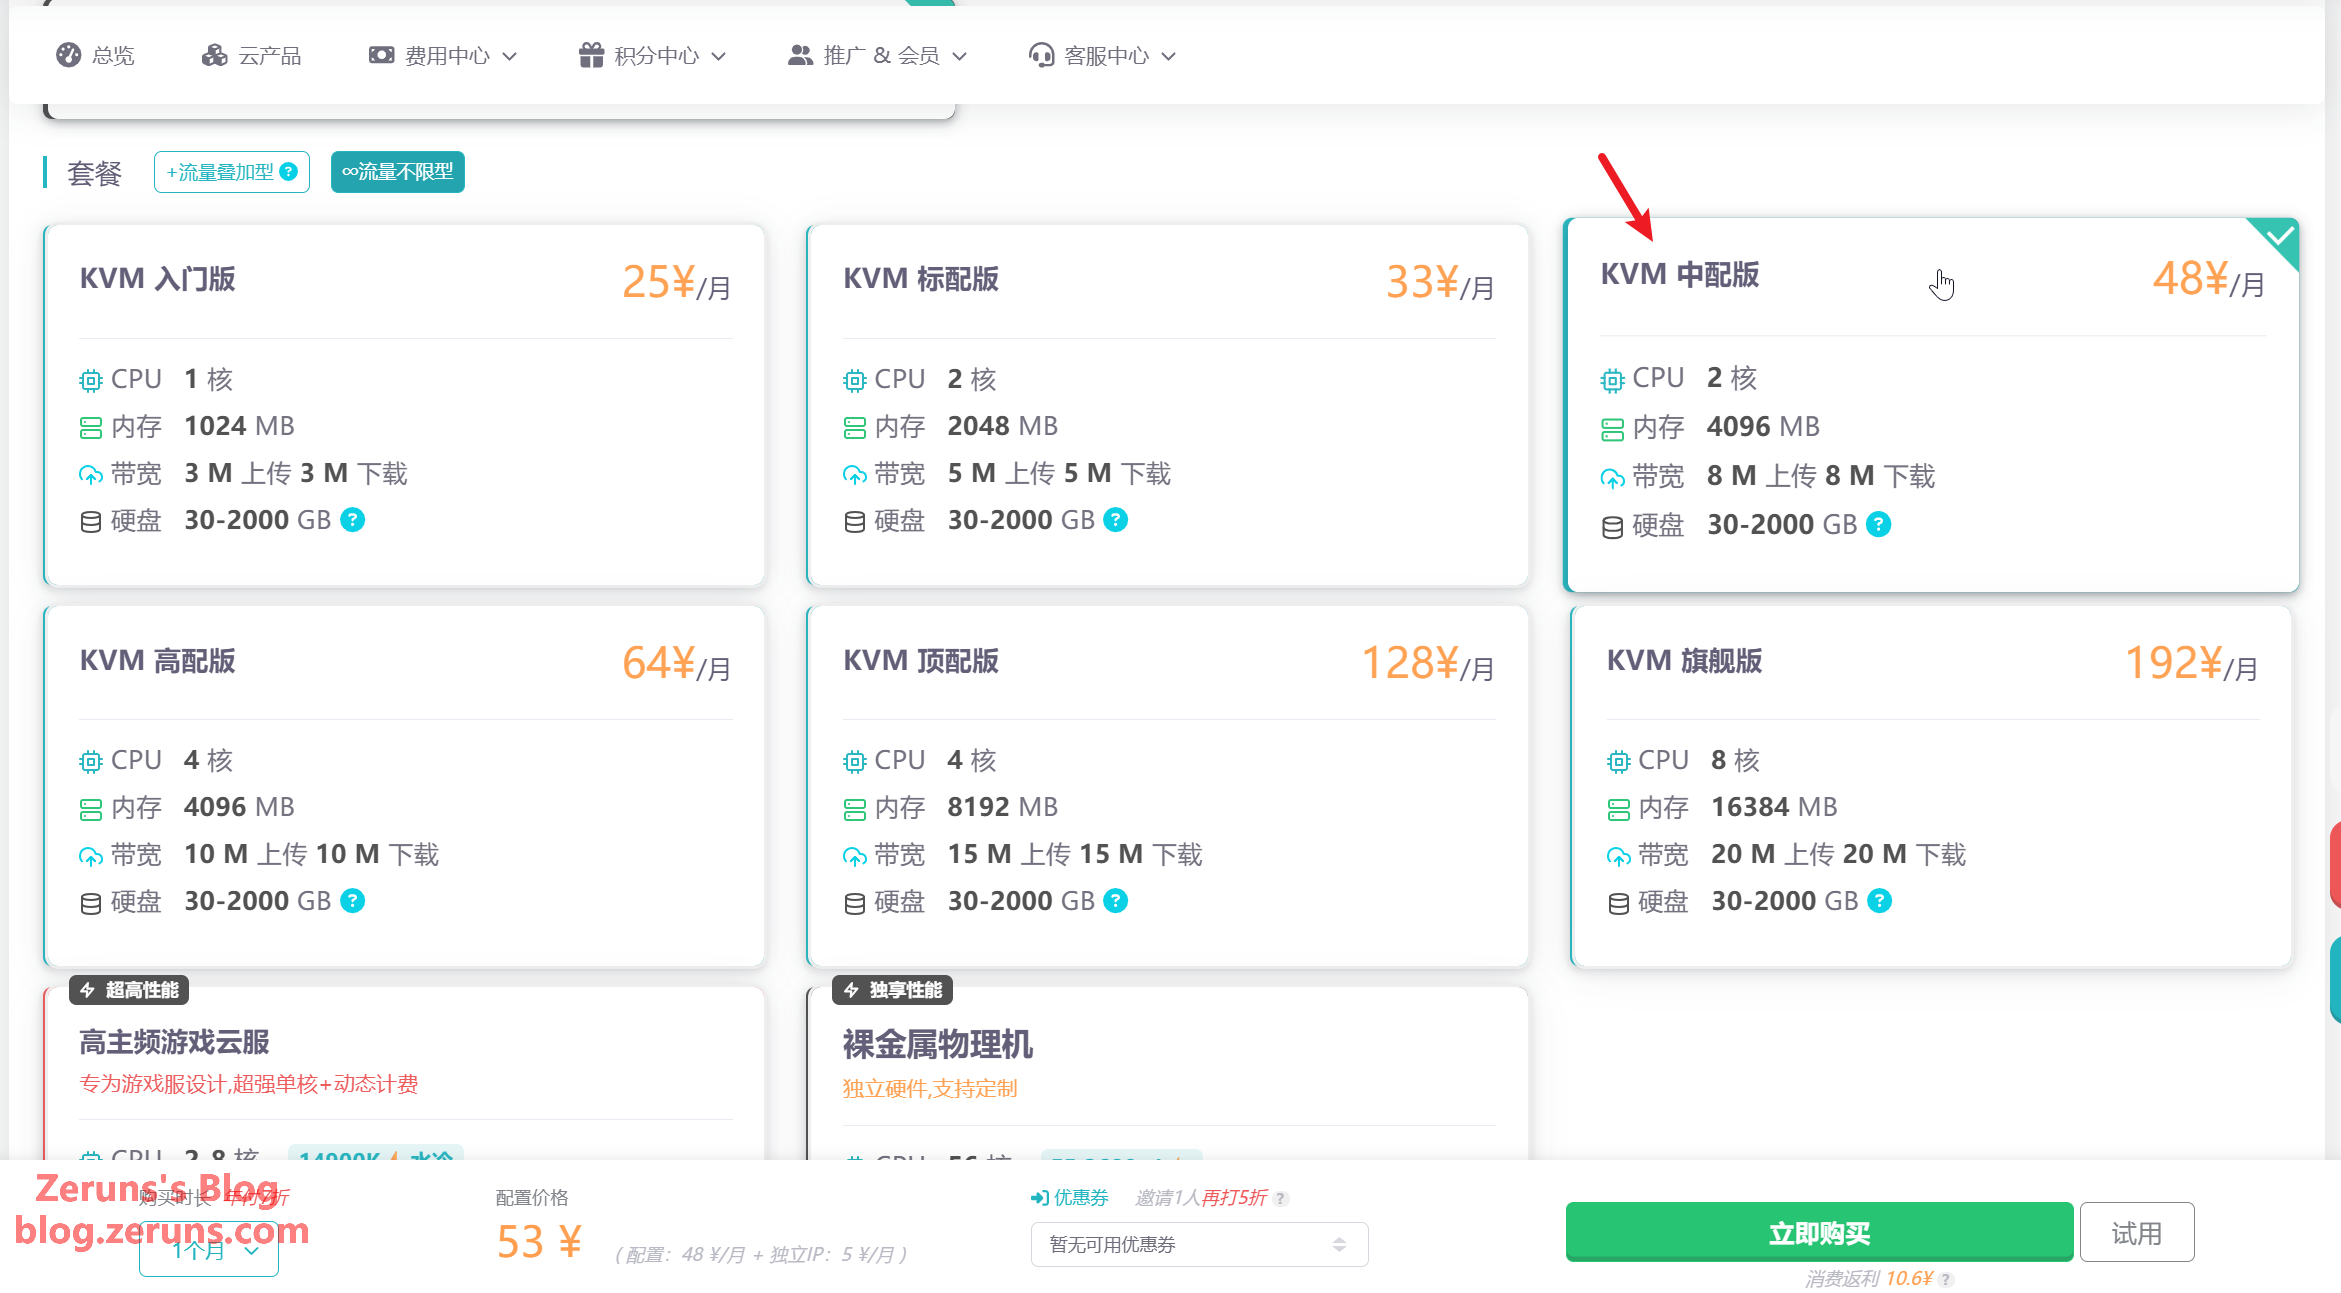
Select 2‑CPU 4 GB RAM, which is usually sufficient; choose higher specs for more traffic, and you can upgrade later.
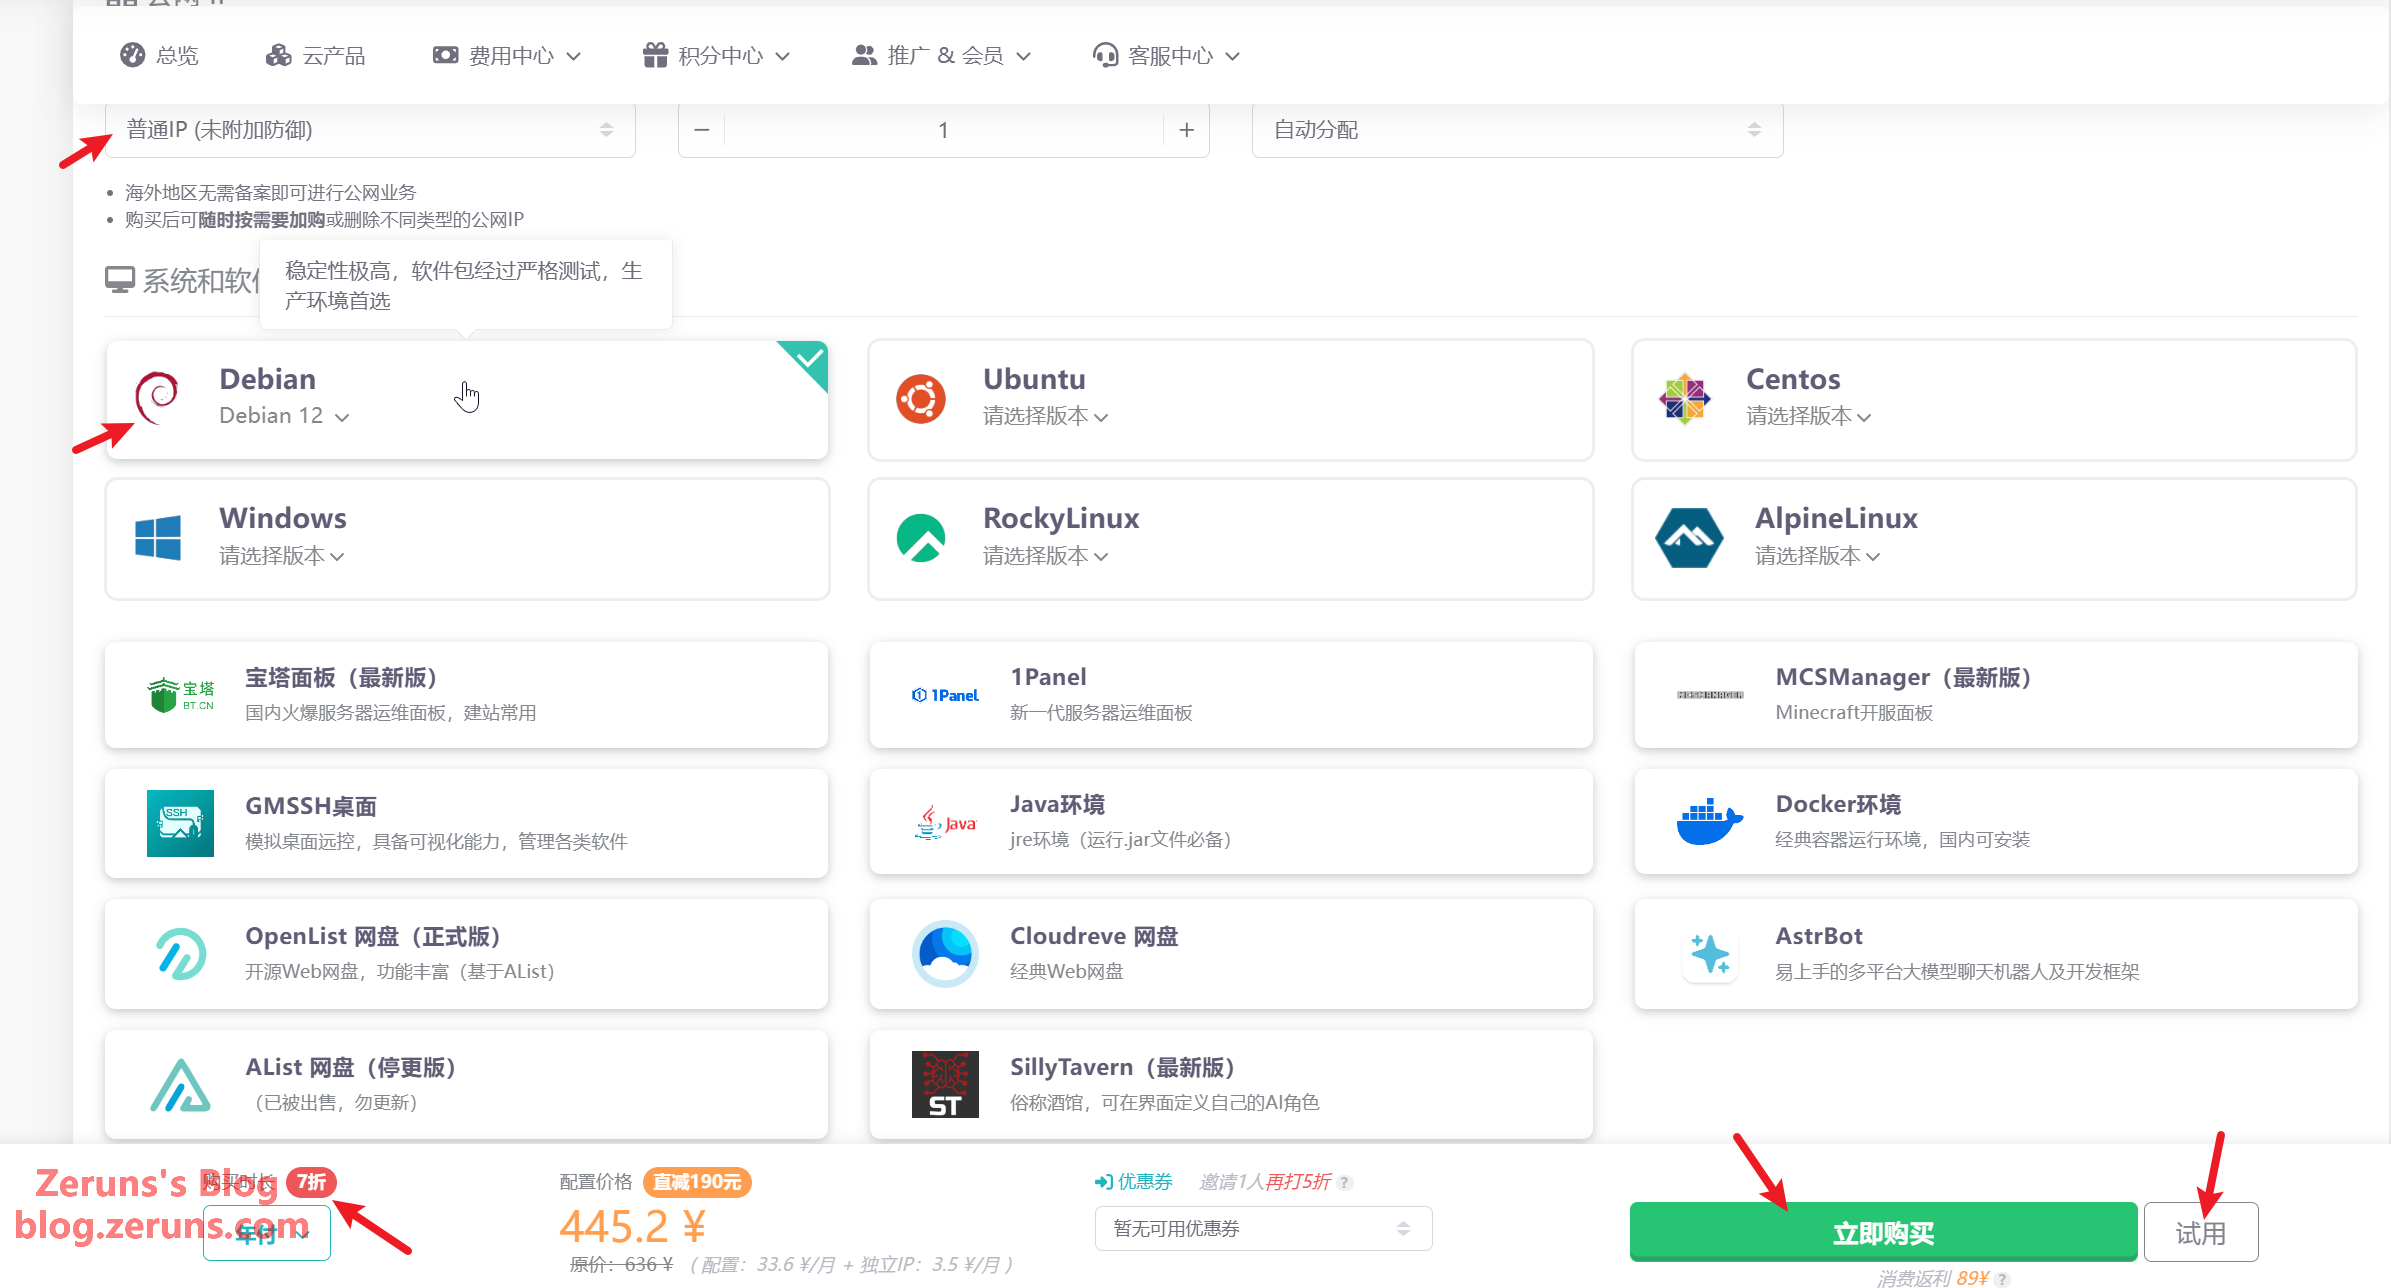
Choose Debian 12 as the OS, then click Buy Now; annual payment gets a 30% discount (with my code you can stack an extra 20% off coupon to achieve ~44% off), or you can try for 1 CNY for 1 day.
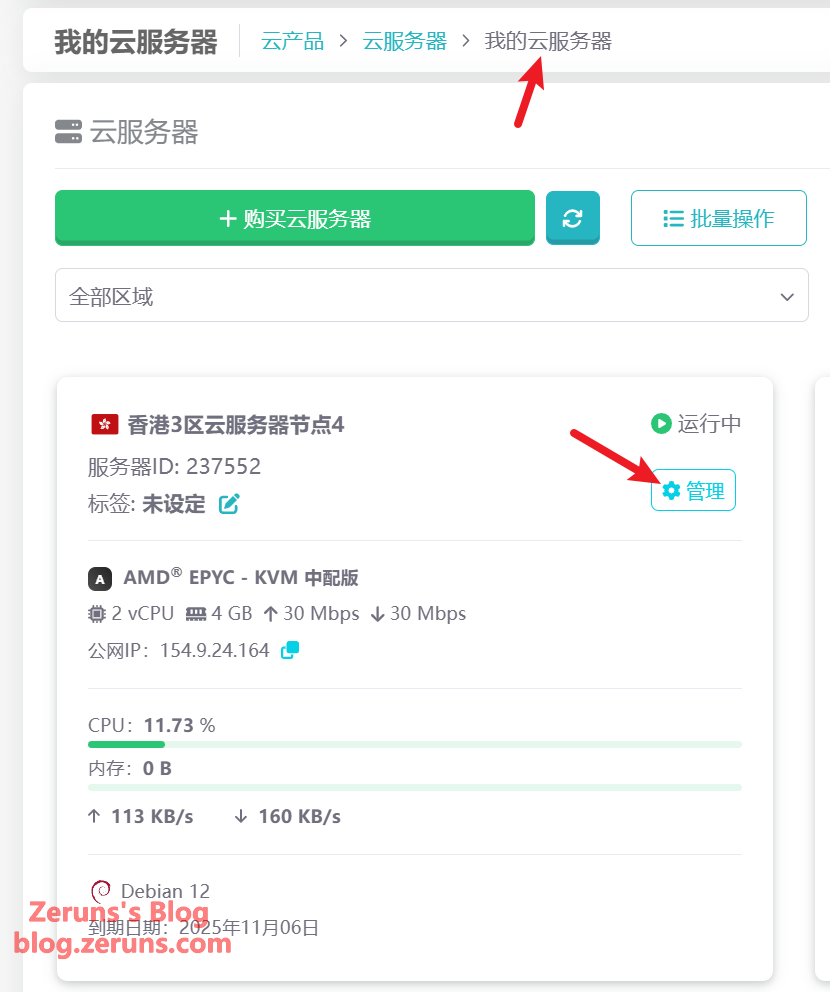
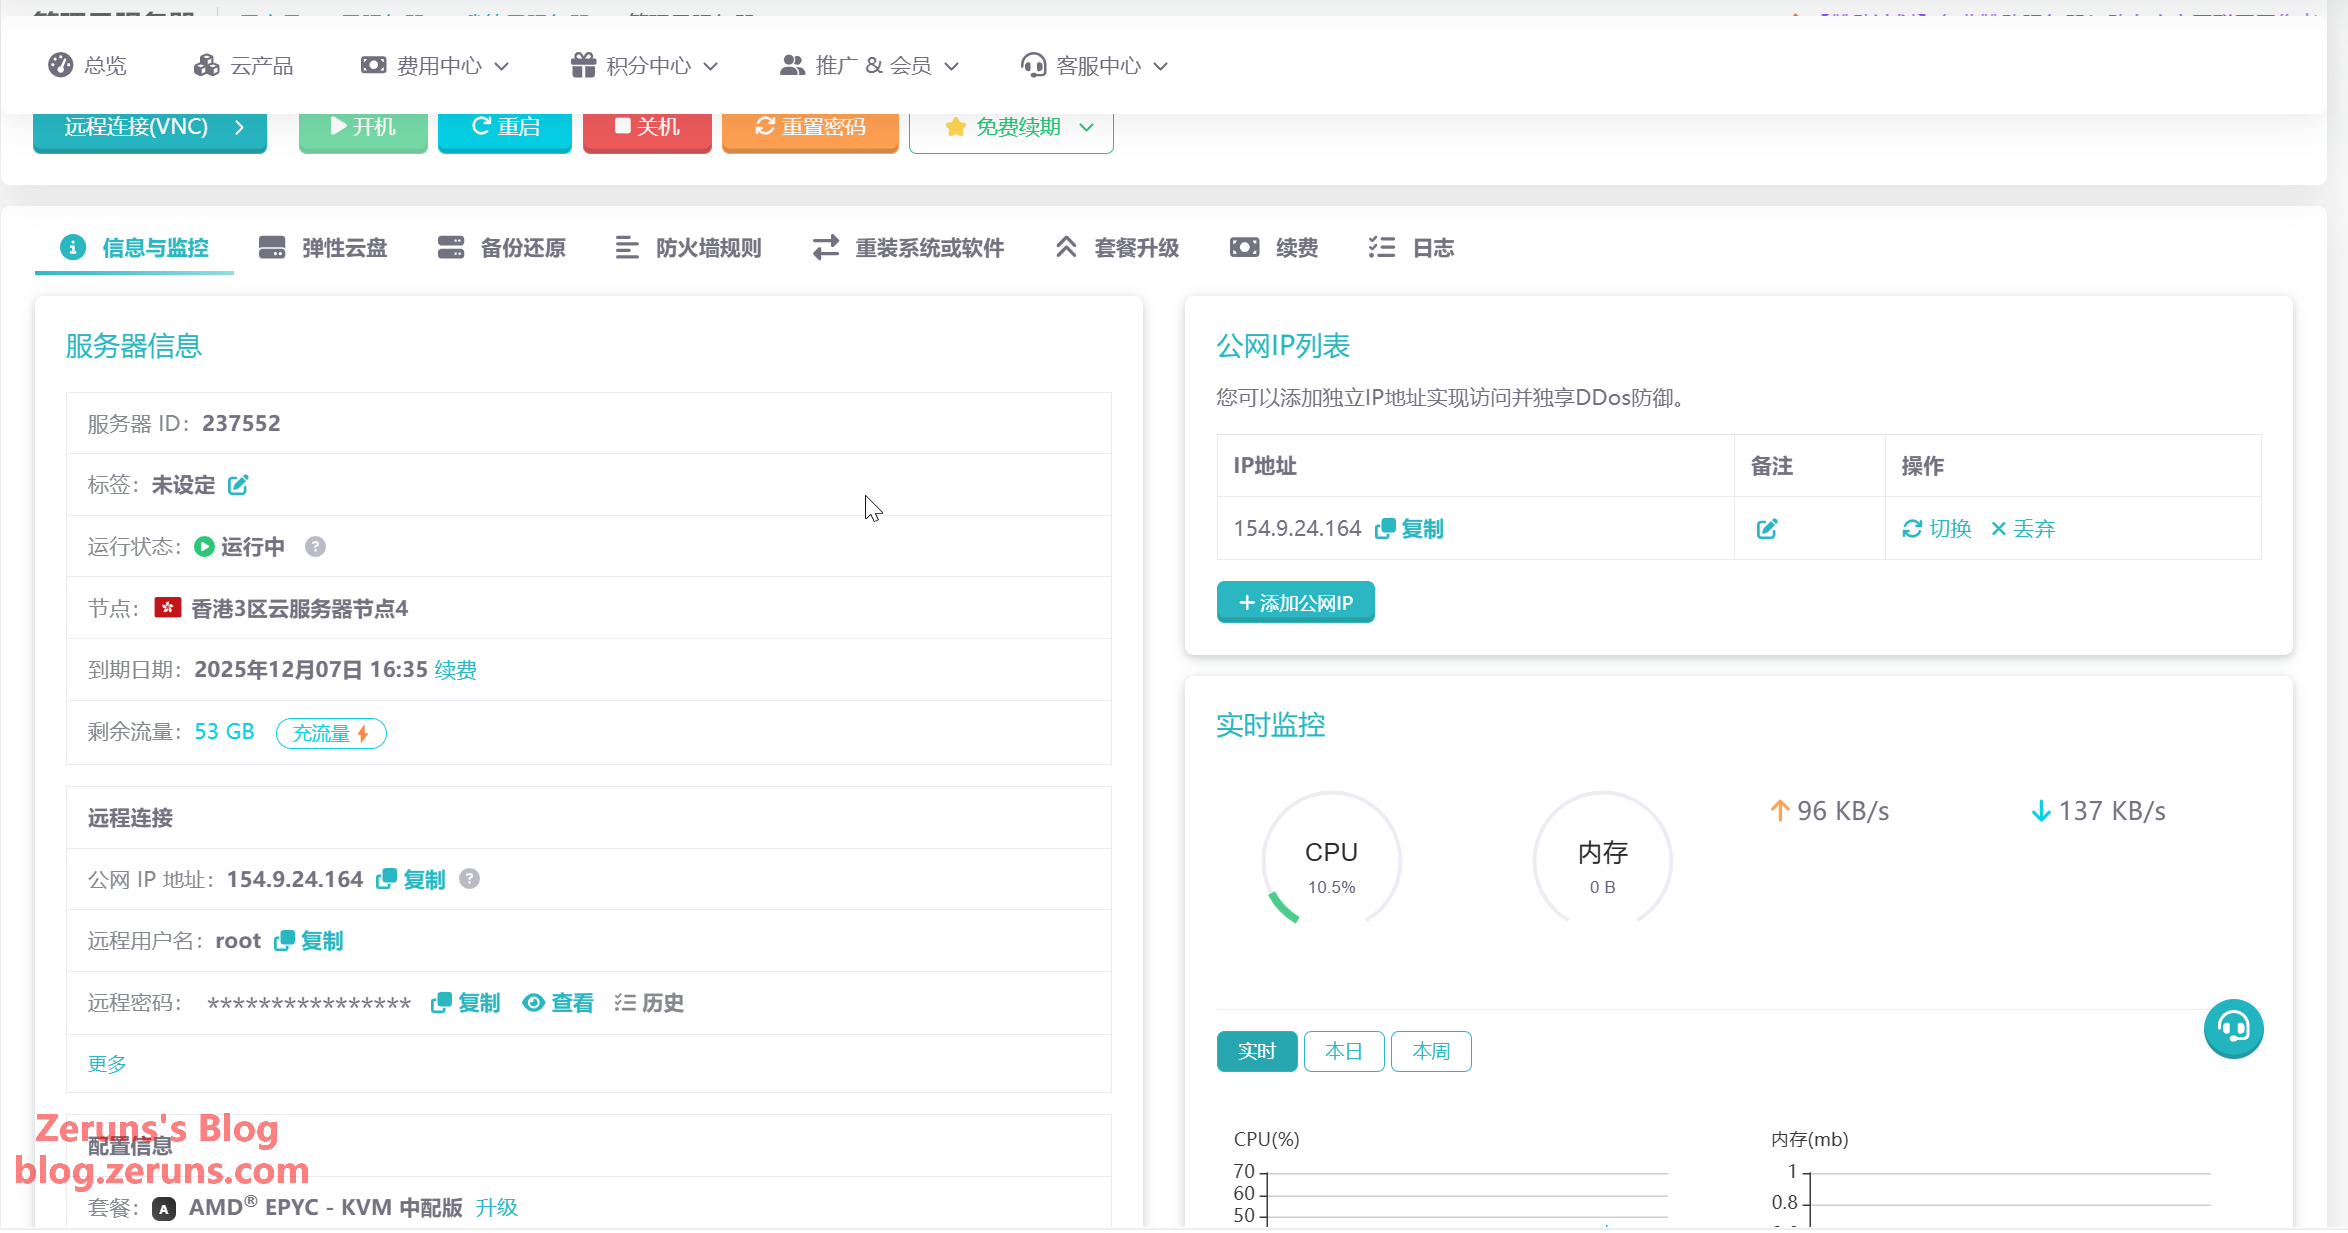
After purchase, you’ll see your server in the list; click Manage.
Here you can reinstall/switch OS, upgrade specs, etc. Wait for the server to be created before proceeding.
Connect to the Server
Download and open an SSH client; we recommend PuTTY or MobaXterm.
SSH client download: https://www.123pan.com/ps/2Y9Djv-UAtvH.html
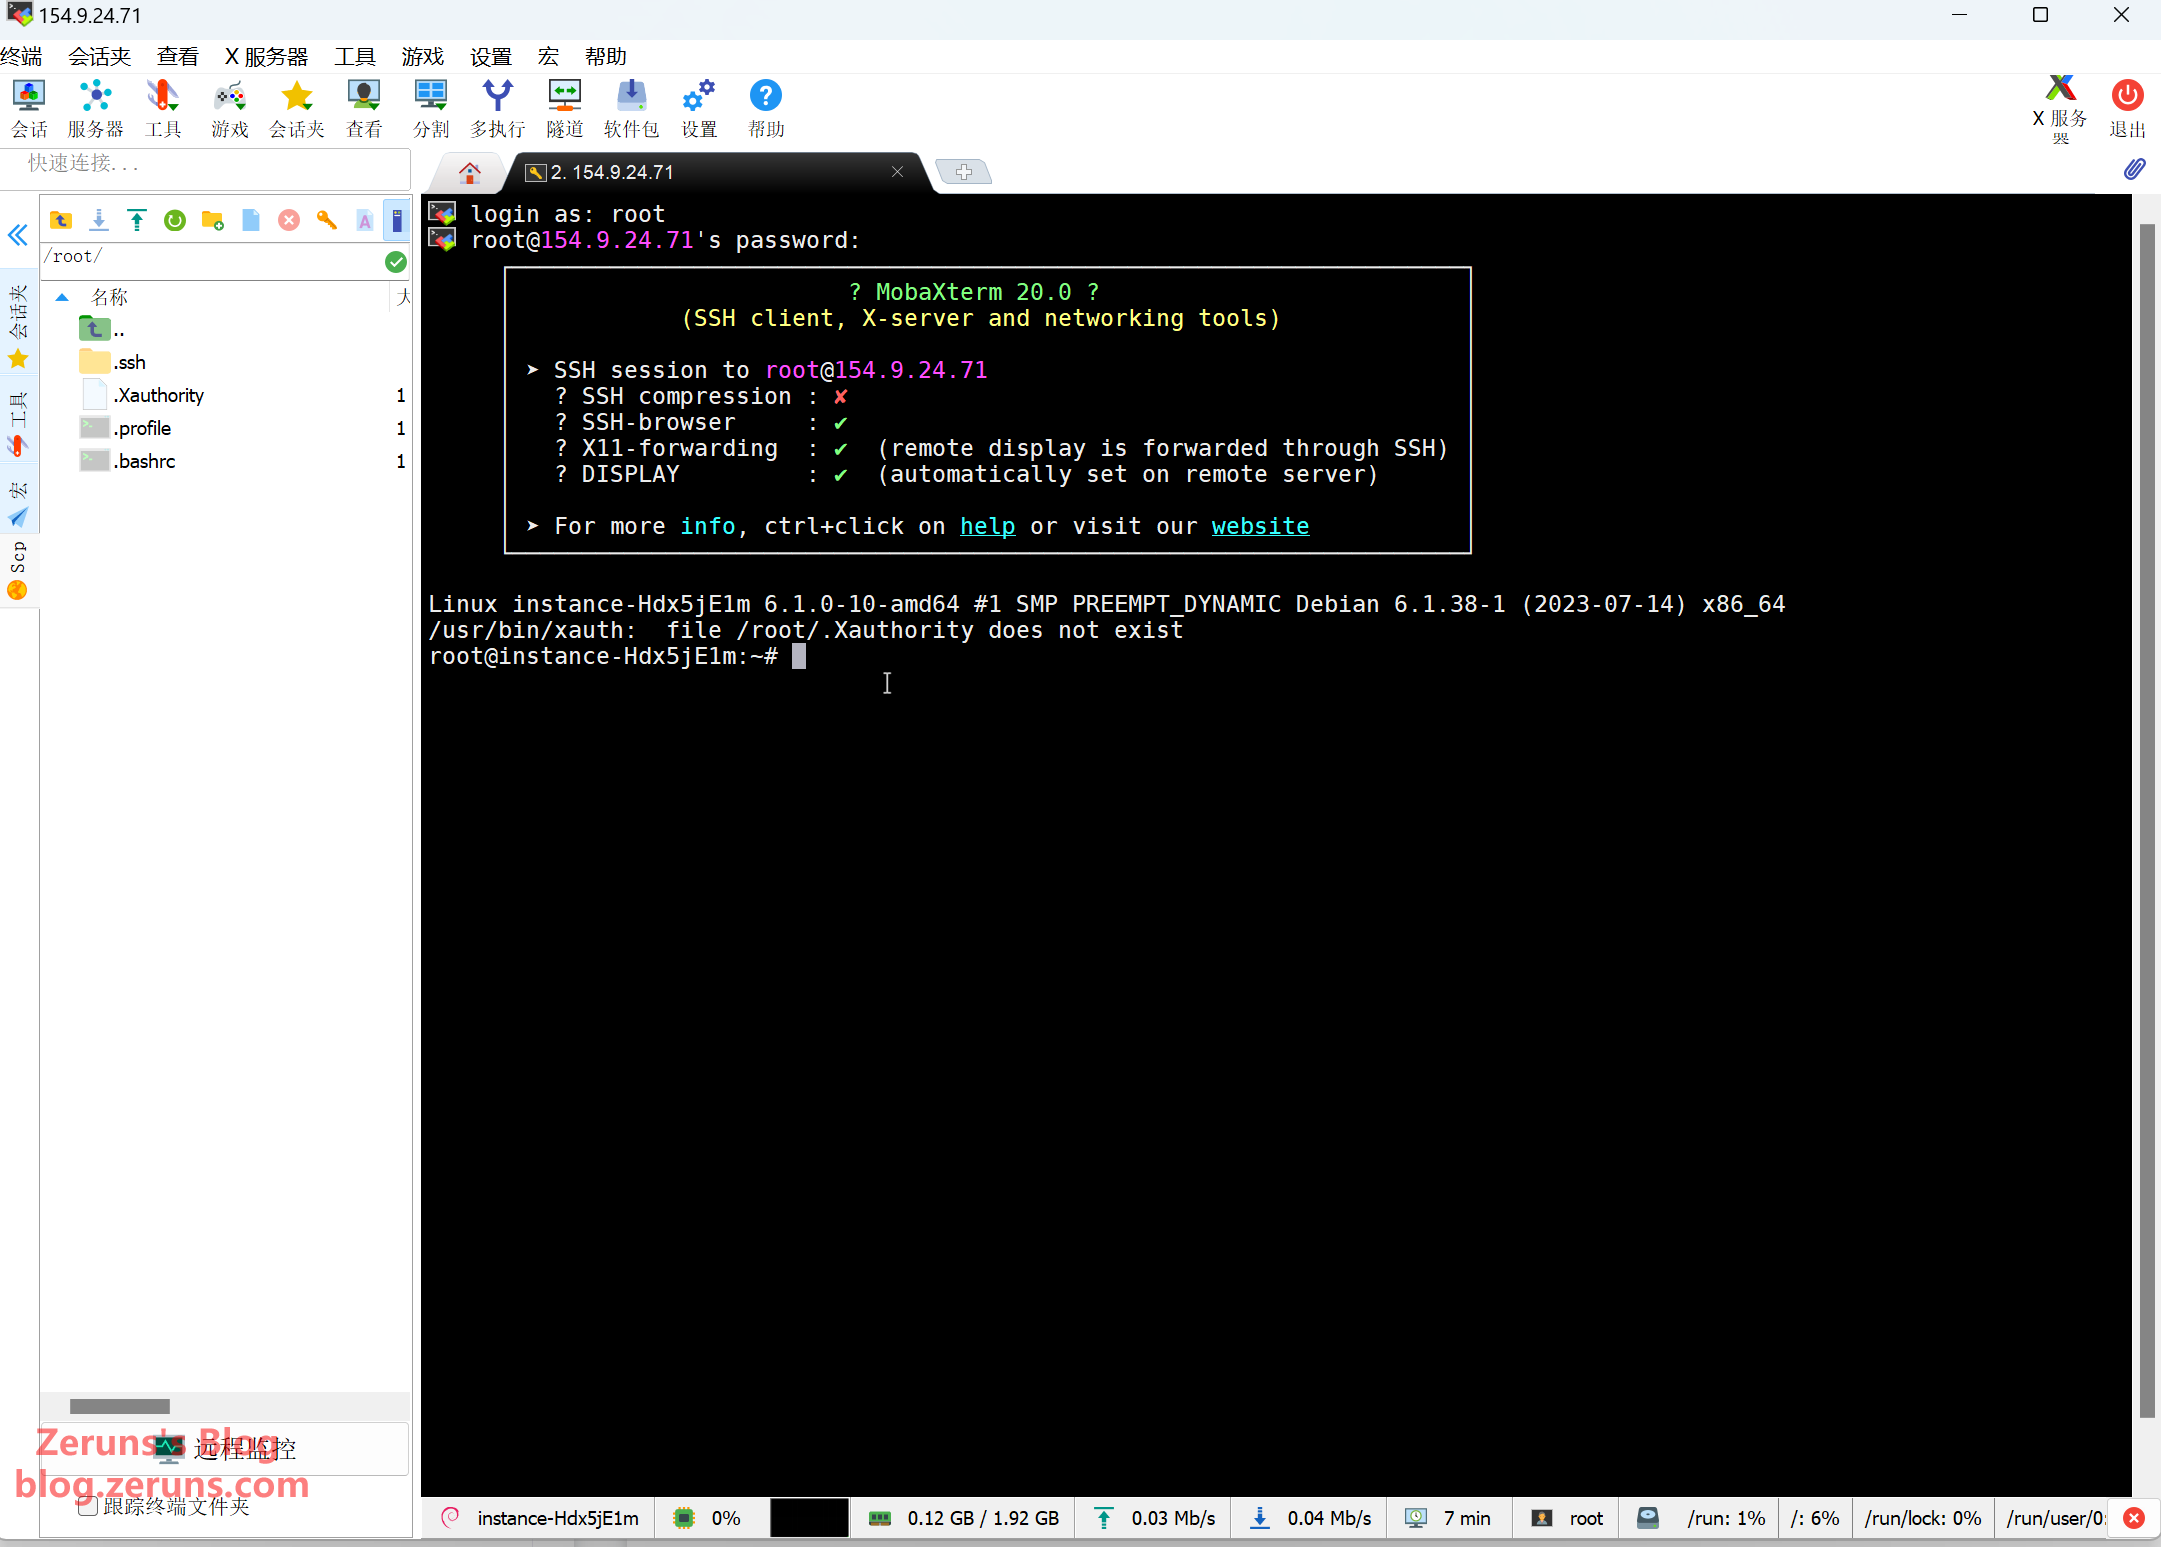
I use MobaXterm; in the SSH client enter your server’s IP (from the console) and SSH port (default 22), then click OK or Open.

Log in as root, then enter the password (also from the console). The password won’t be displayed.
Tip: In the SSH terminal, select text with the left mouse button, release, then click in a blank area to copy. Right‑click to paste.
APT Mirror Change (not needed for overseas servers)
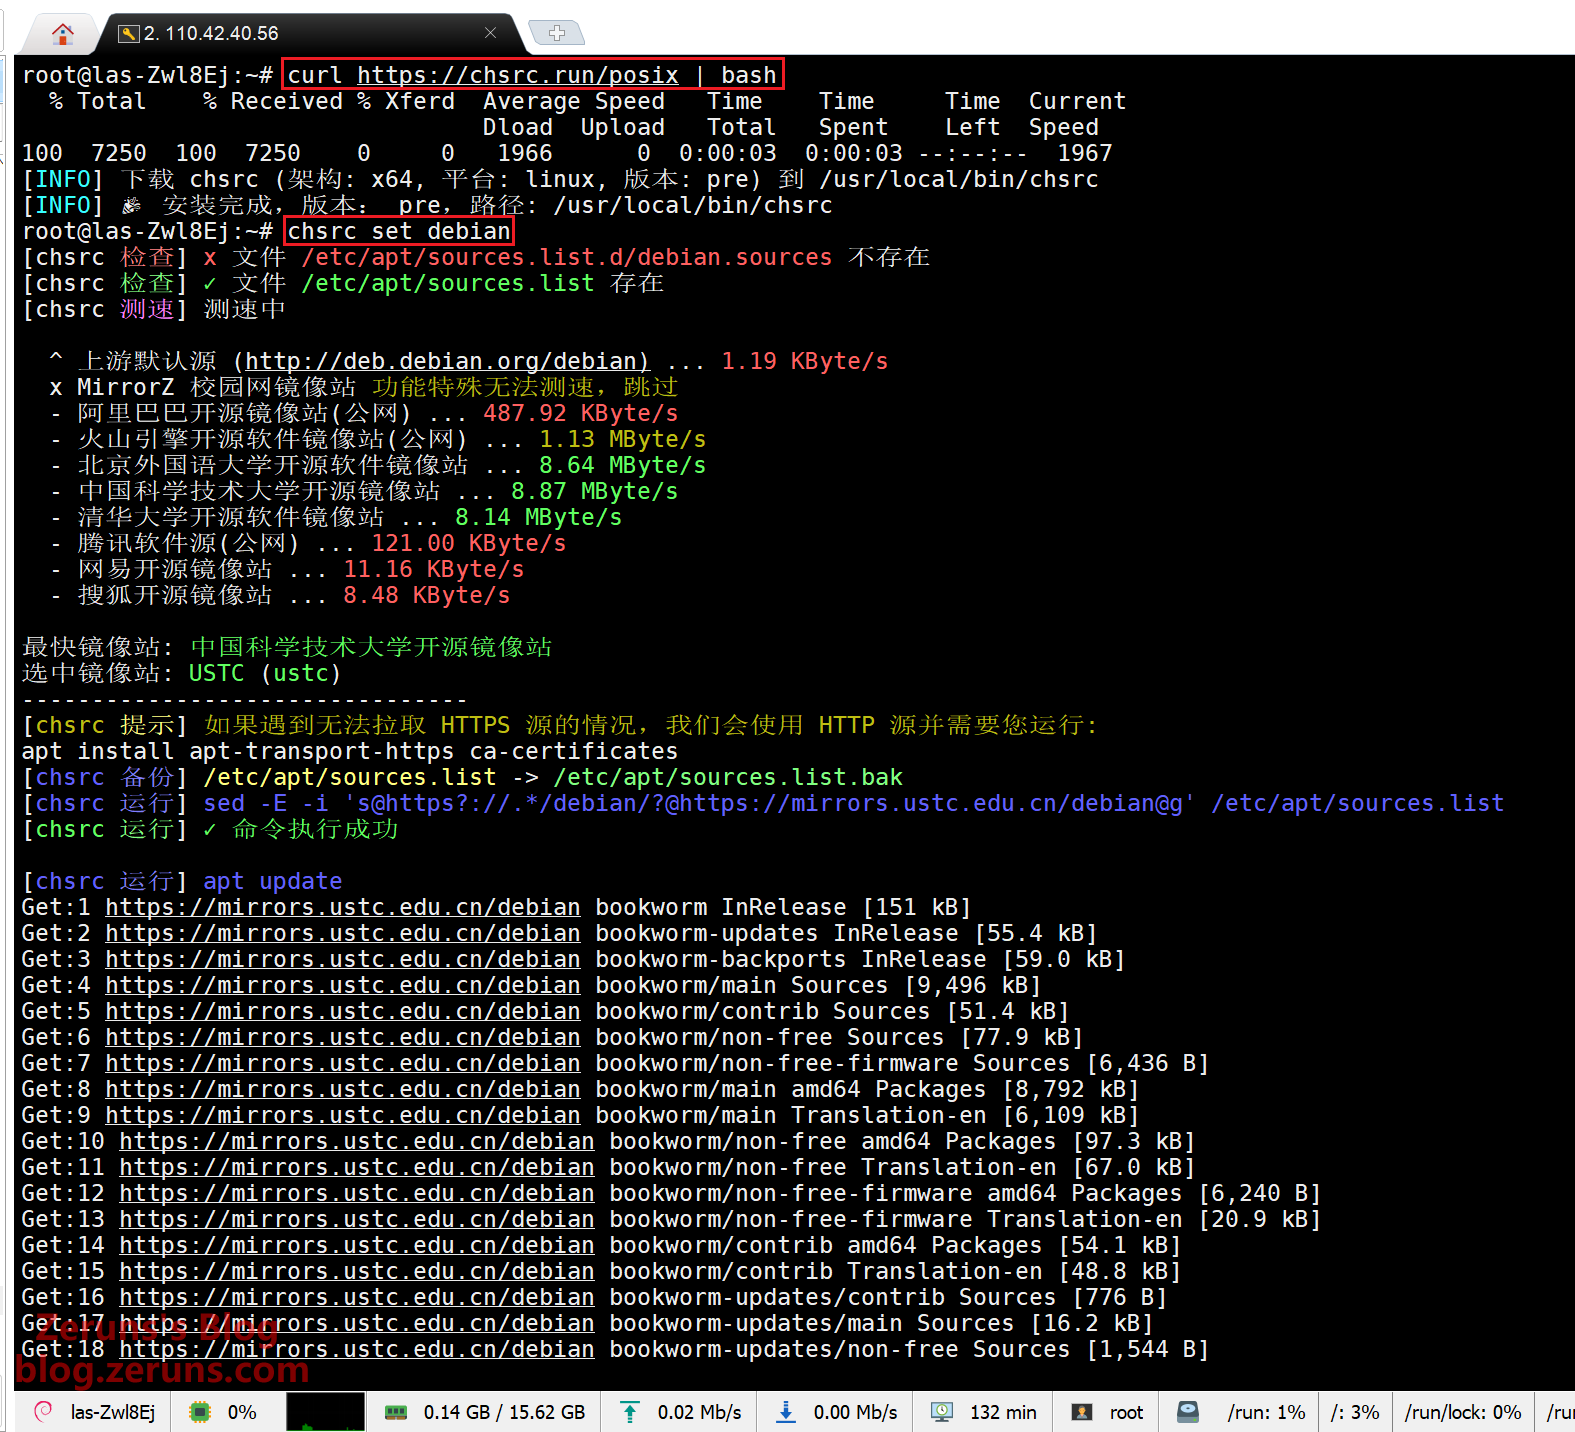
The default APT sources point to foreign mirrors; for domestic servers you should switch to a local mirror using chsrc.
# Install chsrc
curl https://chsrc.run/posix | bash

# Auto speed test, find the fastest source, switch mirrors
chsrc set debian
Install BT Panel
Register a BT account (required for login later): https://www.bt.cn/u/tbUafD
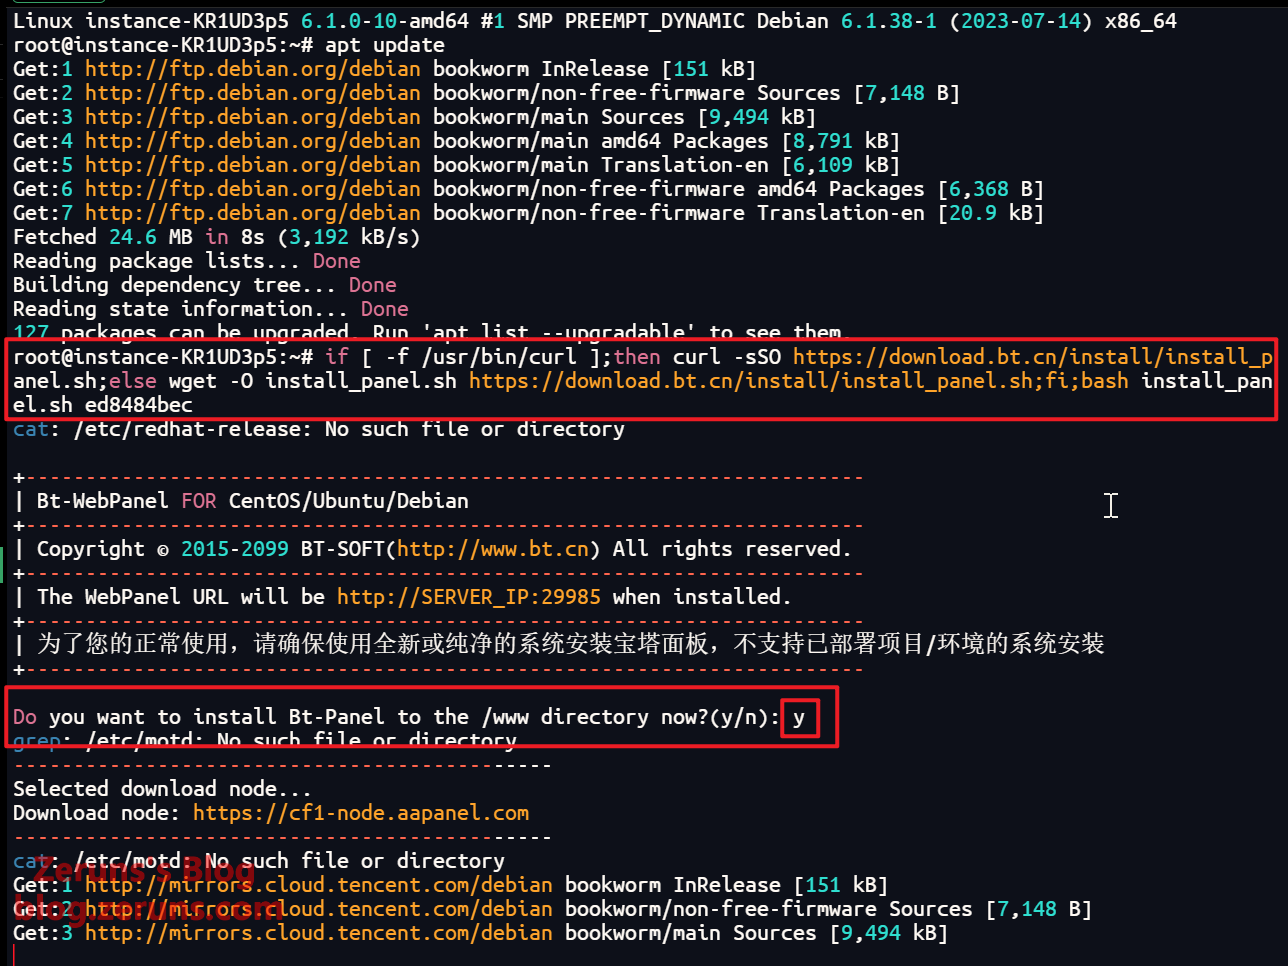
Run the following command in the terminal to install BT Panel:
if [ -f /usr/bin/curl ];then curl -sSO https://download.bt.cn/install/install_panel.sh;else wget -O install_panel.sh https://download.bt.cn/install/install_panel.sh;fi;bash install_panel.sh ed8484bec
Then type y and press Enter to confirm.
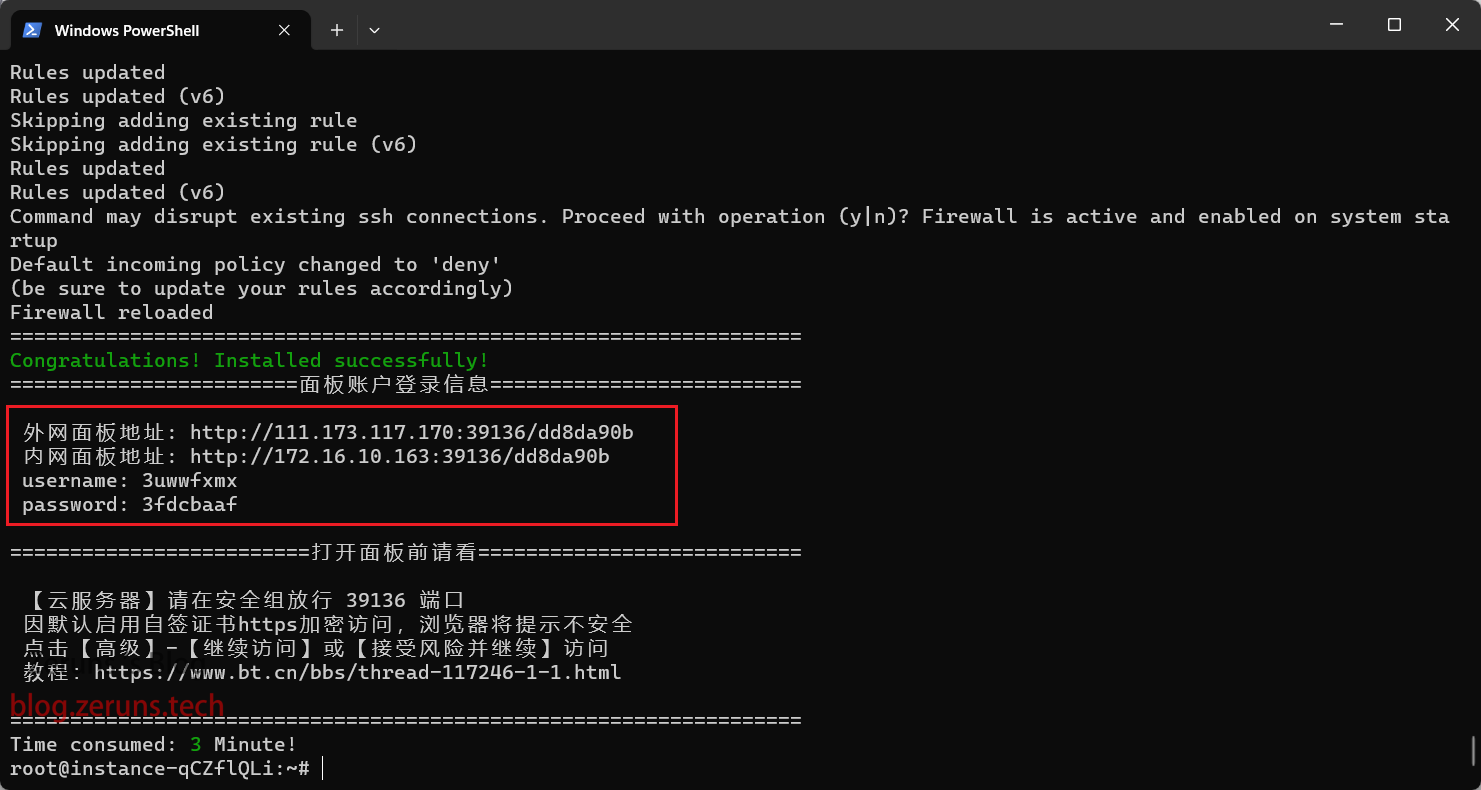
After installation, note the login URL, username, and password.
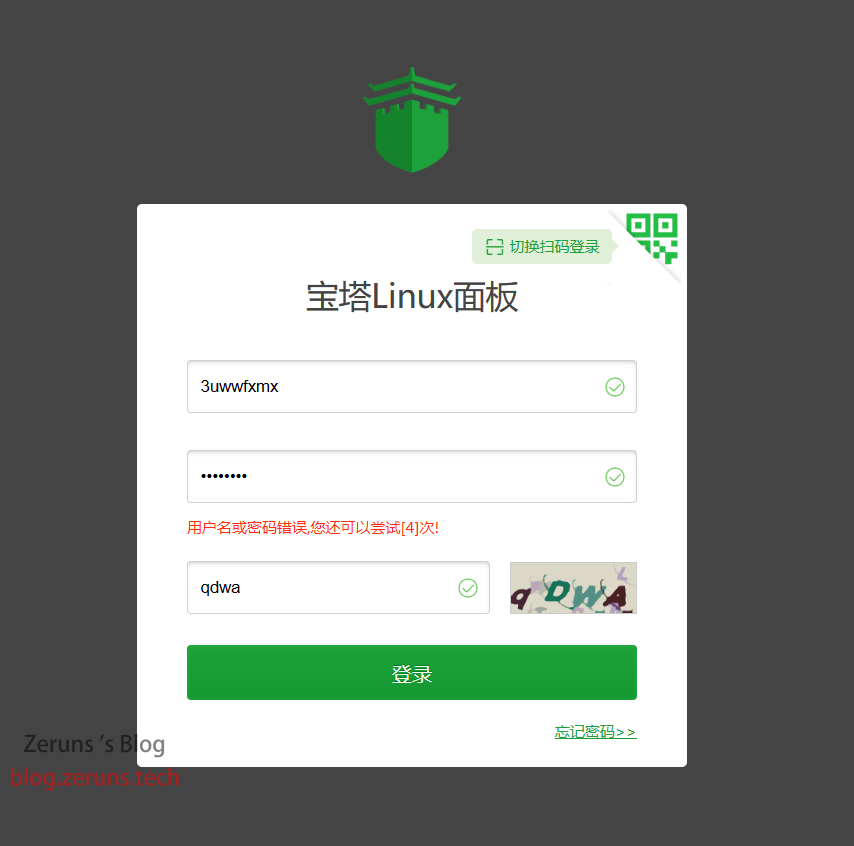
Enter the login URL in your browser.
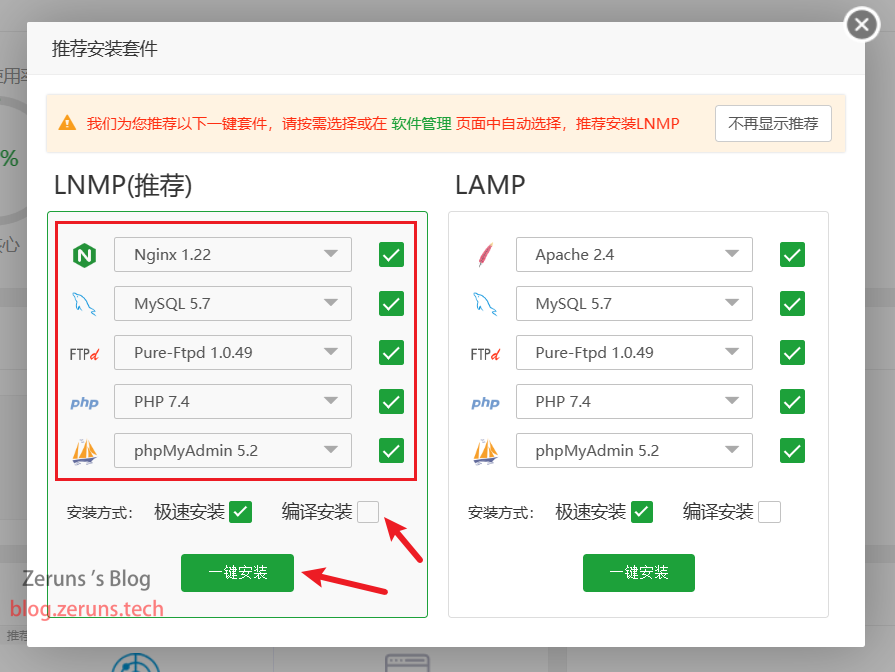
Install the LNMP stack; keep the default options. For production, choose Compile installation (takes longer). (You can select only NGINX if you only need it, but select other components if you plan to host additional PHP sites.)
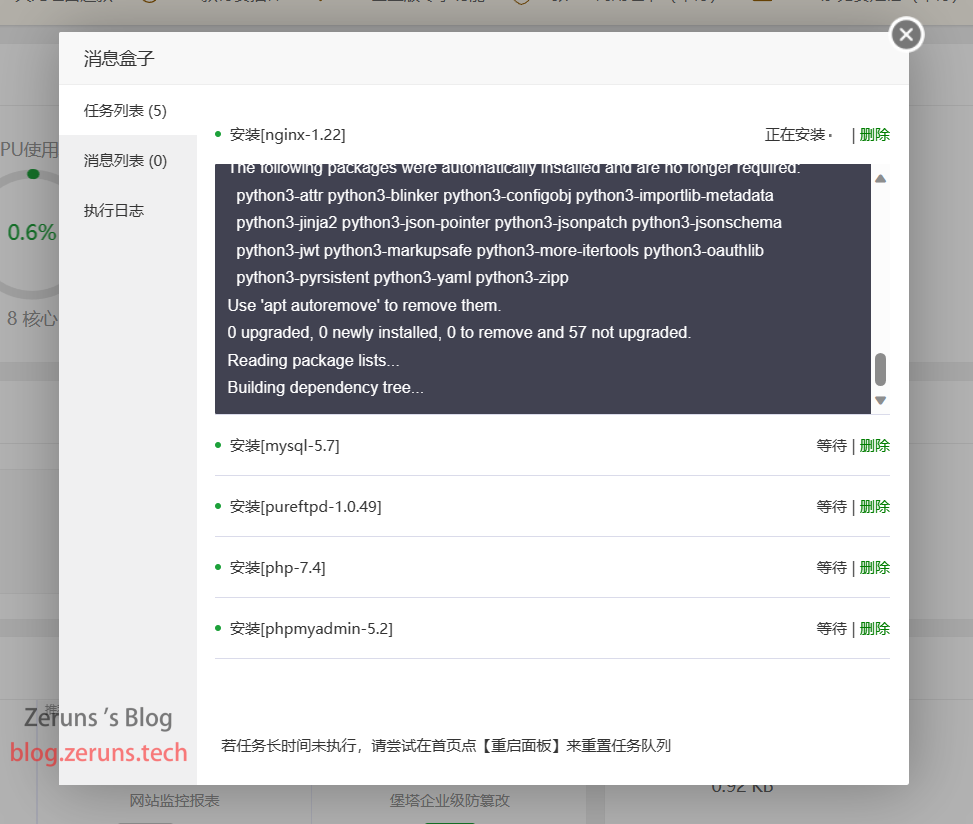
Wait for the installation to finish before proceeding.
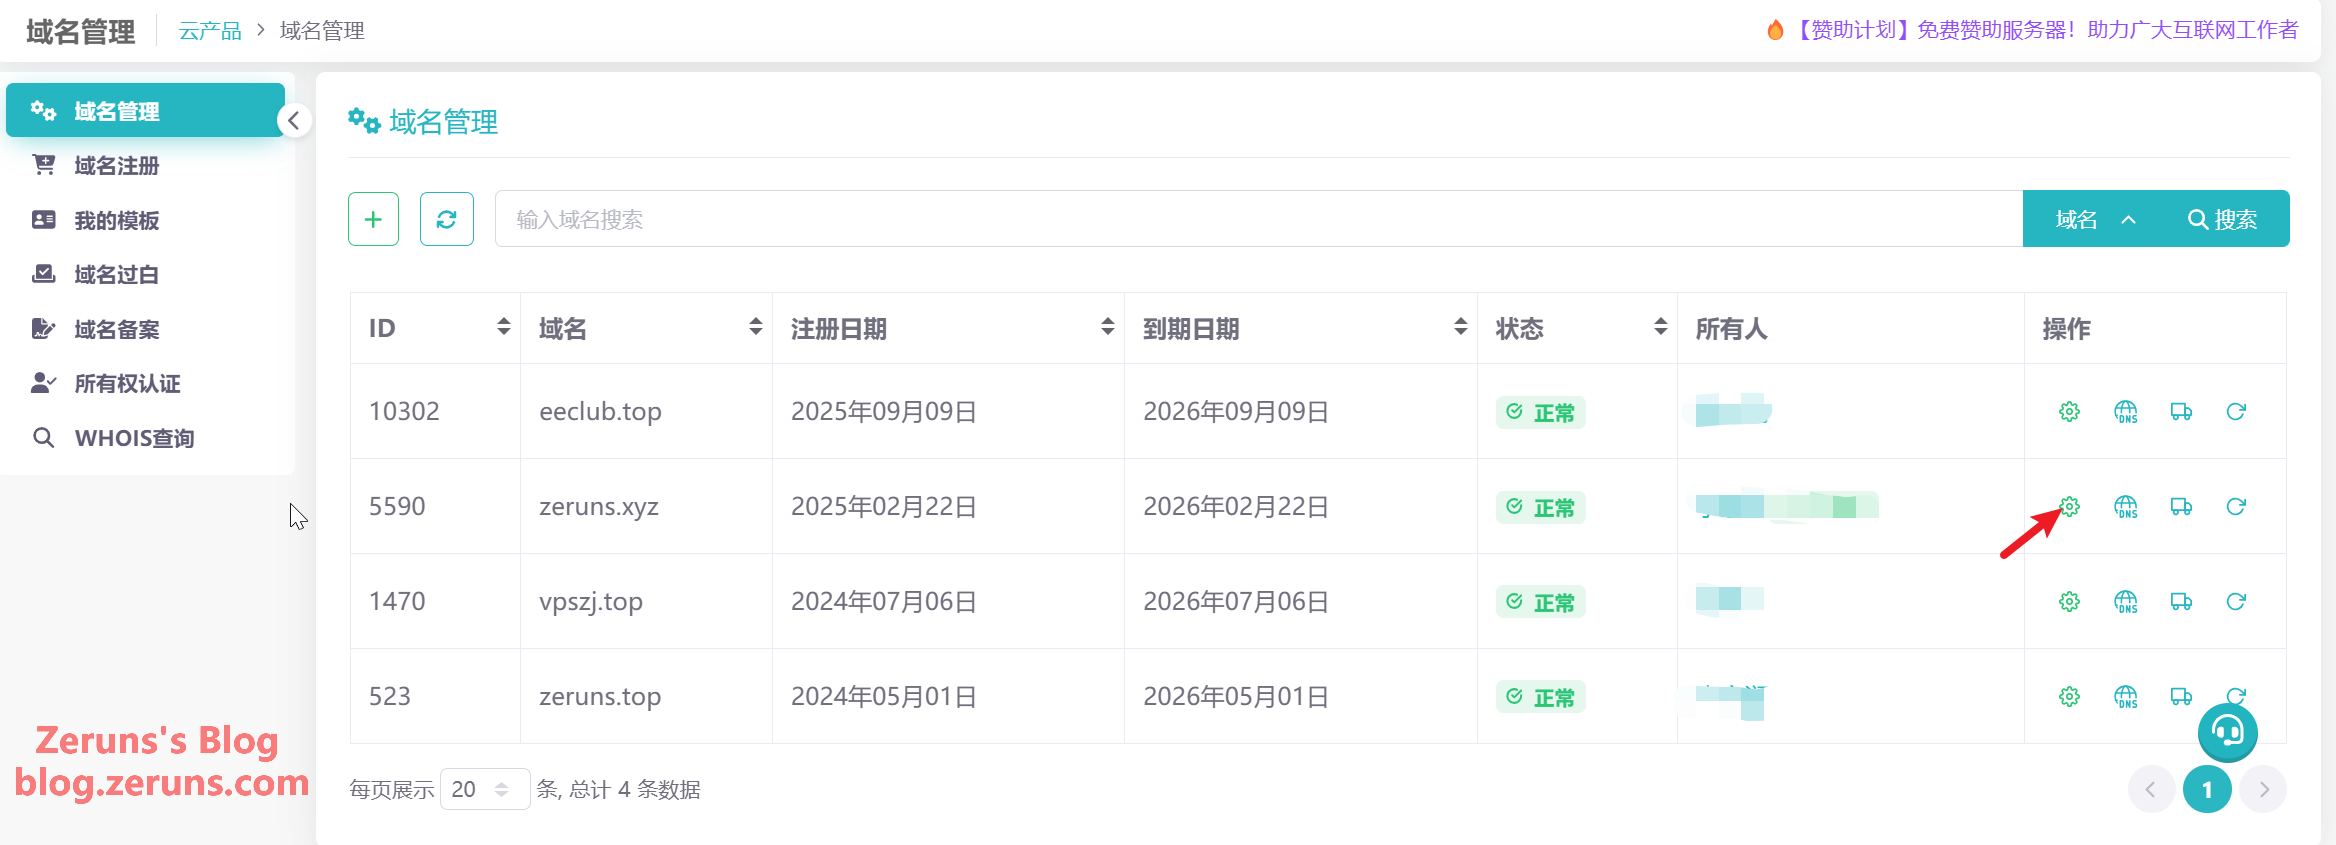
Configure Domain DNS
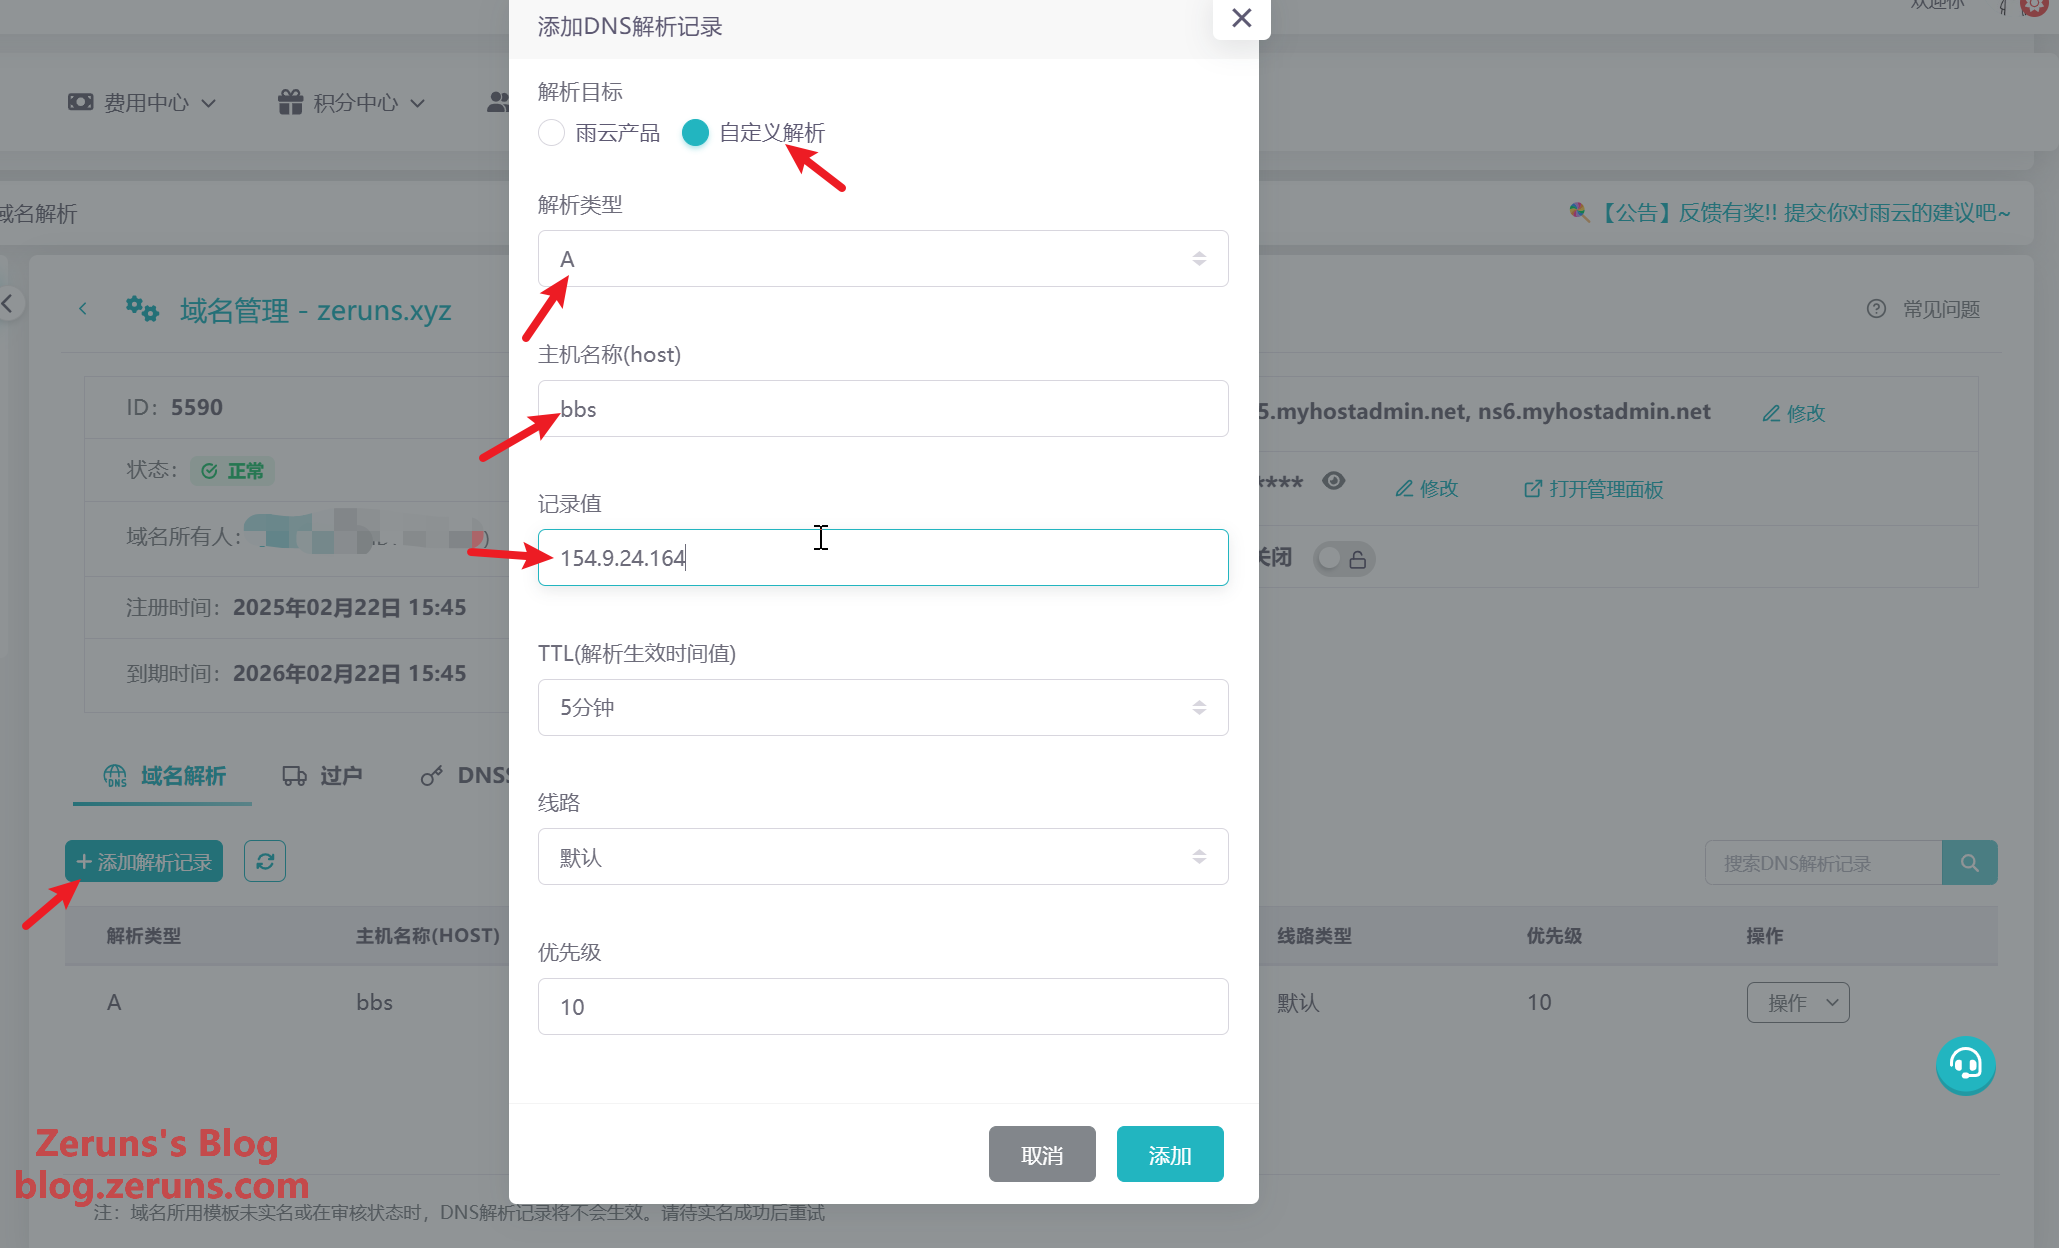
Go to your domain DNS console, add a record. Set the host name (e.g., bbs) so the site will be accessed as bbs.zeruns.xyz. Use @ for the root domain (zeruns.xyz). Set the record value to your server’s IP.
Deploy Discourse
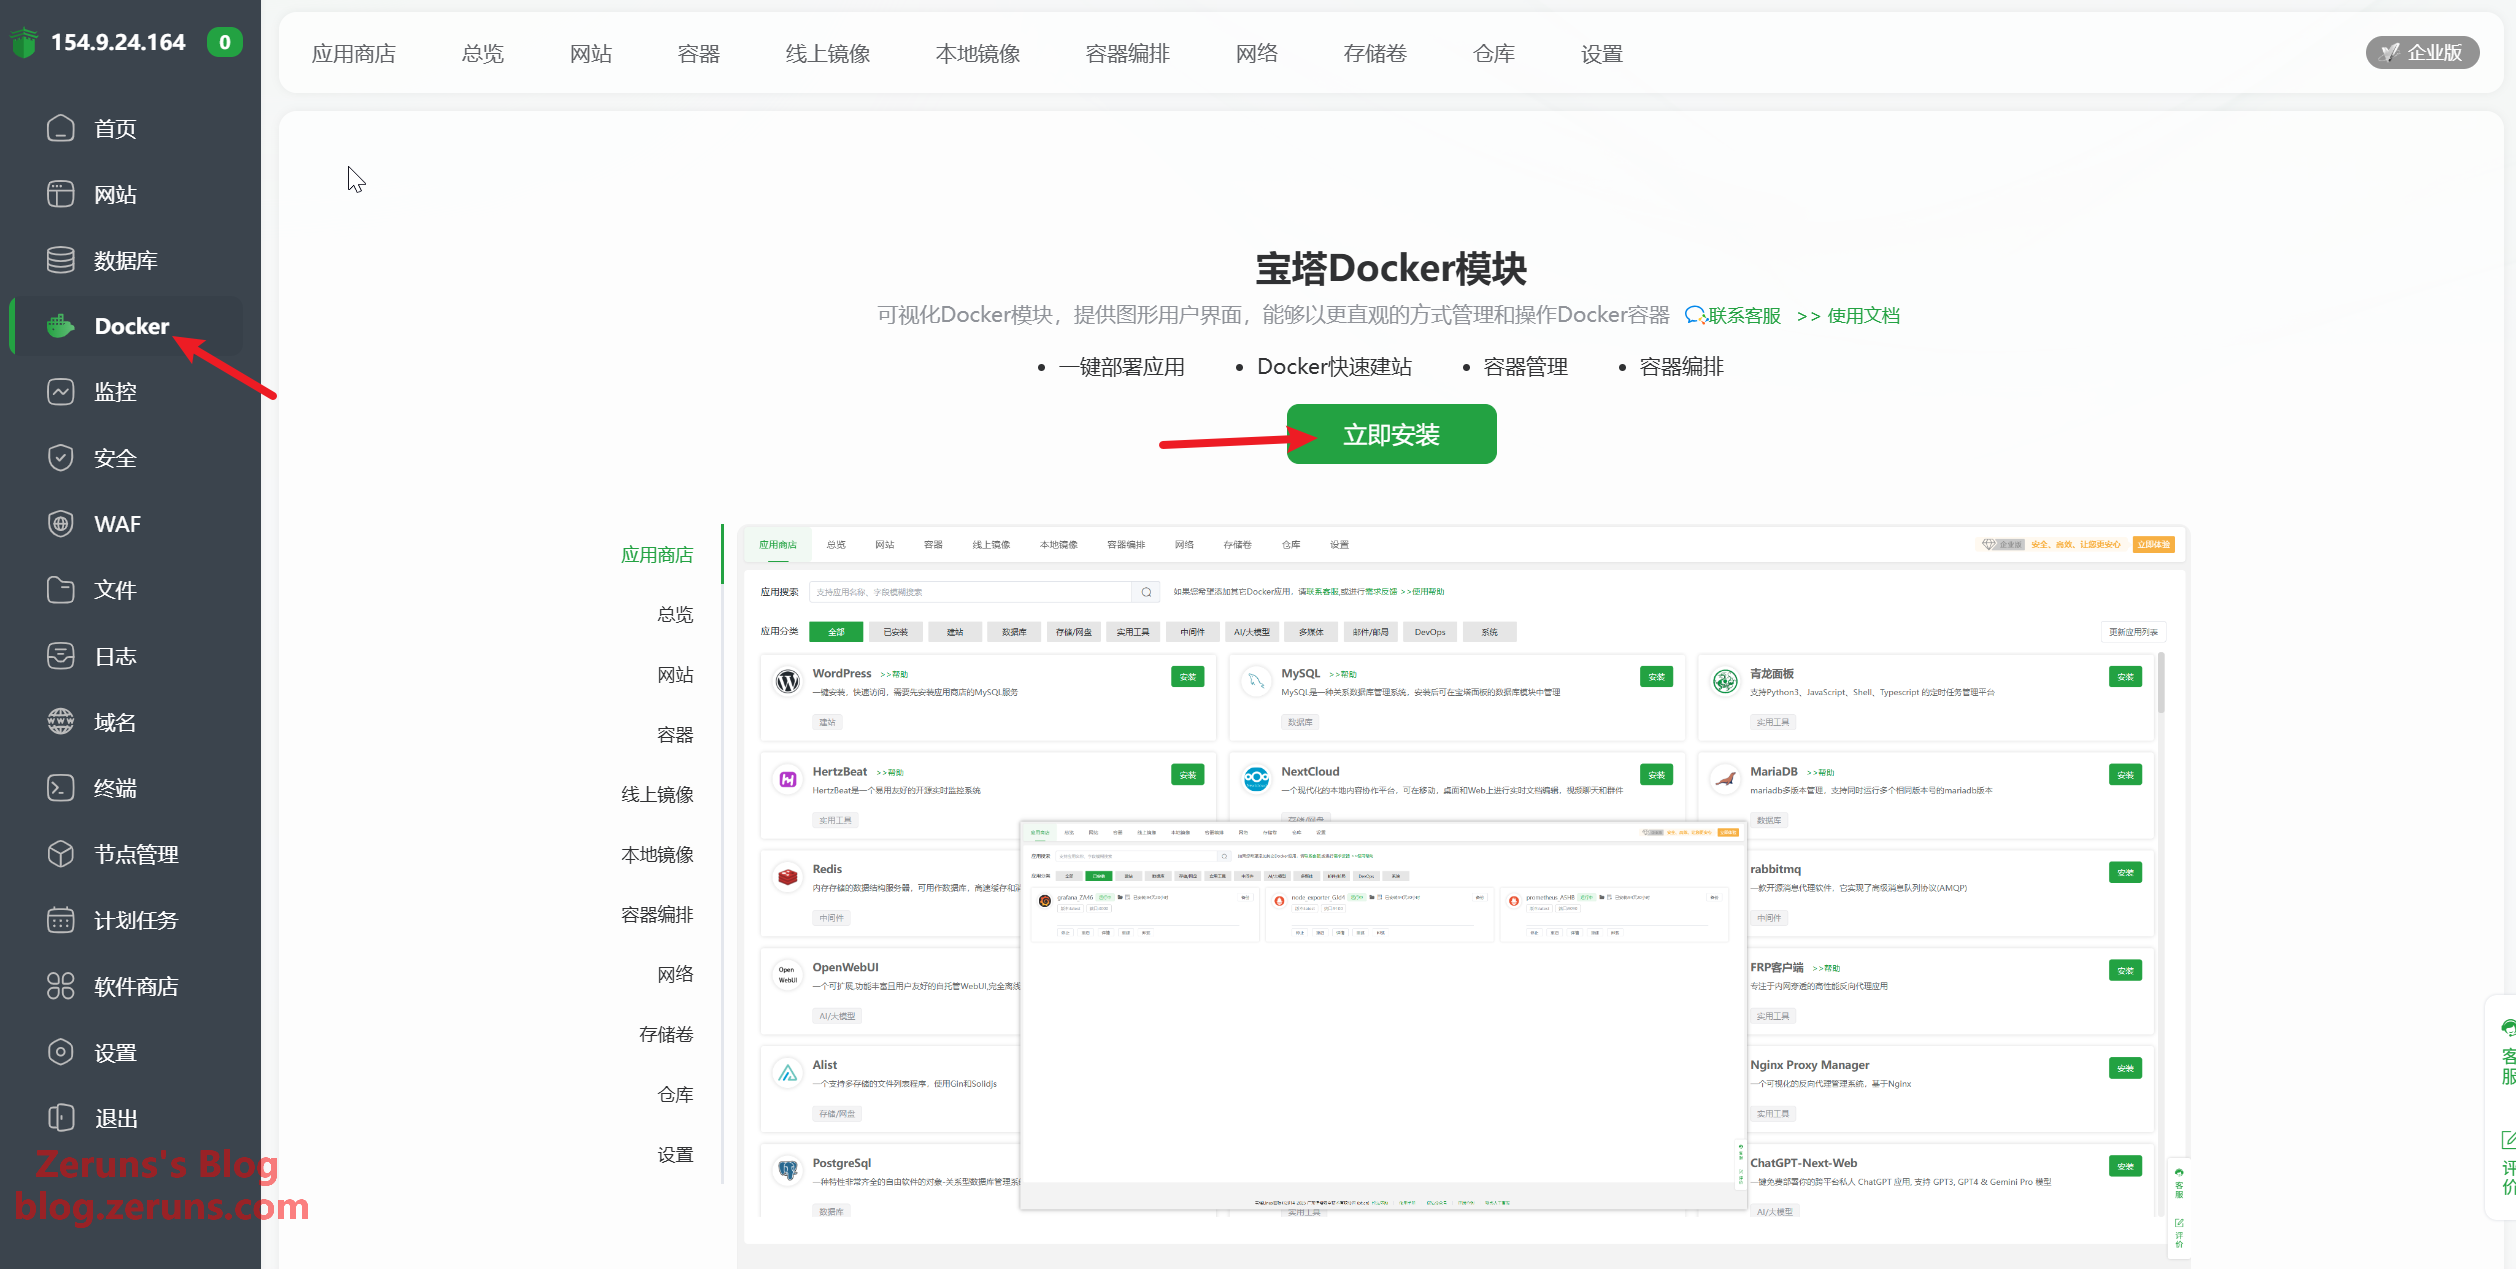
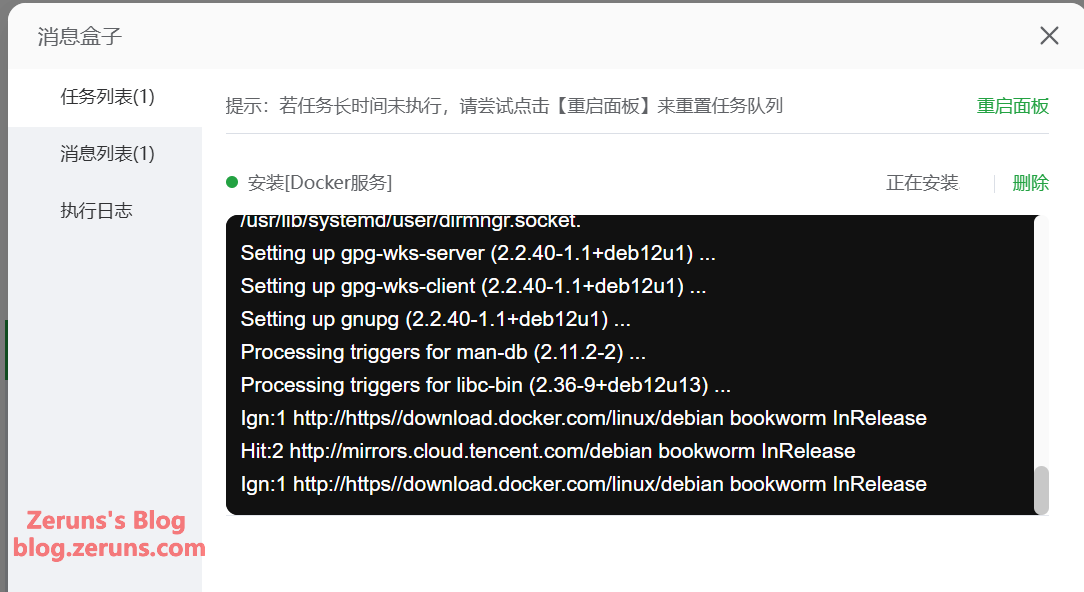
Discourse requires Docker, so first install Docker via the BT Panel: click Docker → Install Now, choose Default, then Confirm and wait for completion.
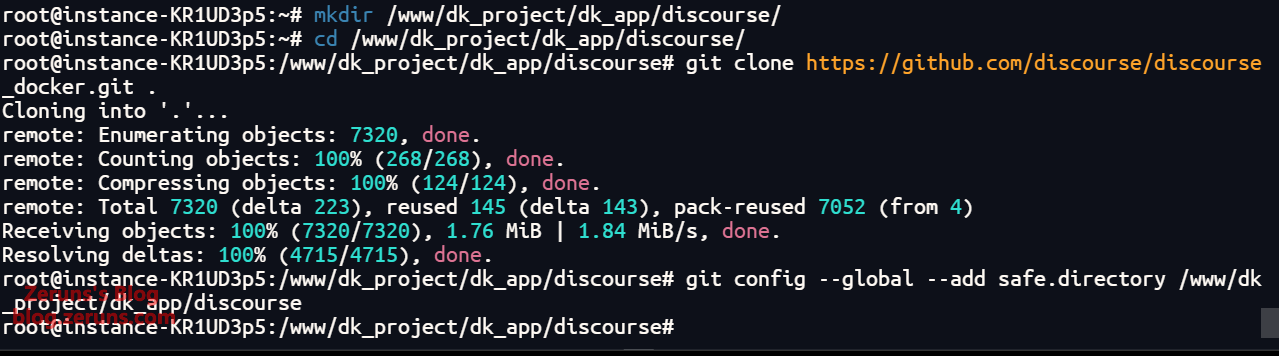
Back in the SSH terminal, download the Discourse source code (execute line by line; do not copy the comments).
# Create discourse directory
mkdir /www/dk_project/dk_app/discourse/
# Enter discourse directory
cd /www/dk_project/dk_app/discourse/
# Clone project
git clone https://github.com/discourse/discourse_docker.git .
# Add this discourse directory to the global safe list to prevent warning errors
git config --global --add safe.directory /www/dk_project/dk_app/discourse
Configure Discourse – because the BT Panel occupies the default ports 80/443 and our installation directory differs from the default, we cannot run ./discourse-setup directly. Instead, copy the template file and edit it.
cp /www/dk_project/dk_app/discourse/samples/standalone.yml /www/dk_project/dk_app/discourse/containers/app.yml
In the BT Panel file manager, navigate to /www/dk_project/dk_app/discourse/containers and edit app.yml. Below is the translated version of the file (all comments have been converted to English).
## This is an all‑in‑one, standalone Discourse Docker container template
##
## After modifying this file you must rebuild the container with:
## /var/discourse/launcher rebuild app
##
## Edit with extreme care!
## YAML is very sensitive to spacing and alignment.
## Use http://www.yamllint.com/ to validate if needed.

templates:
  - "templates/postgres.template.yml"  # PostgreSQL database configuration template
  - "templates/redis.template.yml"     # Redis cache configuration template
  - "templates/web.template.yml"       # Basic web service configuration template
  - "templates/web.ratelimited.template.yml"  # Web service with rate limiting template
  ## To add Let's Encrypt (HTTPS), uncomment the two lines below
  #- "templates/web.ssl.template.yml"
  #- "templates/web.letsencrypt.ssl.template.yml"

## Which TCP/IP ports should this container expose?
## If you want Discourse to share ports with Apache, Nginx, etc., see:
## https://meta.discourse.org/t/17247
expose:
  - "80:80"   # HTTP port
  - "443:443" # HTTPS port

params:
  db_default_text_search_config: "pg_catalog.english"  # Default DB text search config (English)

  ## Set db_shared_buffers to up to 25% of total memory.
  ## The launcher auto‑detects memory; you can override manually.
  #db_shared_buffers: "256MB"

  ## Improves sort performance but increases per‑connection memory usage.
  #db_work_mem: "40MB"

  ## Which Git version should this container use? (default: latest)
  #version: latest

env:
  LC_ALL: en_US.UTF-8  # System locale (UTF‑8, US English)
  LANG: en_US.UTF-8
  LANGUAGE: en_US.UTF-8
  # DISCOURSE_DEFAULT_LOCALE: en  # Default Discourse language (English)

  ## Number of concurrent web workers (depends on RAM and CPU cores).
  ## The launcher auto‑detects CPU; you can override manually.
  #UNICORN_WORKERS: 3

  ## TODO: The domain name this Discourse instance will respond to (required).
  ## Discourse cannot run directly on a bare IP address.
  DISCOURSE_HOSTNAME: 'discourse.example.com'

  ## If you want the container to use the same hostname as above (‑h option), uncomment.
  ## (Default hostname format: "$hostname-$config")
  #DOCKER_USE_HOSTNAME: true

  ## TODO: List of emails (comma‑separated) that will be set as admin/developer on first registration.
  ## Example: '[email protected],[email protected]'
  DISCOURSE_DEVELOPER_EMAILS: '[email protected],[email protected]'

  ## TODO: SMTP server for account verification and notifications.
  # SMTP address is required.
  # Warning: put the SMTP password in quotes to avoid issues with special characters.
  DISCOURSE_SMTP_ADDRESS: smtp.example.com  # SMTP server address
  #DISCOURSE_SMTP_PORT: 587                 # SMTP port (default 587)
  DISCOURSE_SMTP_USER_NAME: [email protected]  # SMTP username
  DISCOURSE_SMTP_PASSWORD: "pa$$word"       # SMTP password
  #DISCOURSE_SMTP_ENABLE_START_TLS: true    # Enable STARTTLS (default true)
  #DISCOURSE_SMTP_DOMAIN: discourse.example.com  # SMTP domain (required by some providers)
  #DISCOURSE_NOTIFICATION_EMAIL: [email protected]  # Notification sender address
  #DISCOURSE_SMTP_OPENSSL_VERIFY_MODE: peer  # SSL verify mode (default peer)
  #DISCOURSE_SMTP_AUTHENTICATION: plain     # SMTP auth method (default plain)

  ## If you added the Let's Encrypt template, uncomment to obtain a free SSL certificate.
  #LETSENCRYPT_ACCOUNT_EMAIL: [email protected]

  ## HTTP/HTTPS CDN URL for this Discourse instance (pull mode).
  ## See https://meta.discourse.org/t/14857
  #DISCOURSE_CDN_URL: https://discourse-cdn.example.com

  ## MaxMind GeoIP account ID and license key for IP lookups.
  ## See https://meta.discourse.org/t/-/173941
  #DISCOURSE_MAXMIND_ACCOUNT_ID: 123456
  #DISCOURSE_MAXMIND_LICENSE_KEY: 1234567890123456

## Docker containers are stateless; all data is stored under /shared.
volumes:
  - volume:
      host: /var/discourse/shared/standalone  # Host shared data directory
      guest: /shared                          # Container path
  - volume:
      host: /var/discourse/shared/standalone/log/var-log  # Host log directory
      guest: /var/log                                      # Container log path

## Plugin configuration goes here.
## See https://meta.discourse.org/t/19157
hooks:
  after_code:
    - exec:
        cd: $home/plugins  # Enter plugins directory
        cmd:
          - git clone https://github.com/discourse/docker_manager.git  # Clone Docker manager plugin

## Any custom commands to run after build.
run:
  - exec: echo "Beginning of custom commands"  # Start marker
  ## To set the “from” address for the first registration email, uncomment and modify:
  ## After receiving the first registration email, comment this line again. Run only once.
  #- exec: rails r "SiteSetting.notification_email='[email protected]'"
  - exec: echo "End of custom commands"  # End marker
The points that need editing are as follows:
1. Port mapping
expose:
  - "180:80"   # http
  - "1443:443" # https
Here we map the container’s ports to 180 and 1443 on the host to avoid conflicts with the panel. You can choose other ports, but remember to use the same numbers later. We also prevent the container from exposing itself directly to the public internet, allowing us to use the BT Panel’s Nginx firewall.
2. Bind domain
DISCOURSE_HOSTNAME: 'bbs.zeruns.xyz'
Replace the domain inside the quotes with your own.
3. Administrator email address
DISCOURSE_DEVELOPER_EMAILS: '[email protected]'
Replace the email with your own; you must set this before the first registration, otherwise you won’t be able to activate the admin account.
4. Email sending configuration
DISCOURSE_SMTP_ADDRESS: smtp.qq.com
DISCOURSE_SMTP_PORT: 587
DISCOURSE_SMTP_USER_NAME: [email protected]
DISCOURSE_SMTP_PASSWORD: "xxxxxxxx"
DISCOURSE_NOTIFICATION_EMAIL: [email protected]
Configure SMTP for sending emails. I use QQ Mail here; if you also use QQ, the address and port are the same. Change the email address to yours and generate an authorization code in QQ Mail’s “Account & Security → POP3/IMAP/SMTP/Exchange/CardDAV Service”.
You can also set up your own mail server with your domain; tutorial: https://blog.zeruns.com/archives/822.html
5. Configure persistent storage
volumes:
  - volume:
      host: /www/dk_project/dk_app/discourse/shared/standalone
      guest: /shared
  - volume:
      host: /www/dk_project/dk_app/discourse/shared/standalone/log/var-log
      guest: /var/log
These map two host folders into the container so that Discourse does not lose data when you “rebuild” it. Later you can manage these directories directly via the BT Panel file manager.
6. Change the containers directory permissions to 700
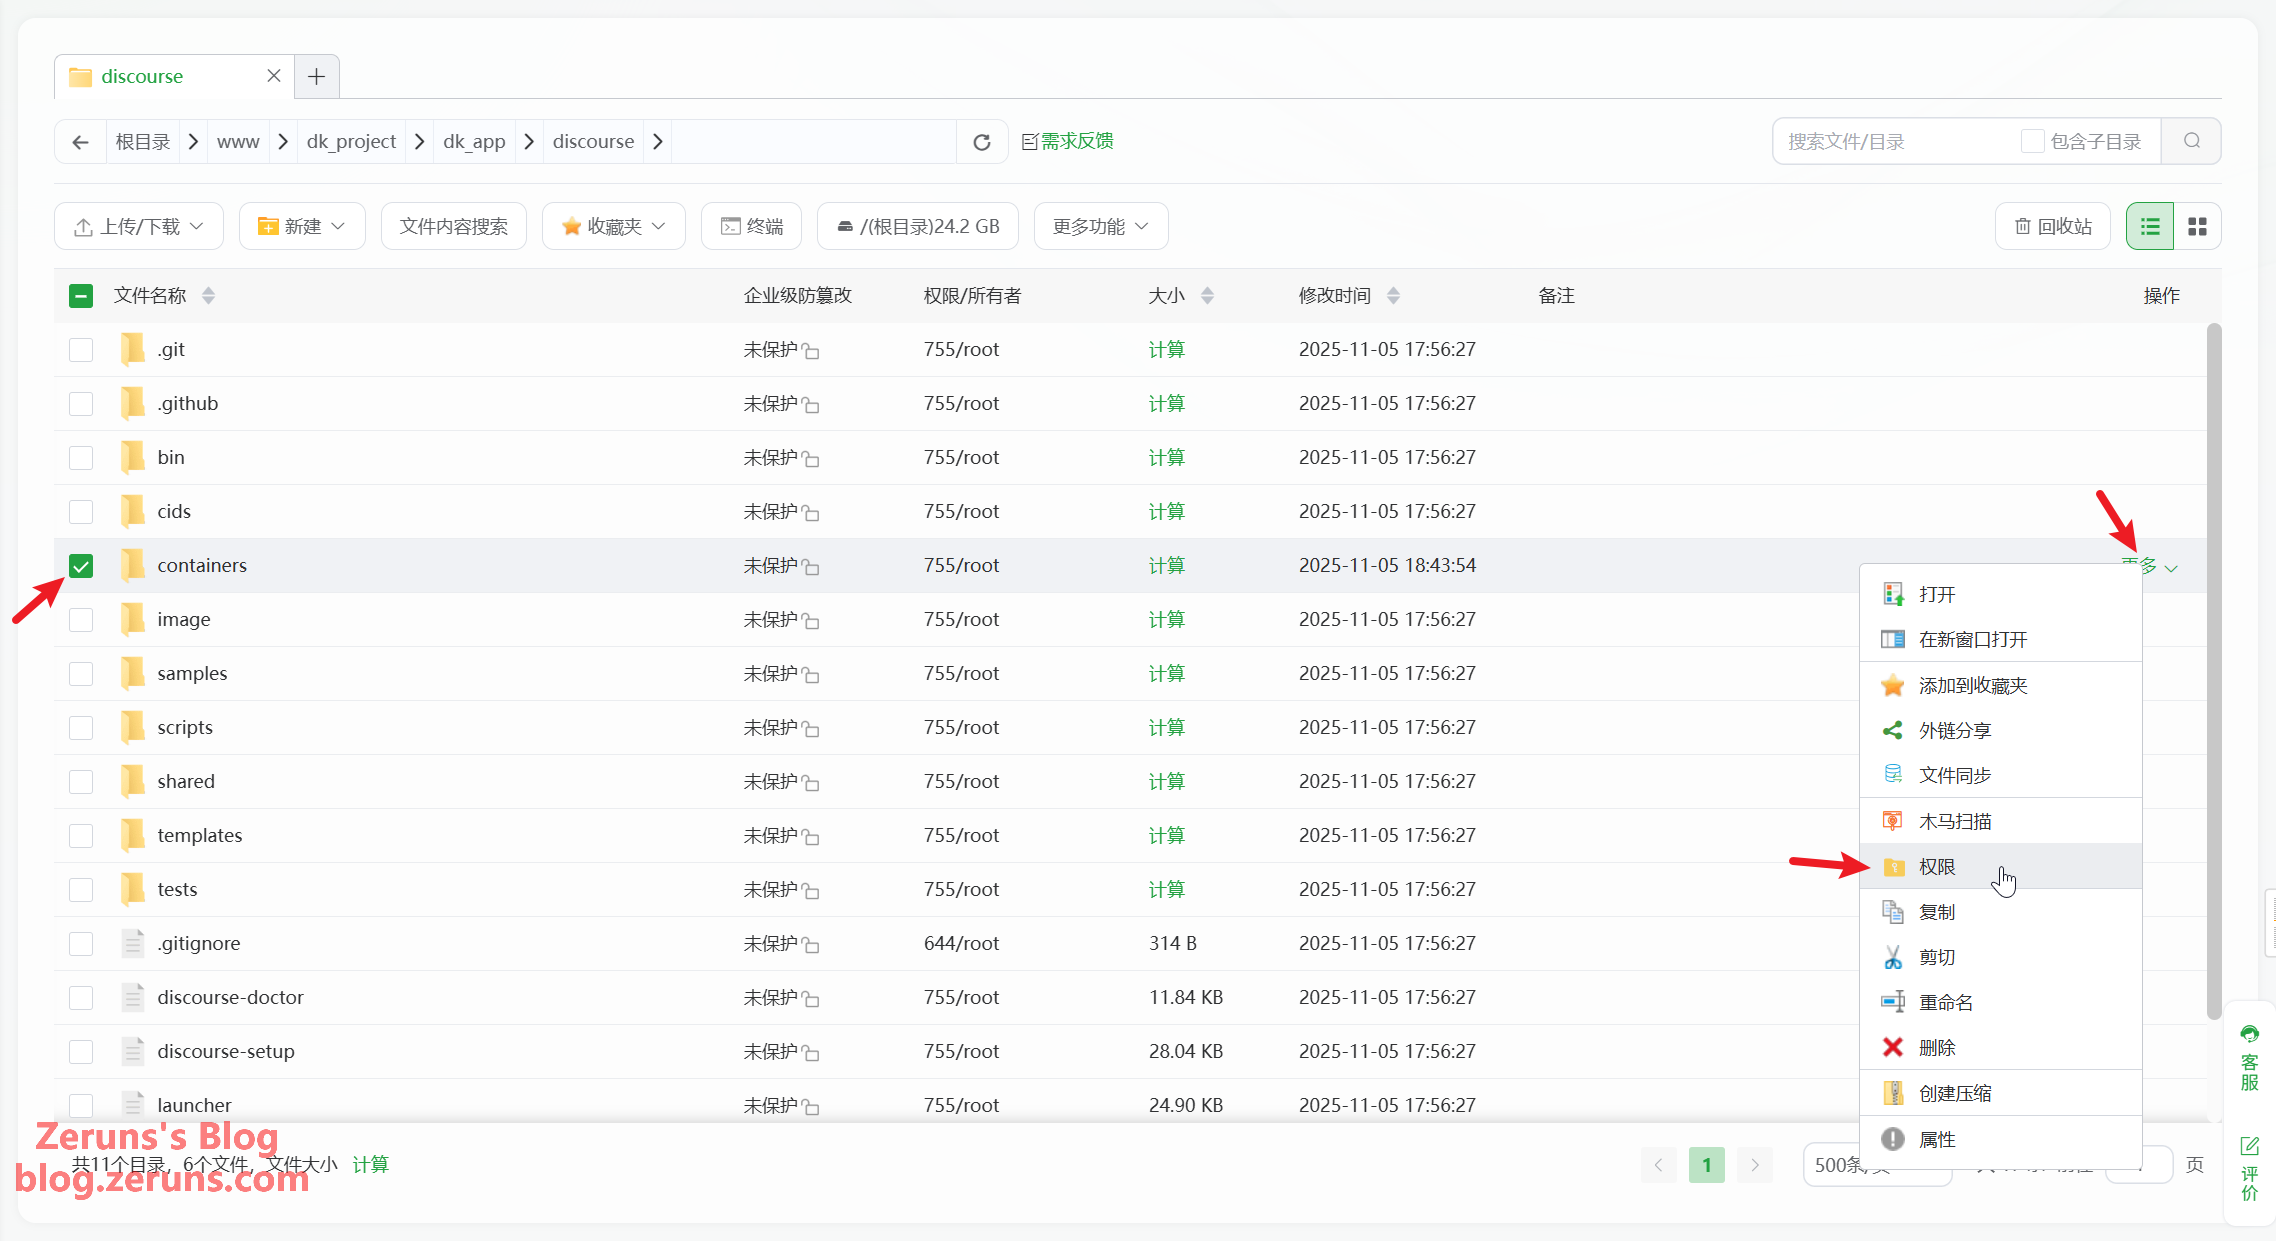
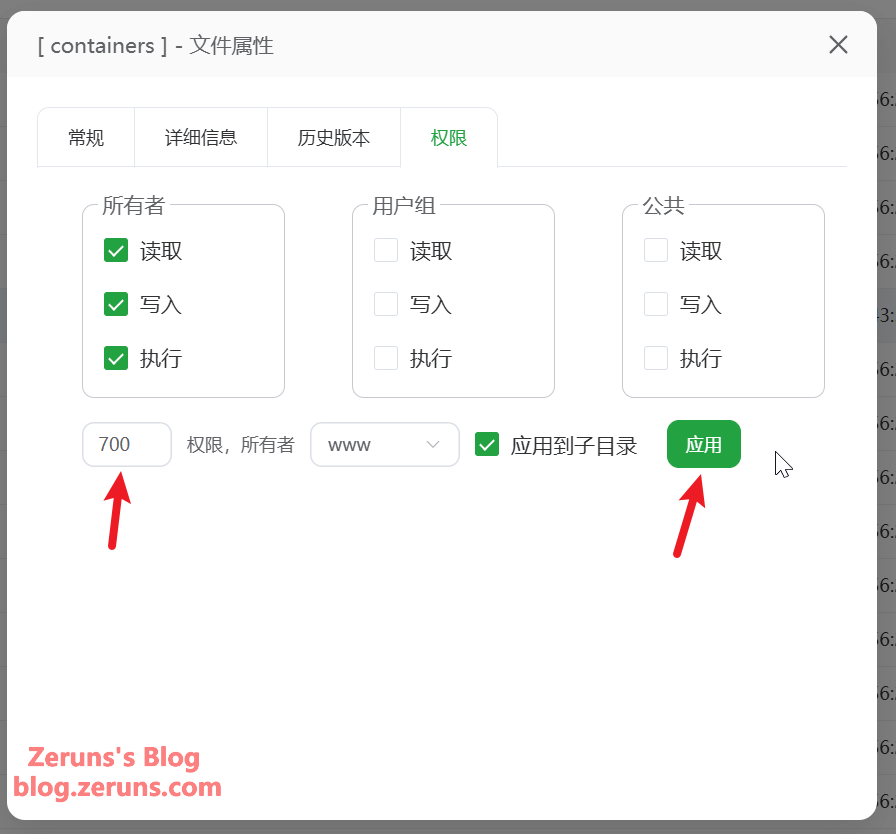
Start Installation
If the SSH connection was closed, reconnect.
cd /www/dk_project/dk_app/discourse
./launcher rebuild app
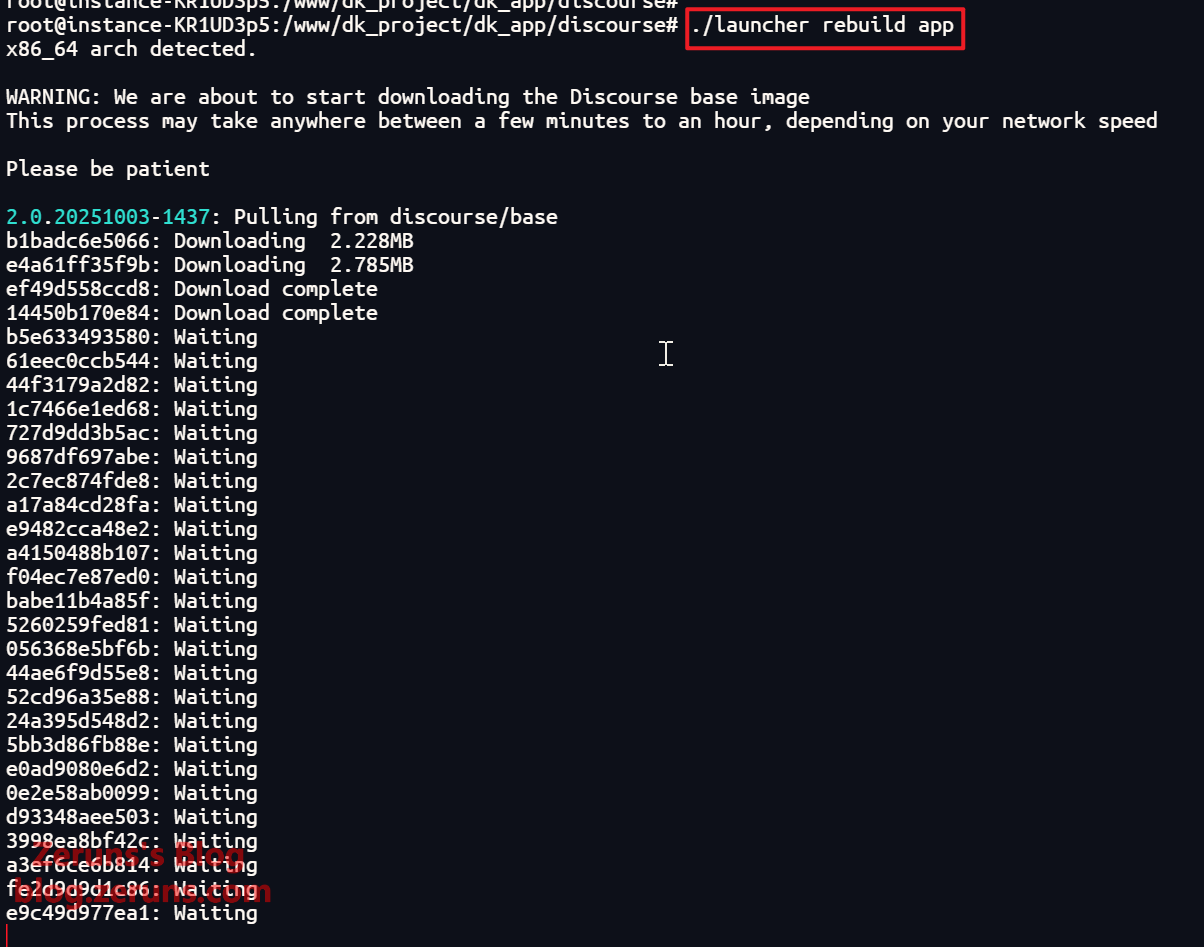
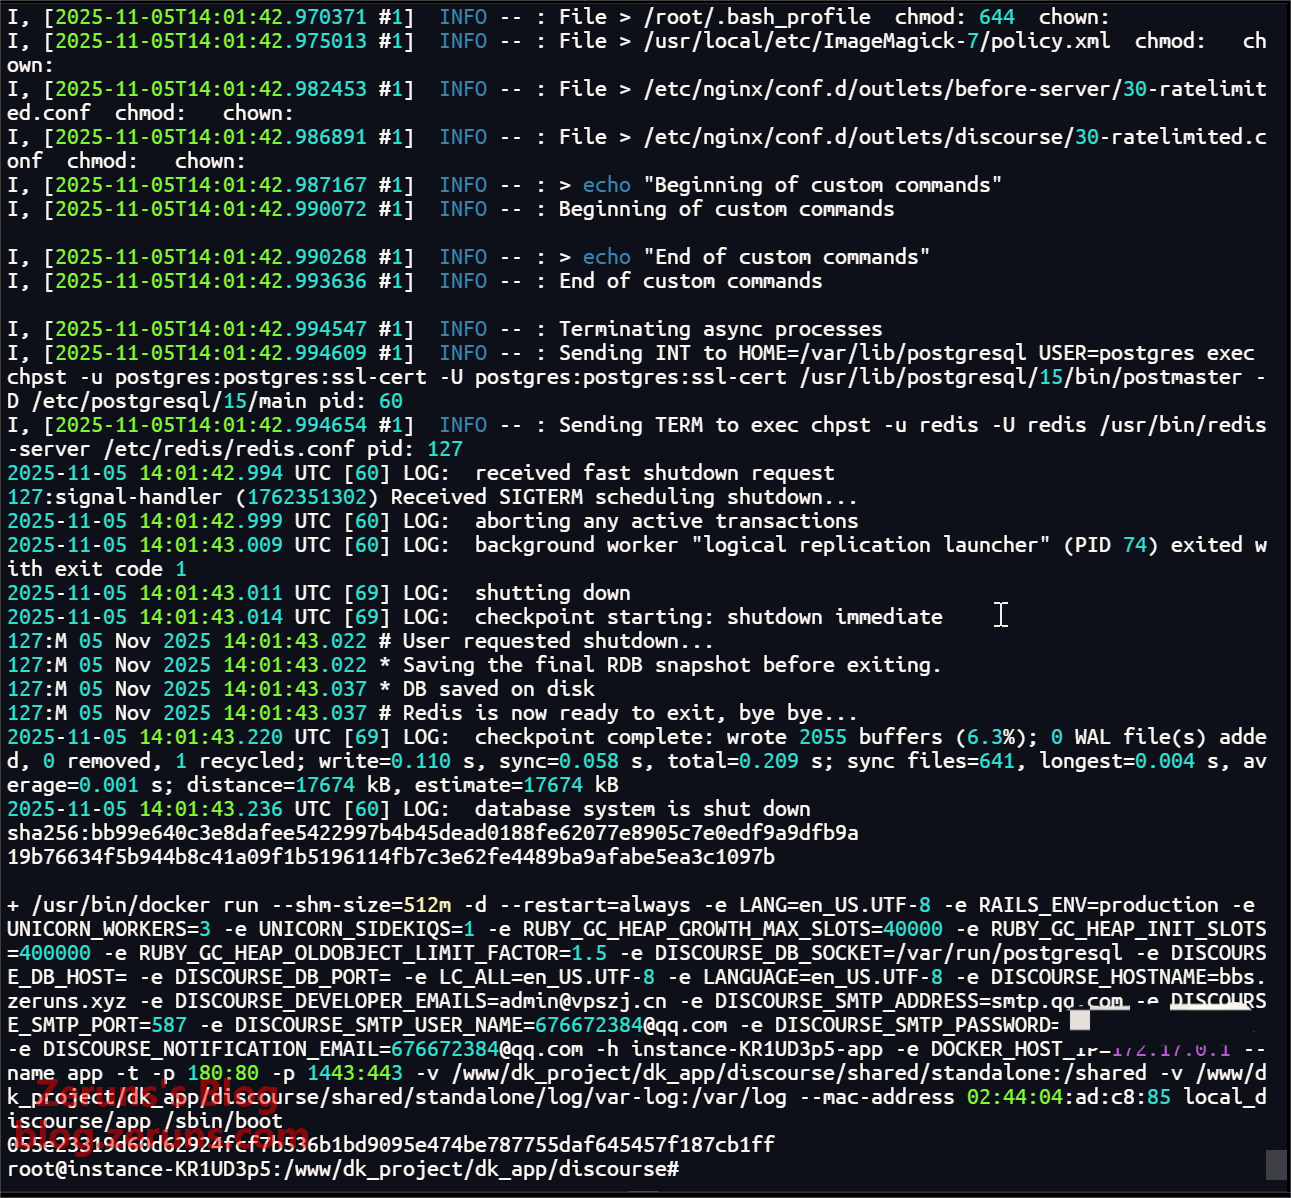
The process takes about ten minutes. If everything is correct, no errors will appear and you’ll return to the command prompt. You’ll then see a running container named app in the BT Panel’s “Containers” section.
Note: Domestic servers may fail to access GitHub; you’ll need to use a VPN or accept a longer installation time.

Configure Site and Certificate
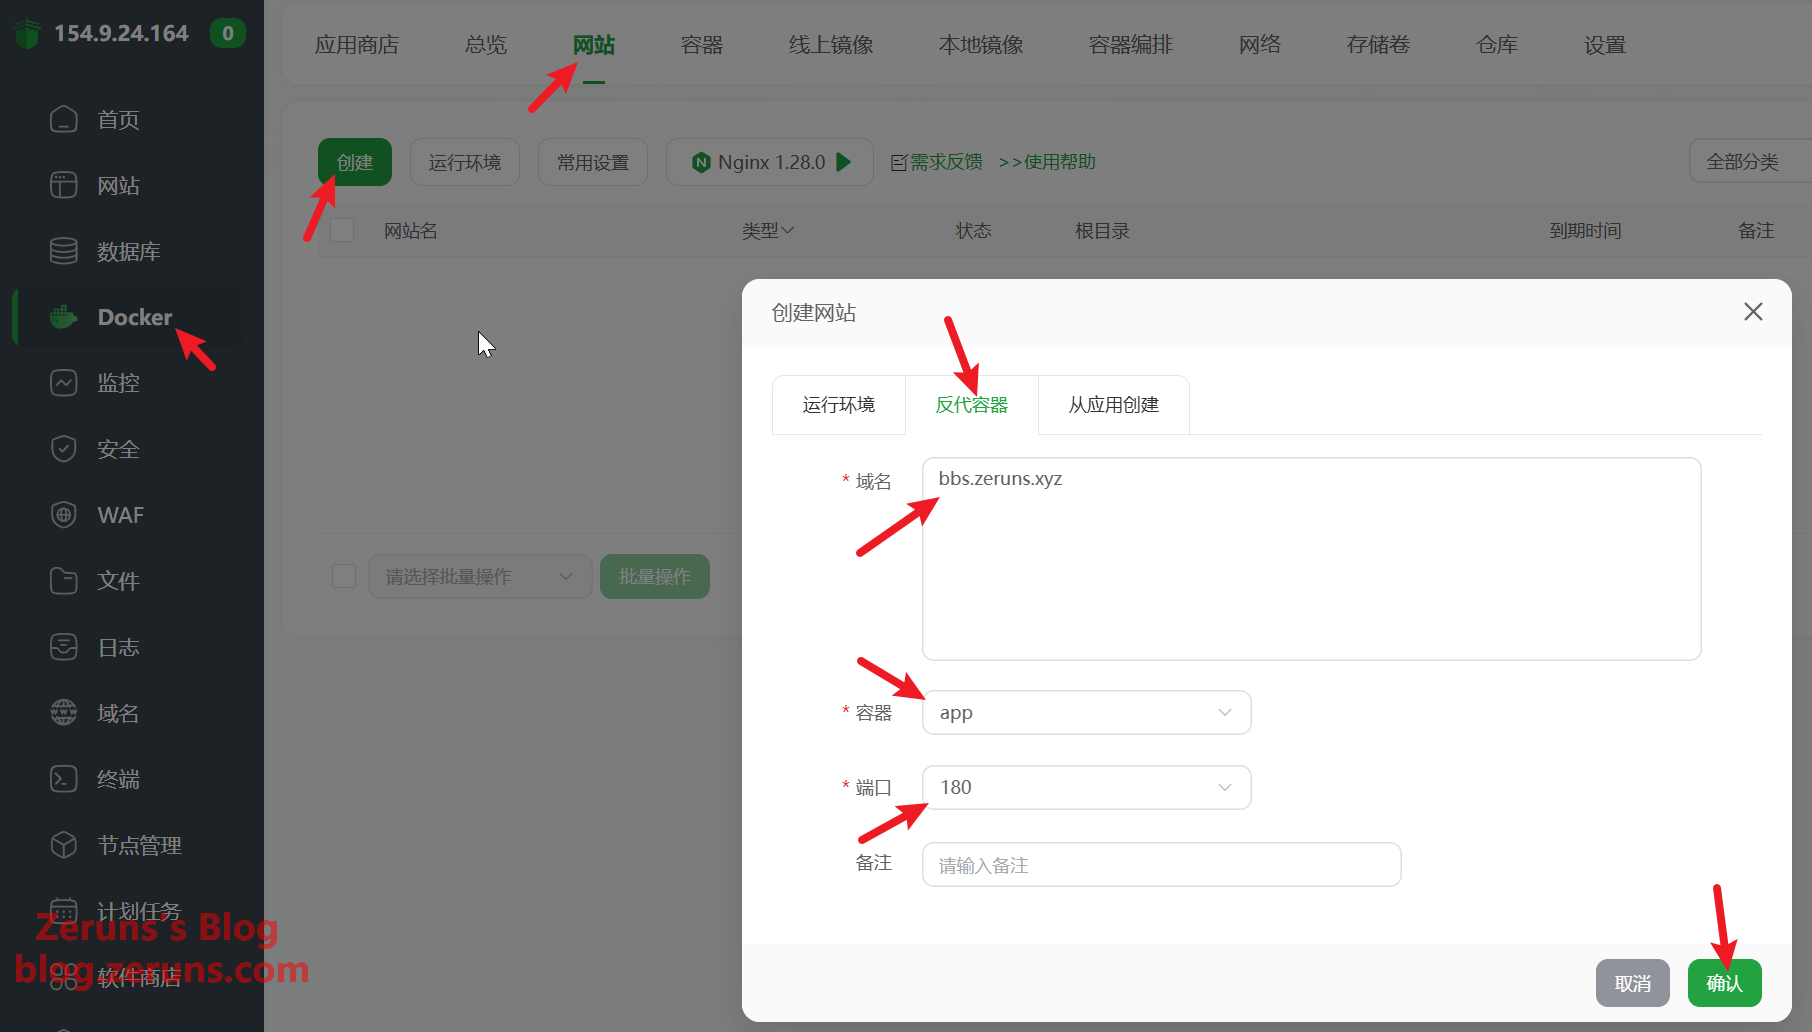
In the BT Panel, go to Docker → Sites → Create → Reverse Proxy Container and create a site.
- Domain: your own domain
- Container:
app - Port: the host port you mapped (e.g.,
180)
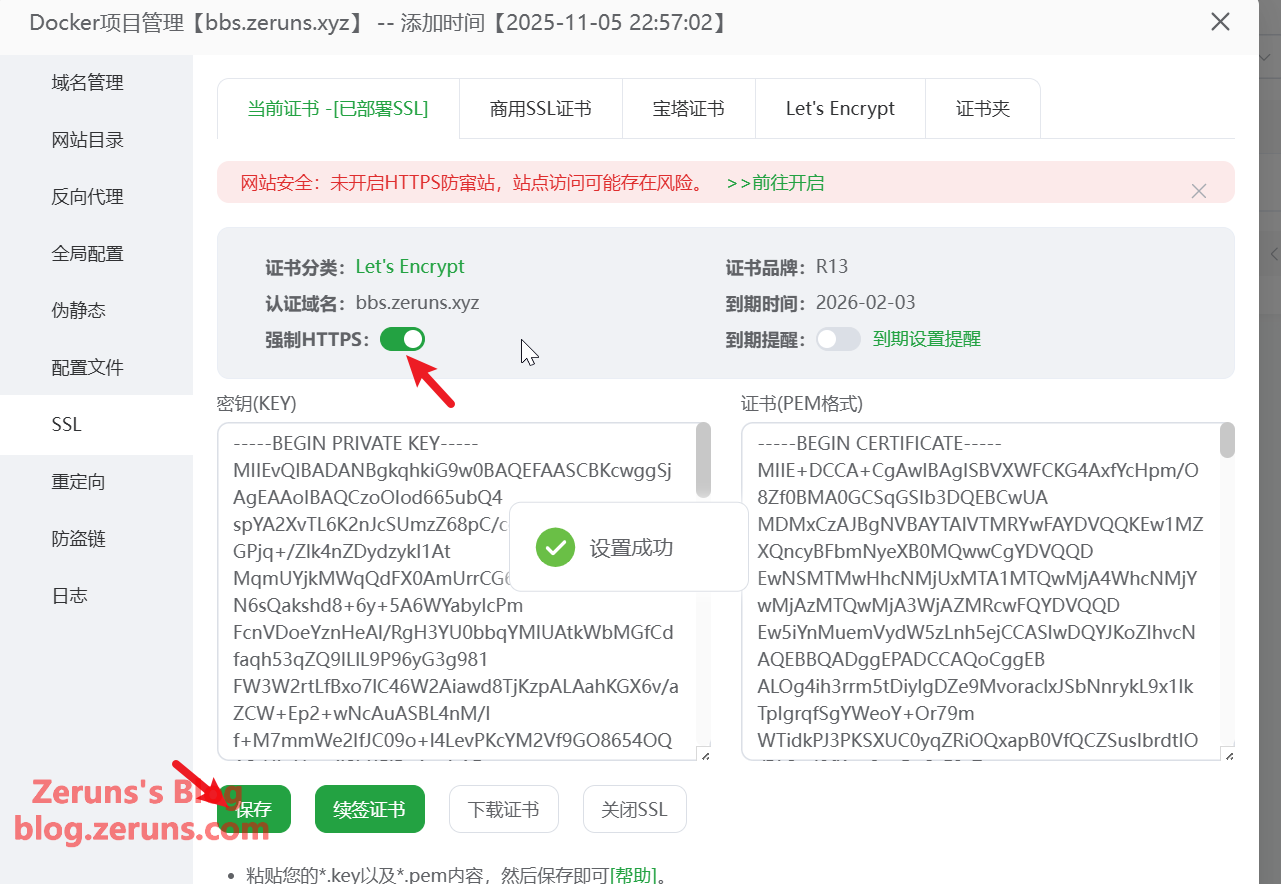
Click Settings for the newly created site, go to SSL → Let’s Encrypt → Request Certificate.

After the certificate is issued, enable Force HTTPS and Save.
Open your domain in a browser and follow the prompts to register an admin account.
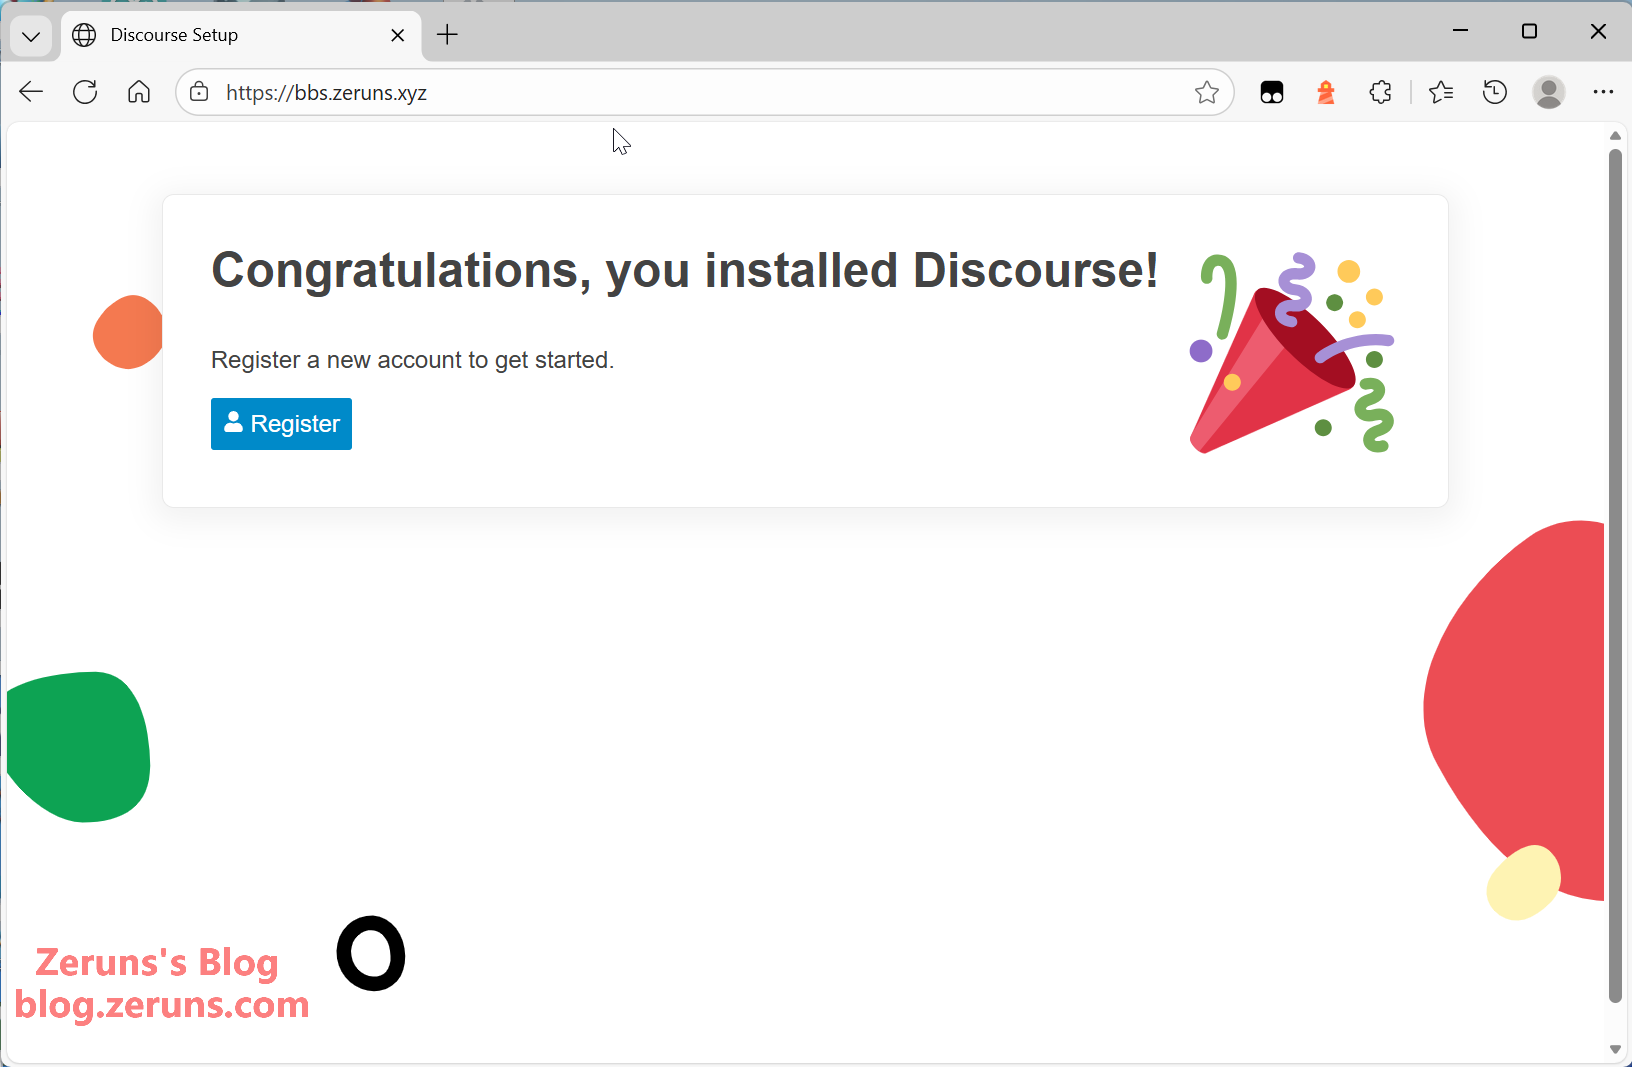
If the SMTP settings are correct, an email will be sent to the admin address you set earlier. Click the verification link in the email to activate the admin account.
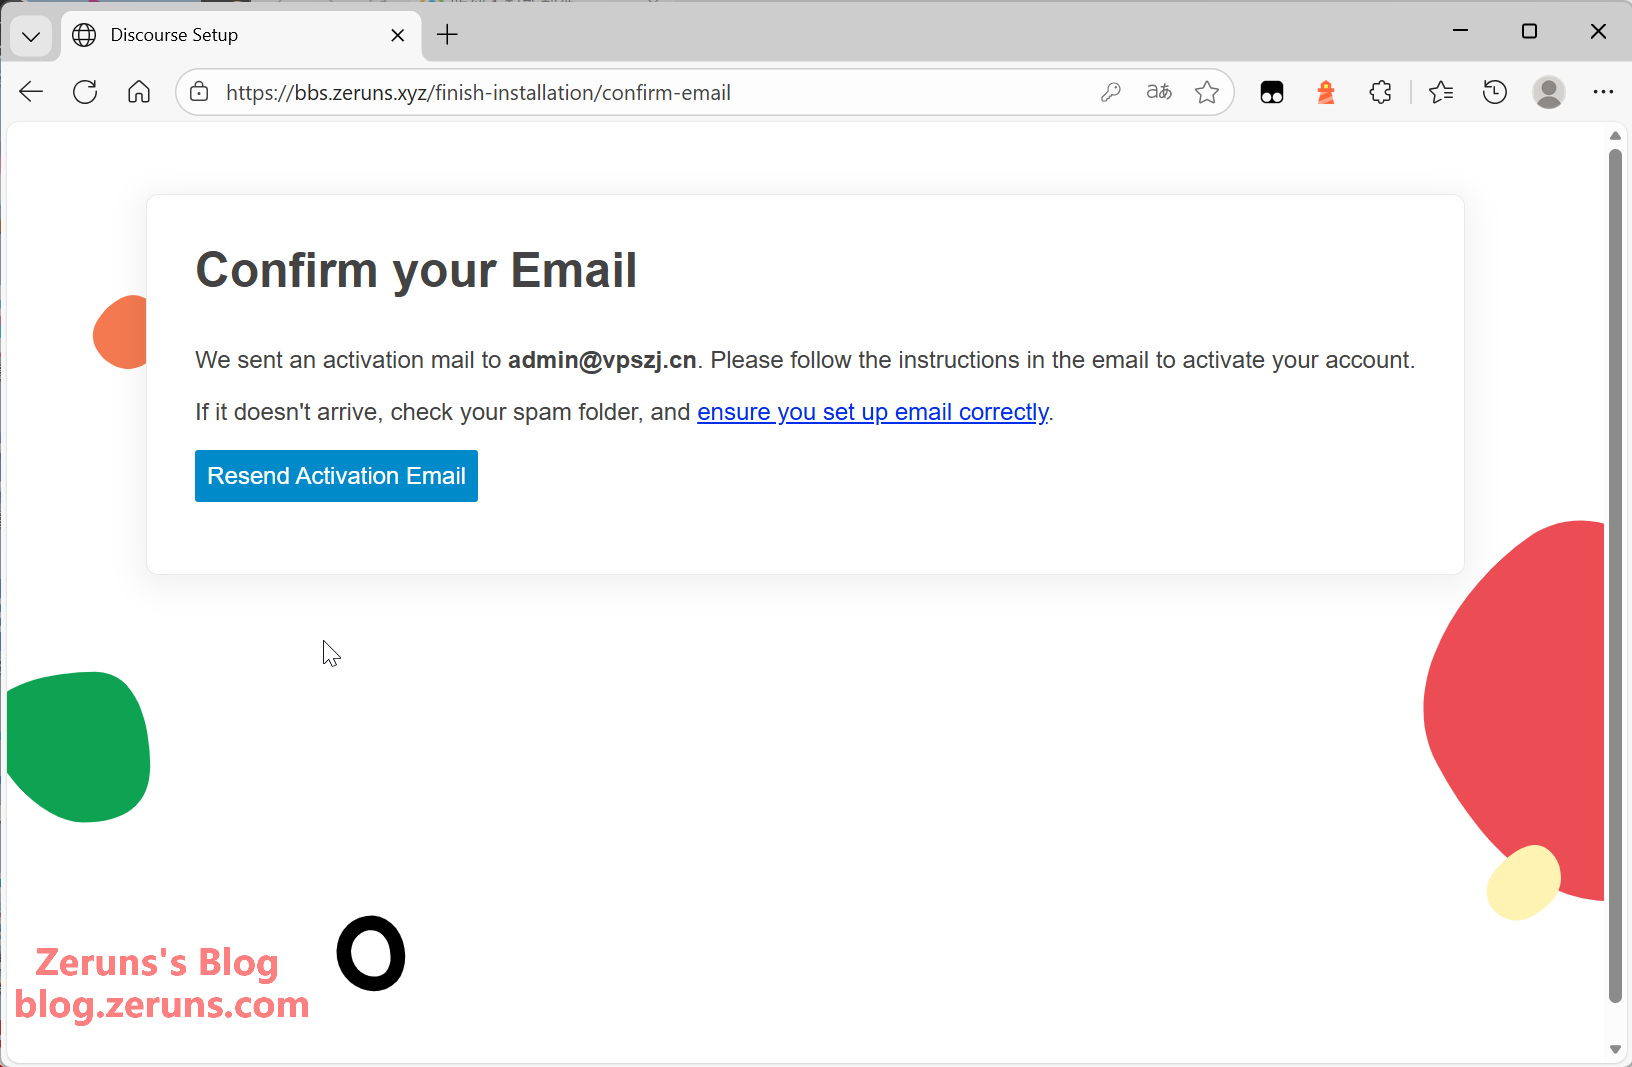
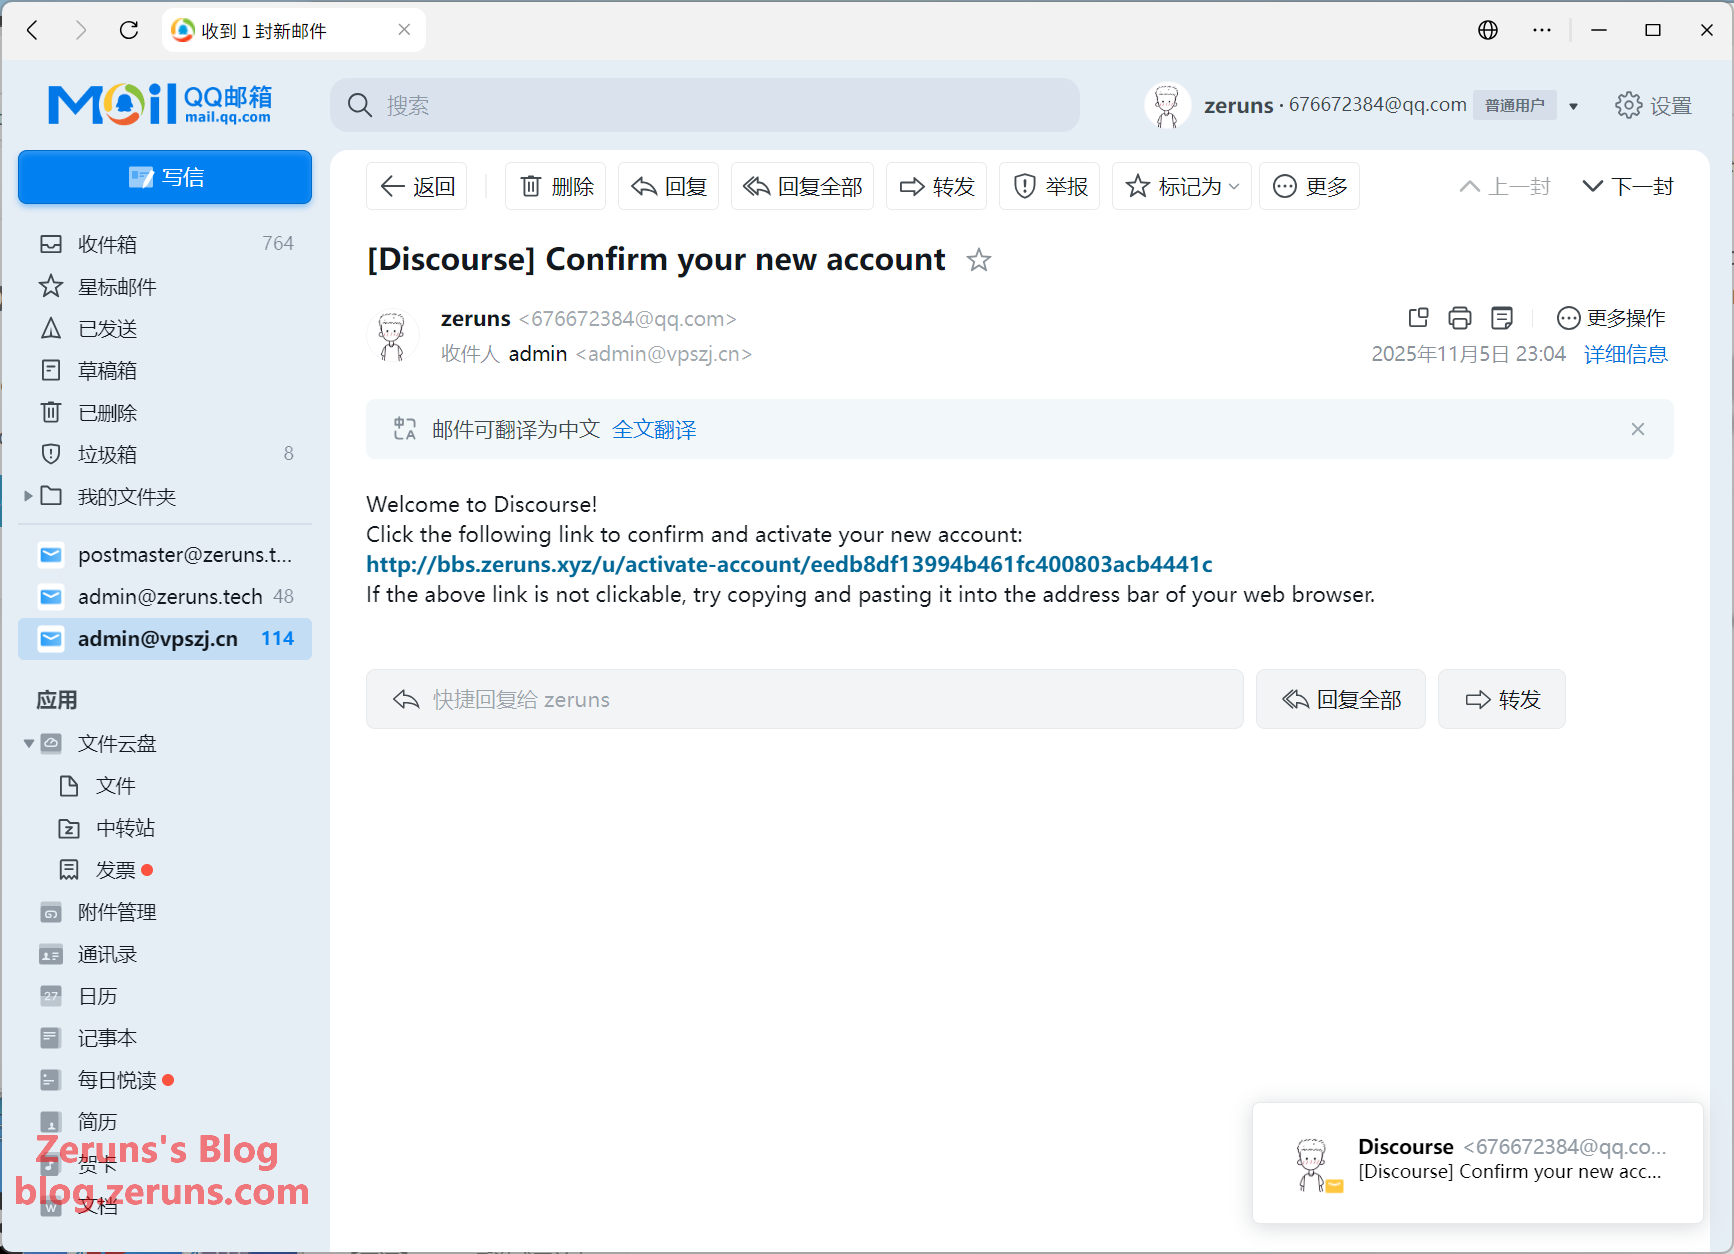
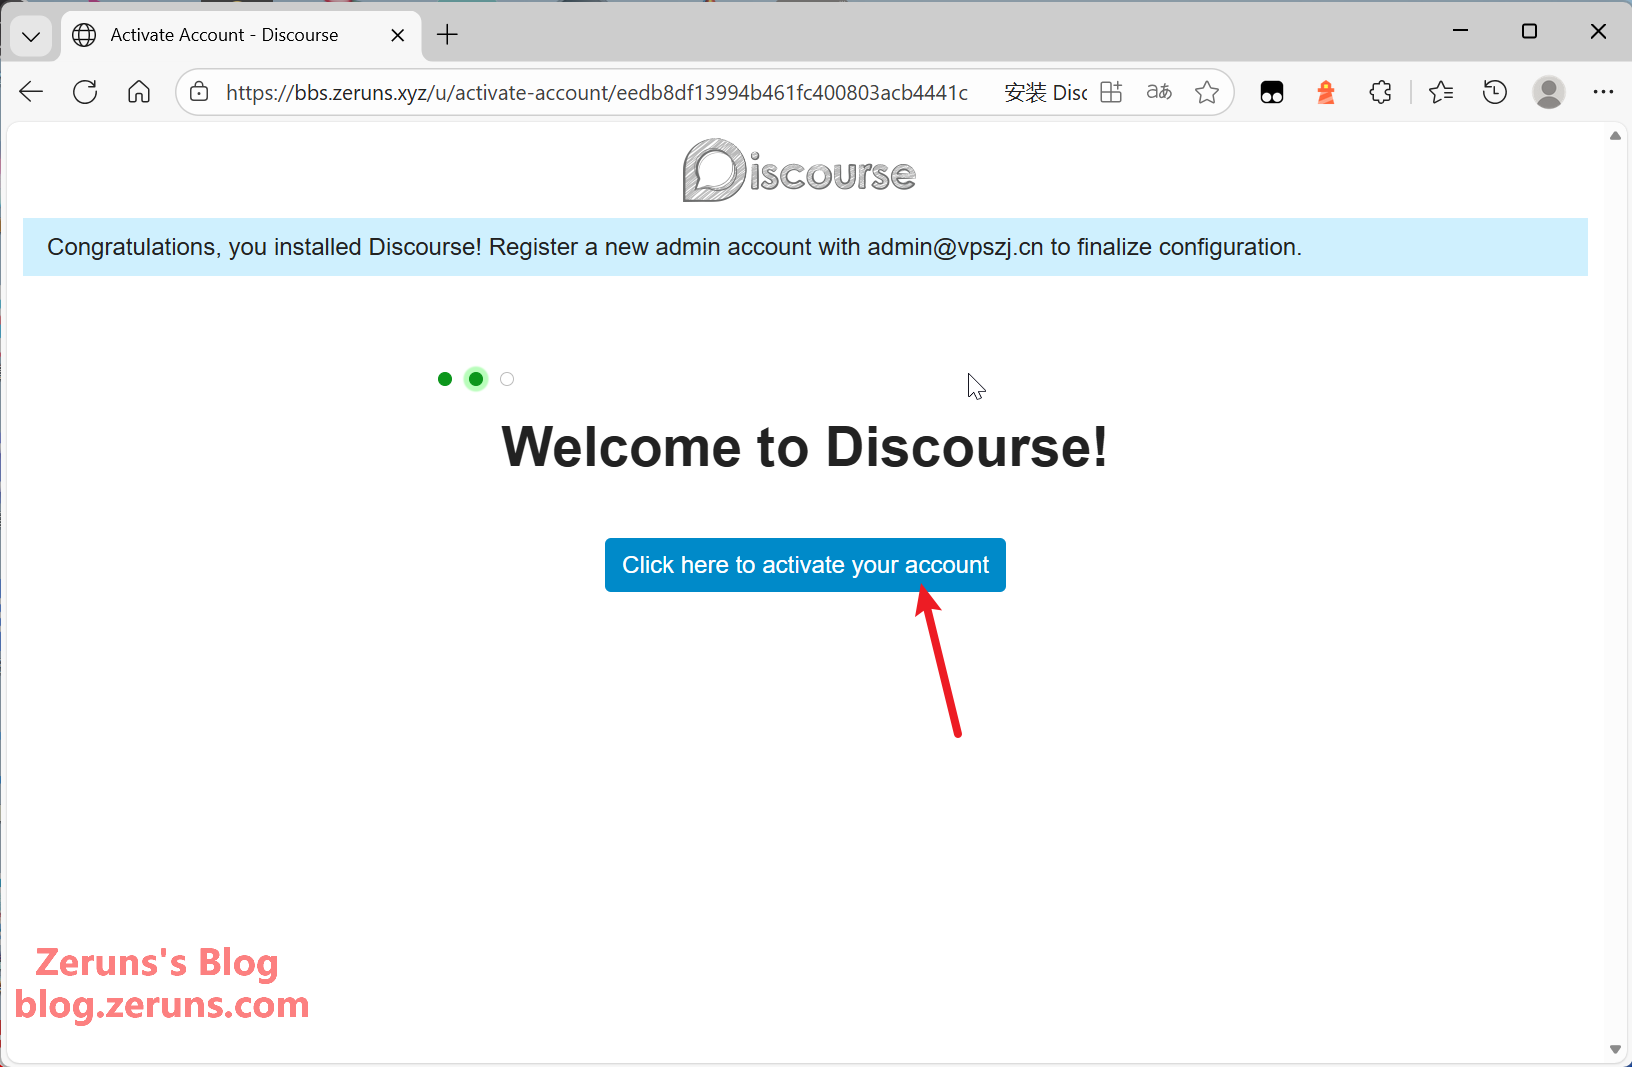
Complete the guided setup: site name, description, language, etc.
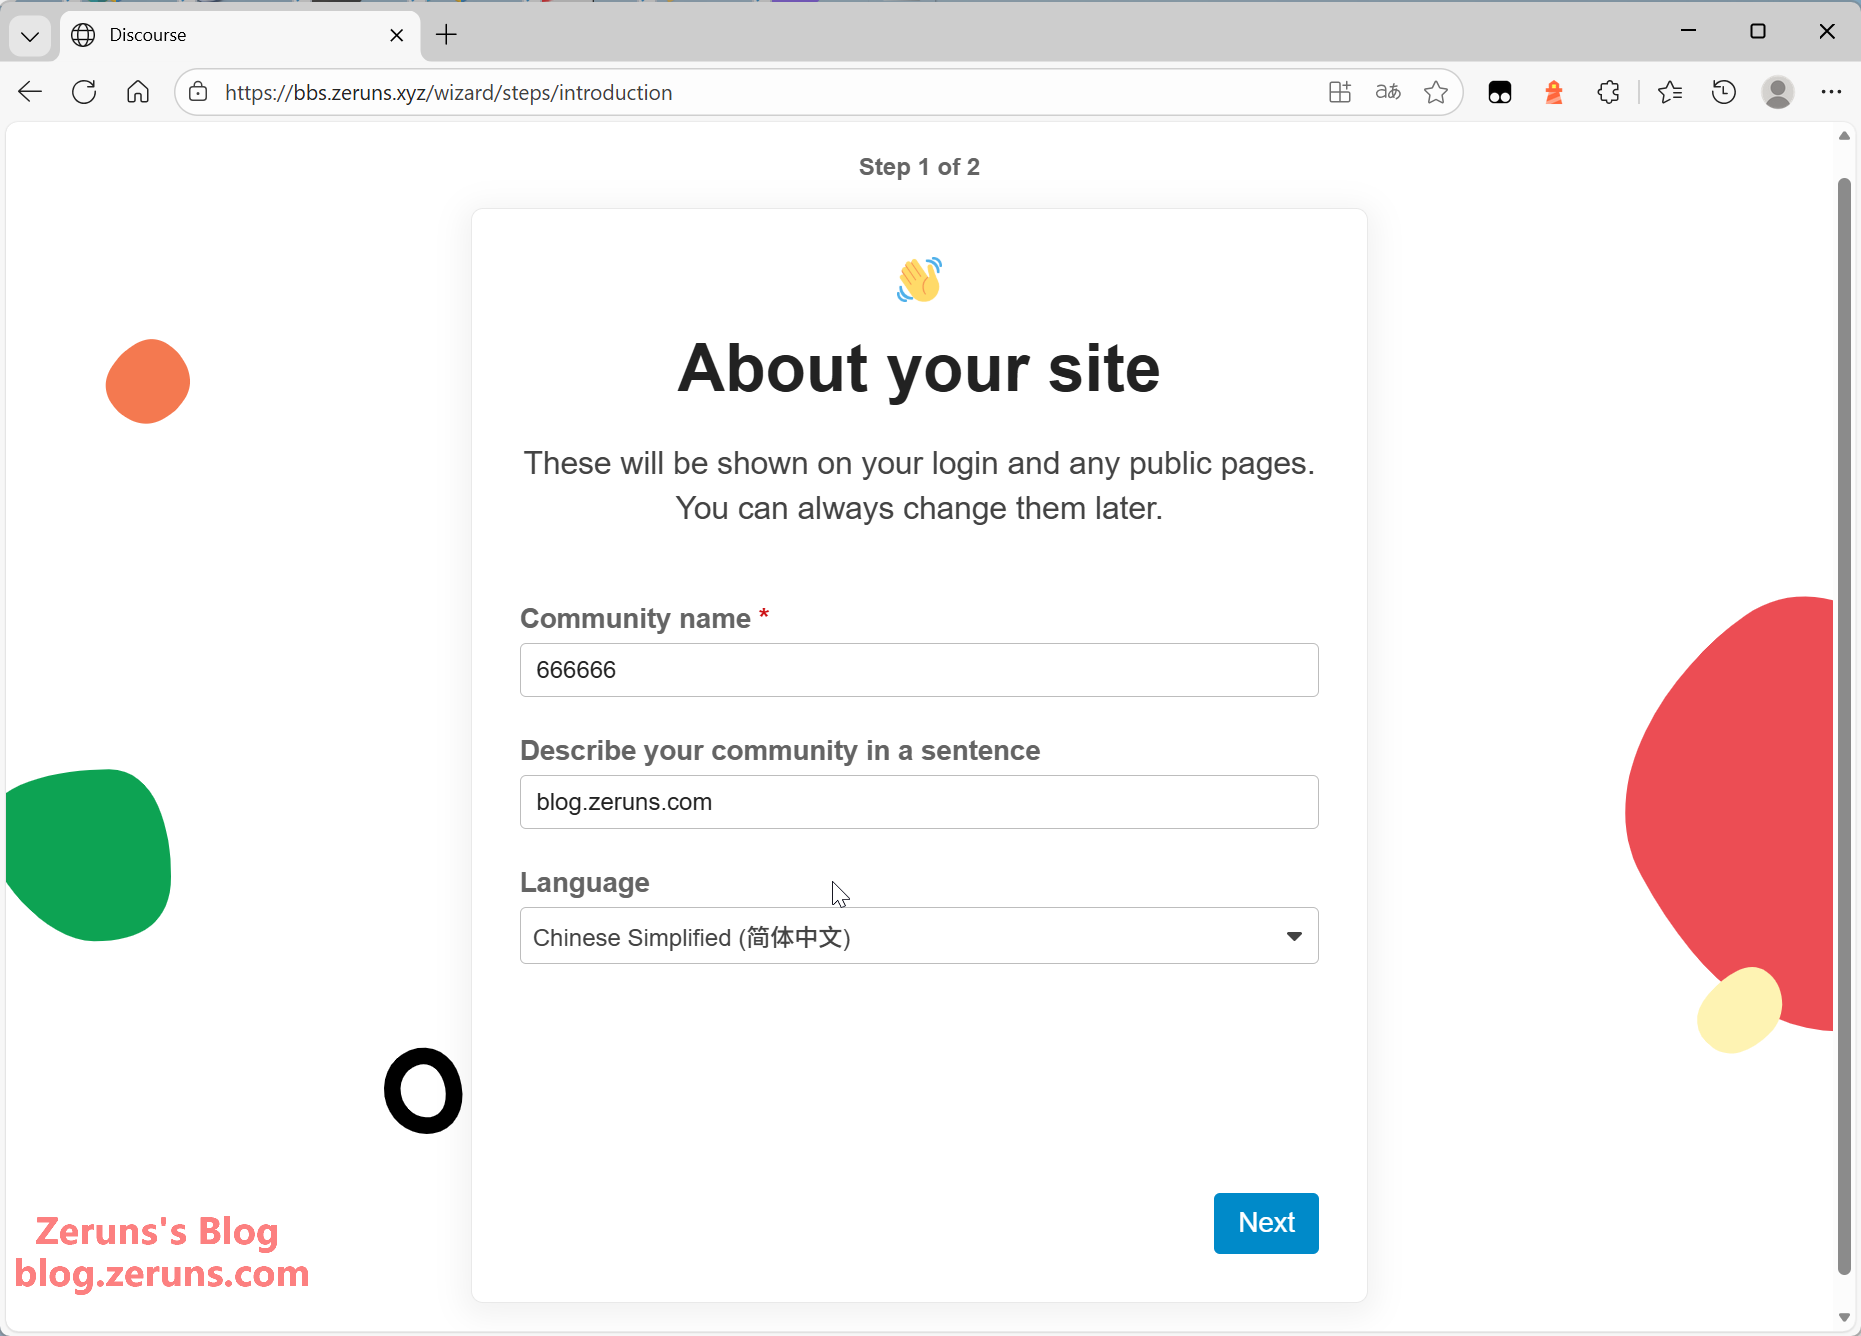
The site is now ready. You can access the admin panel from the left sidebar to adjust settings or install plugins (see the official Discourse community for plugins and tutorials).
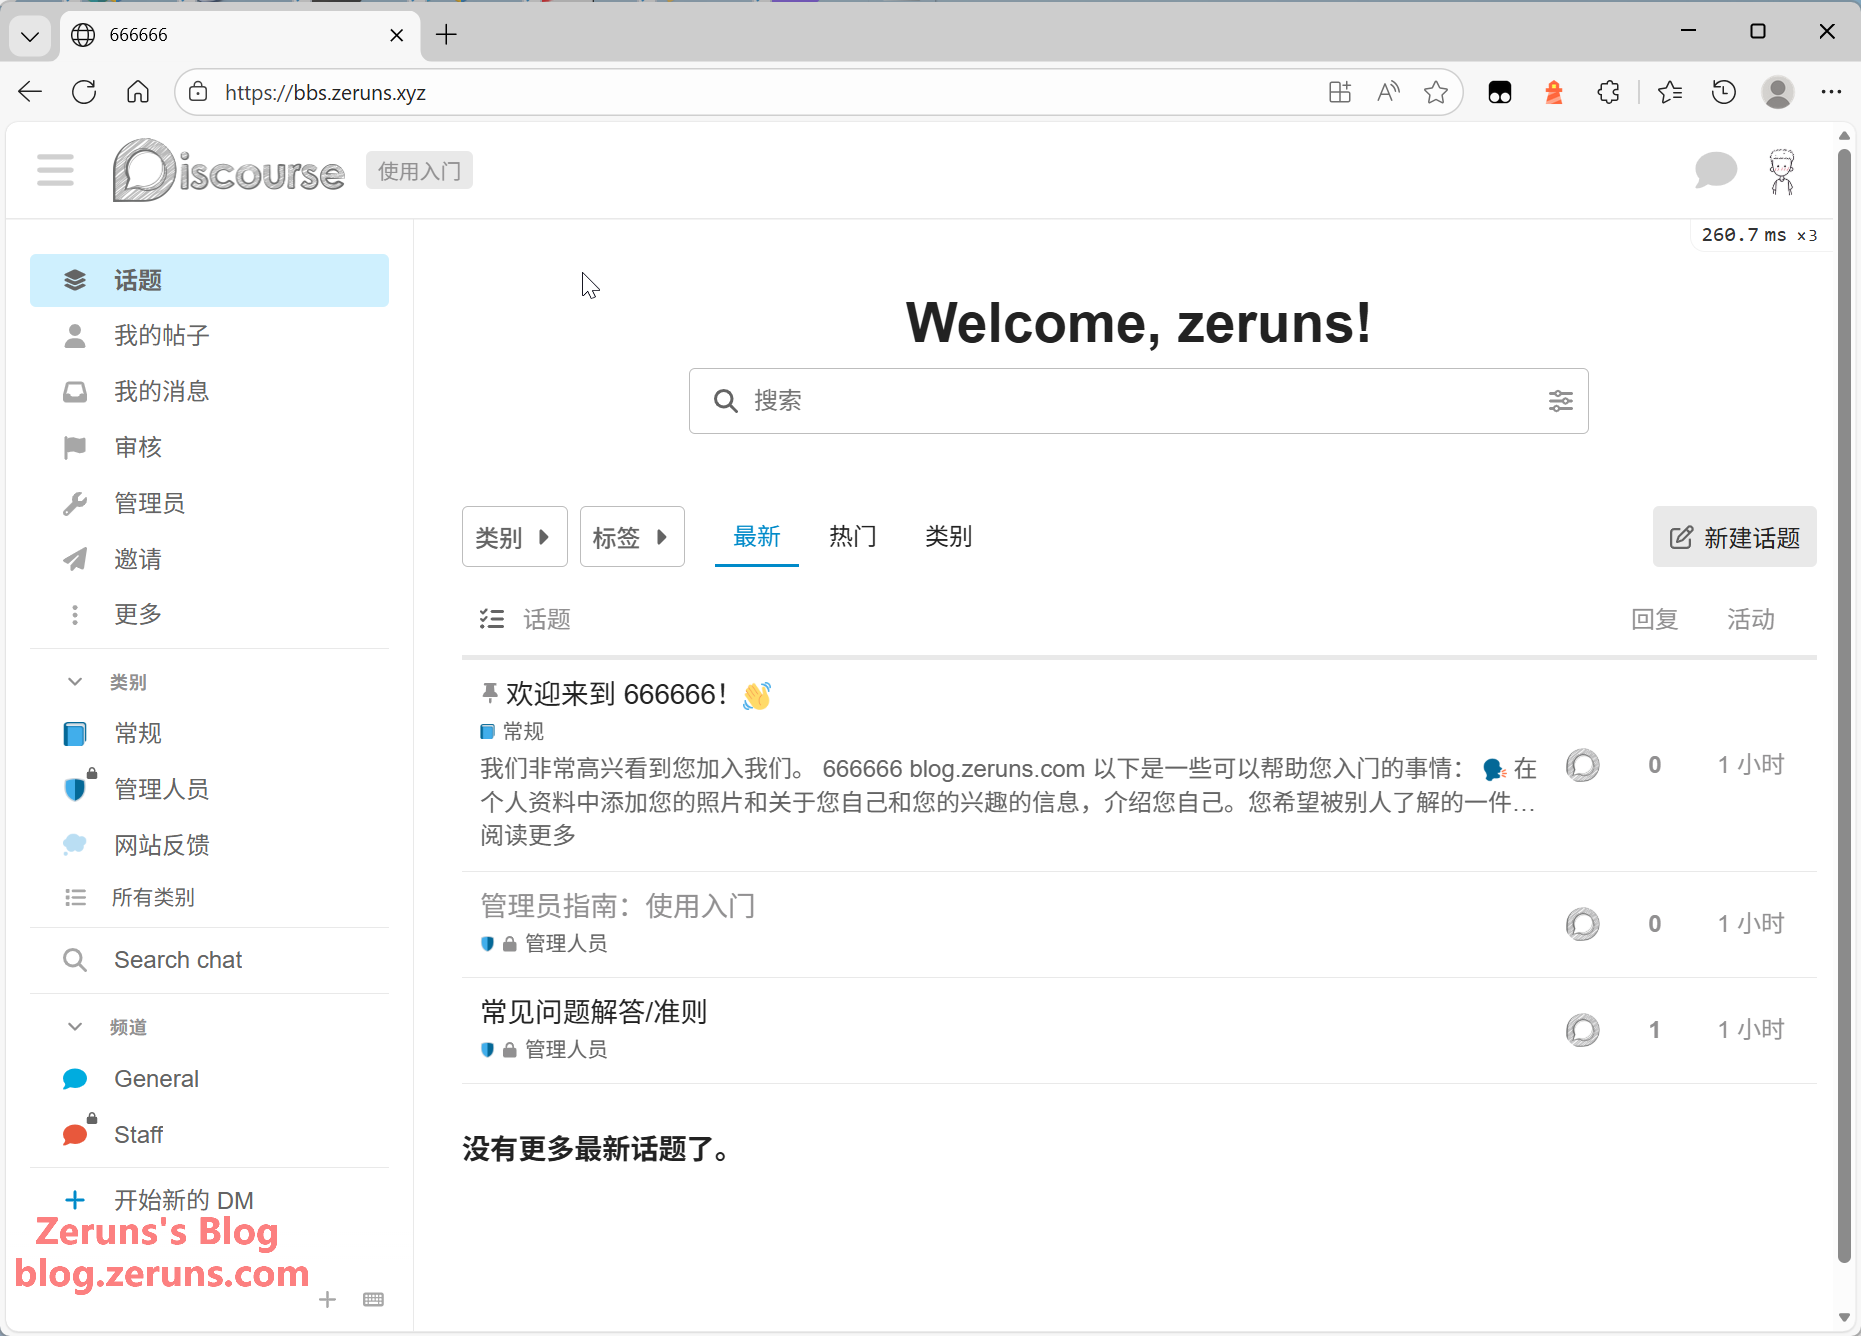
If any issues arise, edit the configuration file and run ./launcher rebuild app again.
Recommended Reading
- High‑performance and cheap VPS/cloud server recommendations: https://blog.zeruns.com/archives/383.html
- My Minecraft server tutorial: https://blog.zeruns.com/tag/mc/
- MC Utopia Adventure 3.5 modpack server tutorial: https://blog.zeruns.com/archives/891.html
- Open‑source 24V3A flyback power supply: https://blog.zeruns.com/archives/910.html
- DJI Mini 2 drone teardown analysis: https://blog.zeruns.com/archives/912.html
- Shenzhen Penjashan hike, sunset & night‑scape photos: https://blog.zeruns.com/archives/916.html
English Version of the Article: https://blog.zeruns.top/archives/79.html


